(Updated October, 2023)
Here at Spotlightr we get asked quite a bit about what LMS we recommend. If you intend to build out a website complete with a course, then we currently recommend you use WordPress and the LearnDash LMS plugin.
Keep in mind we are not affiliates and we in no way benefit from you using LearnDash. Our video player works great with just about any LMS platform, WordPress theme or plugin so ultimately it’s your choice on which to use and Spotlightr will go right along with it. This is a completely unbiased opinion of LearnDash and therefore different from the other articles you may read on this subject.
When configuring your LearnDash course the absolute best way to present your video lessons is with Spotlightr. Not only do we provide tons of branding options and learning features, but we prevent users from downloading video files via encryption.
And is you use our WordPress plugin it’s even easier and more efficient. More on that below.
First let’s get into the purpose of this article which is all about LearnDash’s Video Progression feature. We want to present to you the pros and cons of using this feature along with any pertinent information we feel you need to know.
LearnDash Course Set-Up for Video Progression
Before we get into this important LearnDash feature, let’s touch on the LearnDash architecture for just a moment in case you aren’t familiar with it.
In LearnDash you create Courses which contain Lessons, Topics, and Quizzes. While Topics and Quizzes are optional and certainly used, the Lessons are what create the bulk of the Course and are the heart of LearnDash. They containt the actual learning materials.
Within a Lesson you can add various learning materials such as videos, text, PDFs, audio, etc. The vast majority of online learning is done via video, so of course LearnDash is going to put video at the forefront of it’s learning methods. You can add one or more video to every Lesson you add to LearnDash.
When creating a Lesson, it’s like creating any other WordPress post except it has lots of additonal features. As far as video is concerned, you can add video just like you add it to any other WordPress post or you can use their video progression feature.
But real quick, before we get to that…
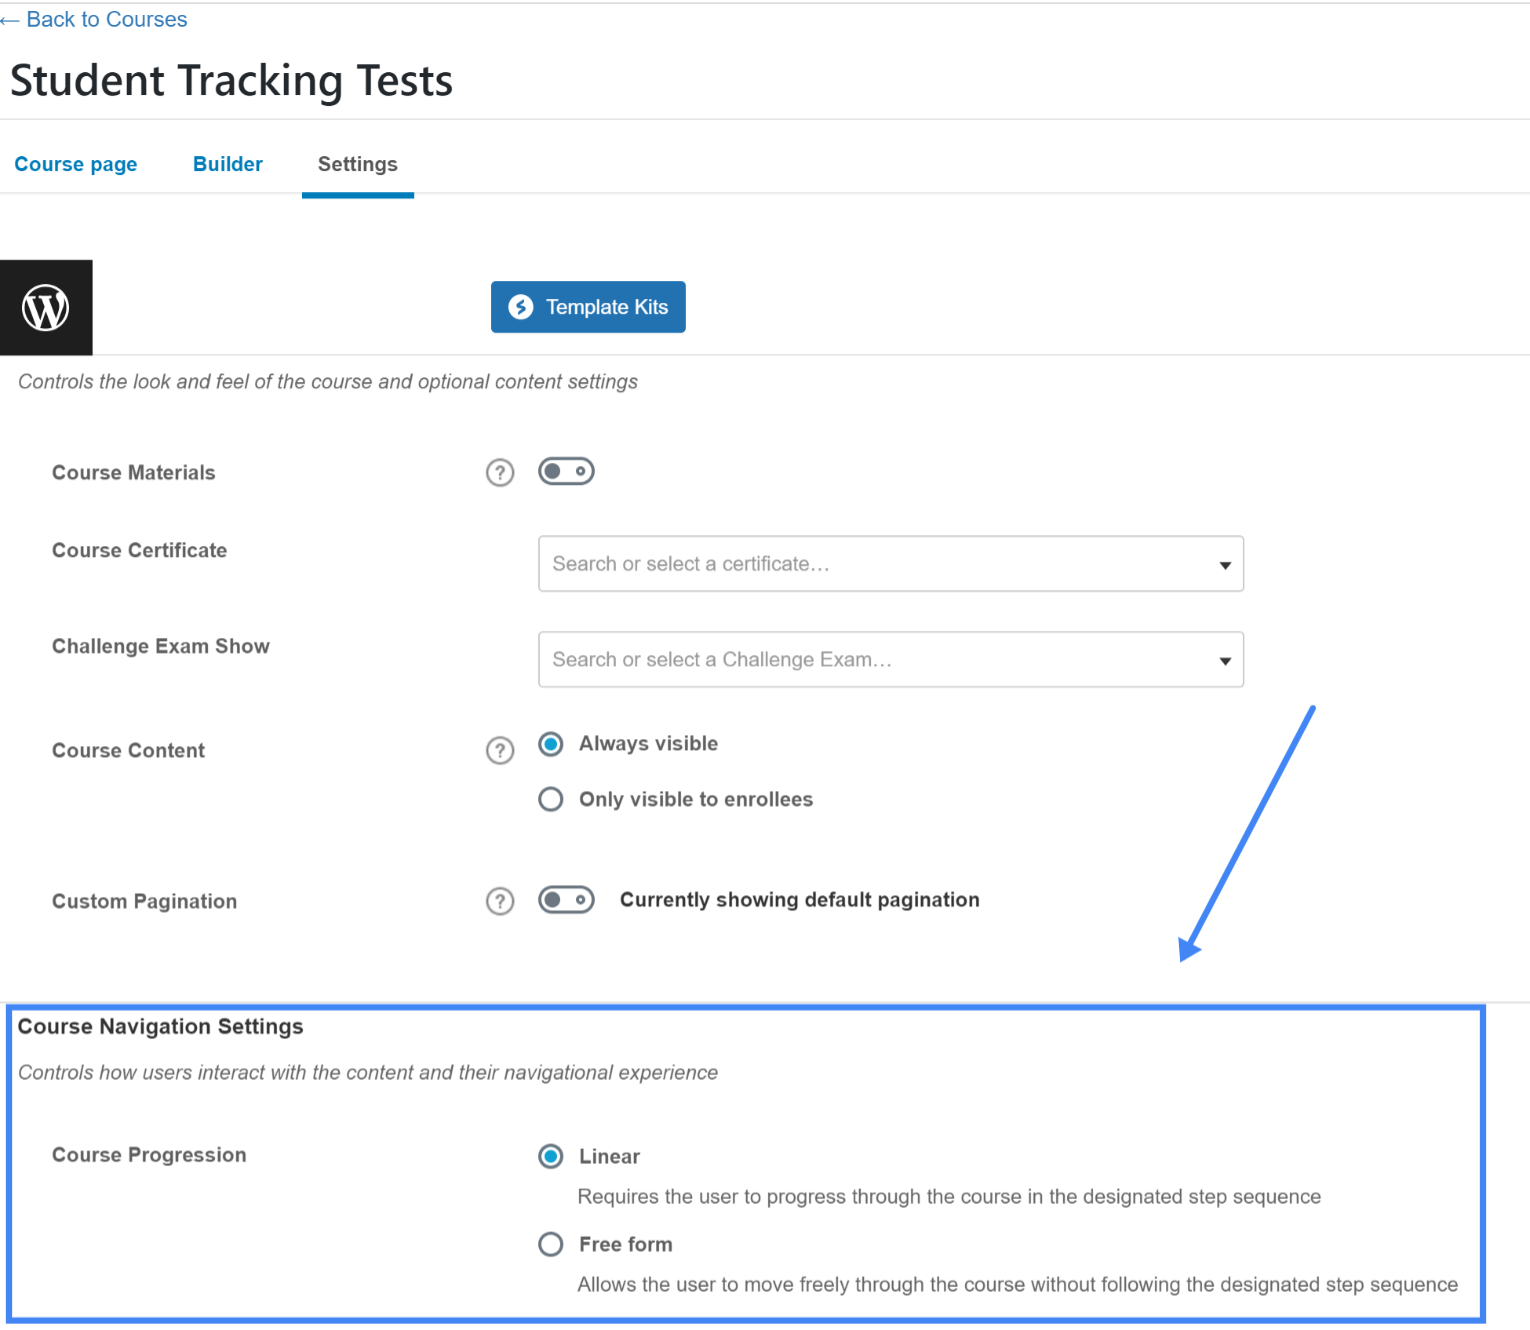
One other important item to first understand is LearnDash’s Linear Course Progression feature. This means that students must progress through each Lesson/Topic/Quiz one at a time in the order they presented and cannot skip around. The other option is “free form” which means students can skip around to any lesson or topics they want throughout the entire course. Setting is as either “Free Form” or “Linear” is done in the COURSE options.
If you want to use Video Progression then your Course must be set up to use Linear Progression here:
OK got it…so what is Video Progression?
Now, their video progression feature fits in with the “Linear” course option in that this forces students to watch the entirety of a video before they are able to click ahead to the next lesson. This encourages students to watch the whole video, so they don’t just click through to the next lesson without watching anything. It’s a simple yet powerful feature.
Why Should You Use It?
If you want to encourage your students to actually watch the video material, as opposed to just marking the Lesson complete without having watched anything, then you can take advantage of this feature.
One thing to keep in mind: your student can simply scan the video forward till a few seconds before the video ends and just watch the last few seconds. This will in essence “cheat” this Video Progression feature. However, there is a way to mitigate that which we will show below.
What Are The Drawbacks?
Well, it could be frustrating for some students if you require them to watch an entire video before moving on if they are very familiar with the material already.
Many course creators decide to adjust access to the video timeline or remove it altogether (more on that below) to ensure students don’t ‘cheat’ their way thru the lesson and skip ahead to the end. So if the student sees they can’t skip forward or don’t see the timeline at all, it could be frustrating.
There may be some technical frustrations for you if you do not have your Course set up correctly.
For example, if you leave your Course Access Mode as Open (instead of Free, Buy now, Recurring, Closed) then Linear Progression isn’t enabled and cannot be enabled. This means that users can skip around all over the Course and don’t have to take the Lessons in order.
Long story short, in order for this feature to work you need to have the course access mode set to anything except Open and must set the course progression option to Linear Progression (not Free form).
We’ve also found that video progression overall can possibly cause random issue with your video player features or functionality due to conflicts with other plugins or even LearnDash bugs or errors. It’s rare, but it happens.
How To Use It?
While you can do this for Topics and Lessons, we are just going to discuss Lessons. It works the same for both.
When you are configuring your Lesson, you just need to go to the Settings tab and you will see the Video Progression option. It’s turned off by default. Just enable that:
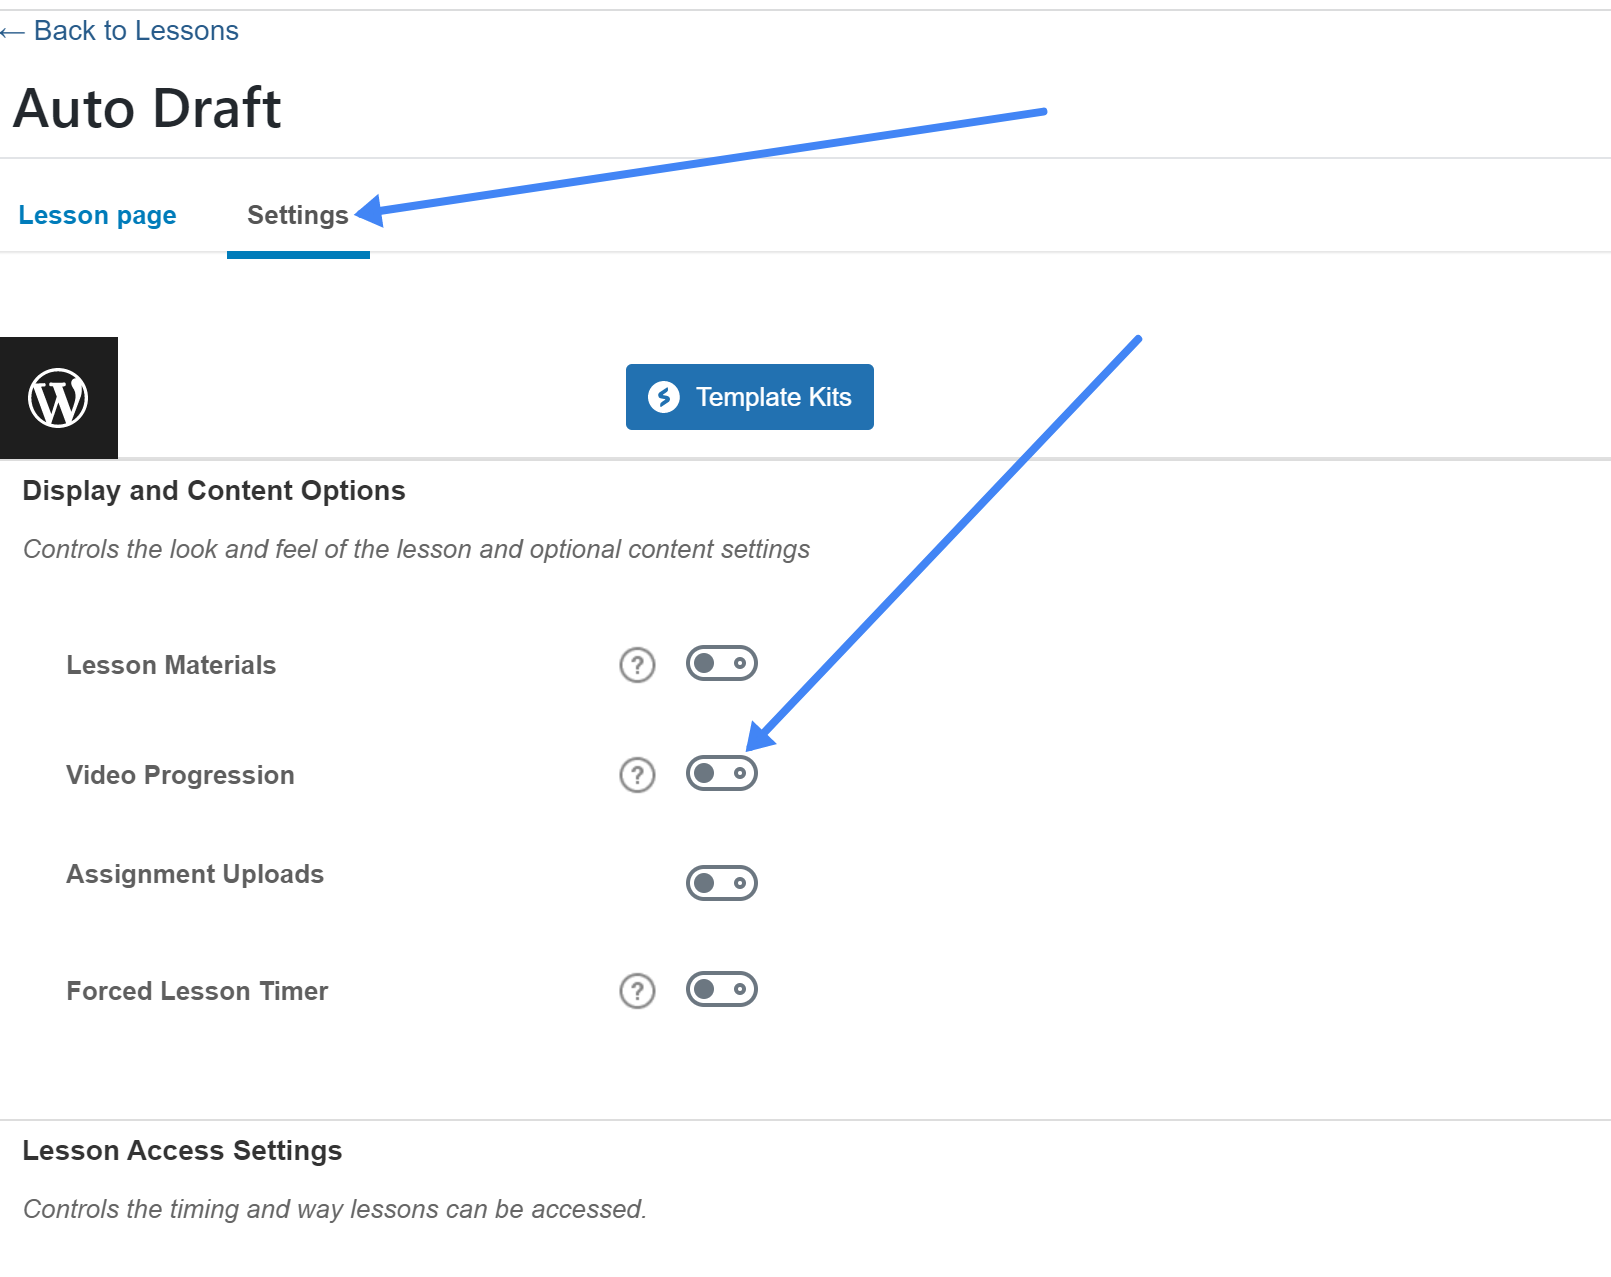
Be aware that adding a video like this will add the video to the top of the Lesson page. You can add it to other places on the page by using the custom Spotlightr blocks.
How Does It Work With Spotlightr?
It’s best used in coordination with our free WordPress plugin. First install our WordPress plugin by following the directions outlined here.
When you enable the Video Progression option you will see an option to use a Spotlightr video:
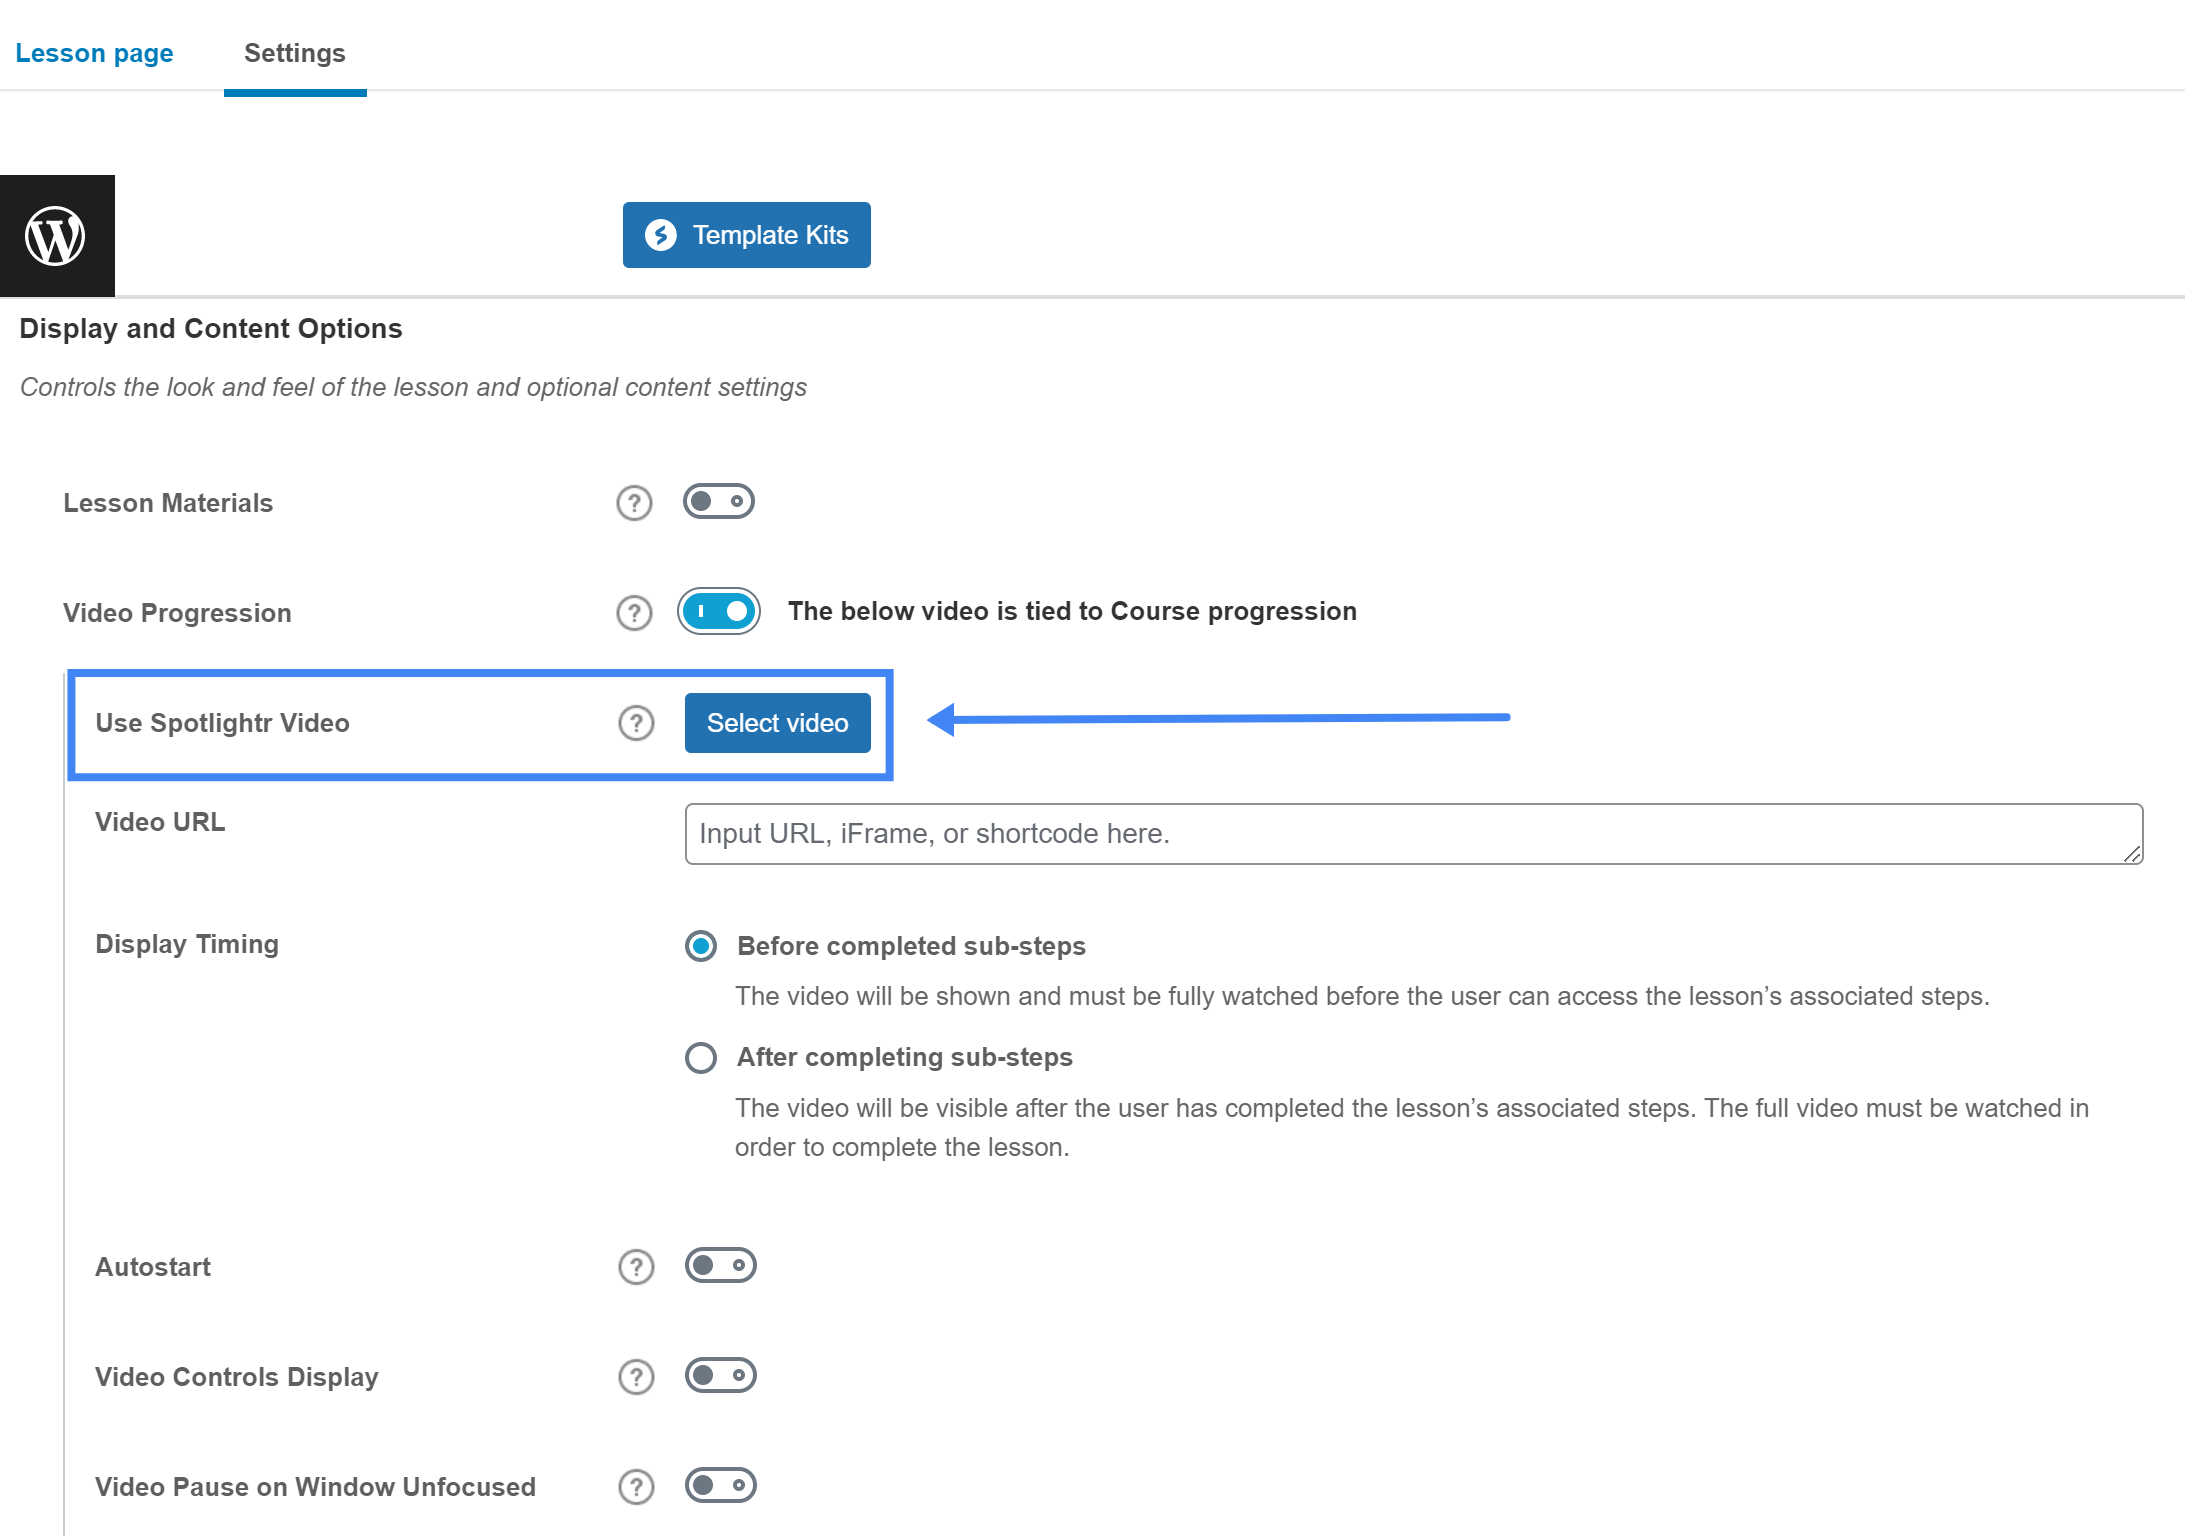
Just click the button to Select video and you will be presented with your Projects from your account
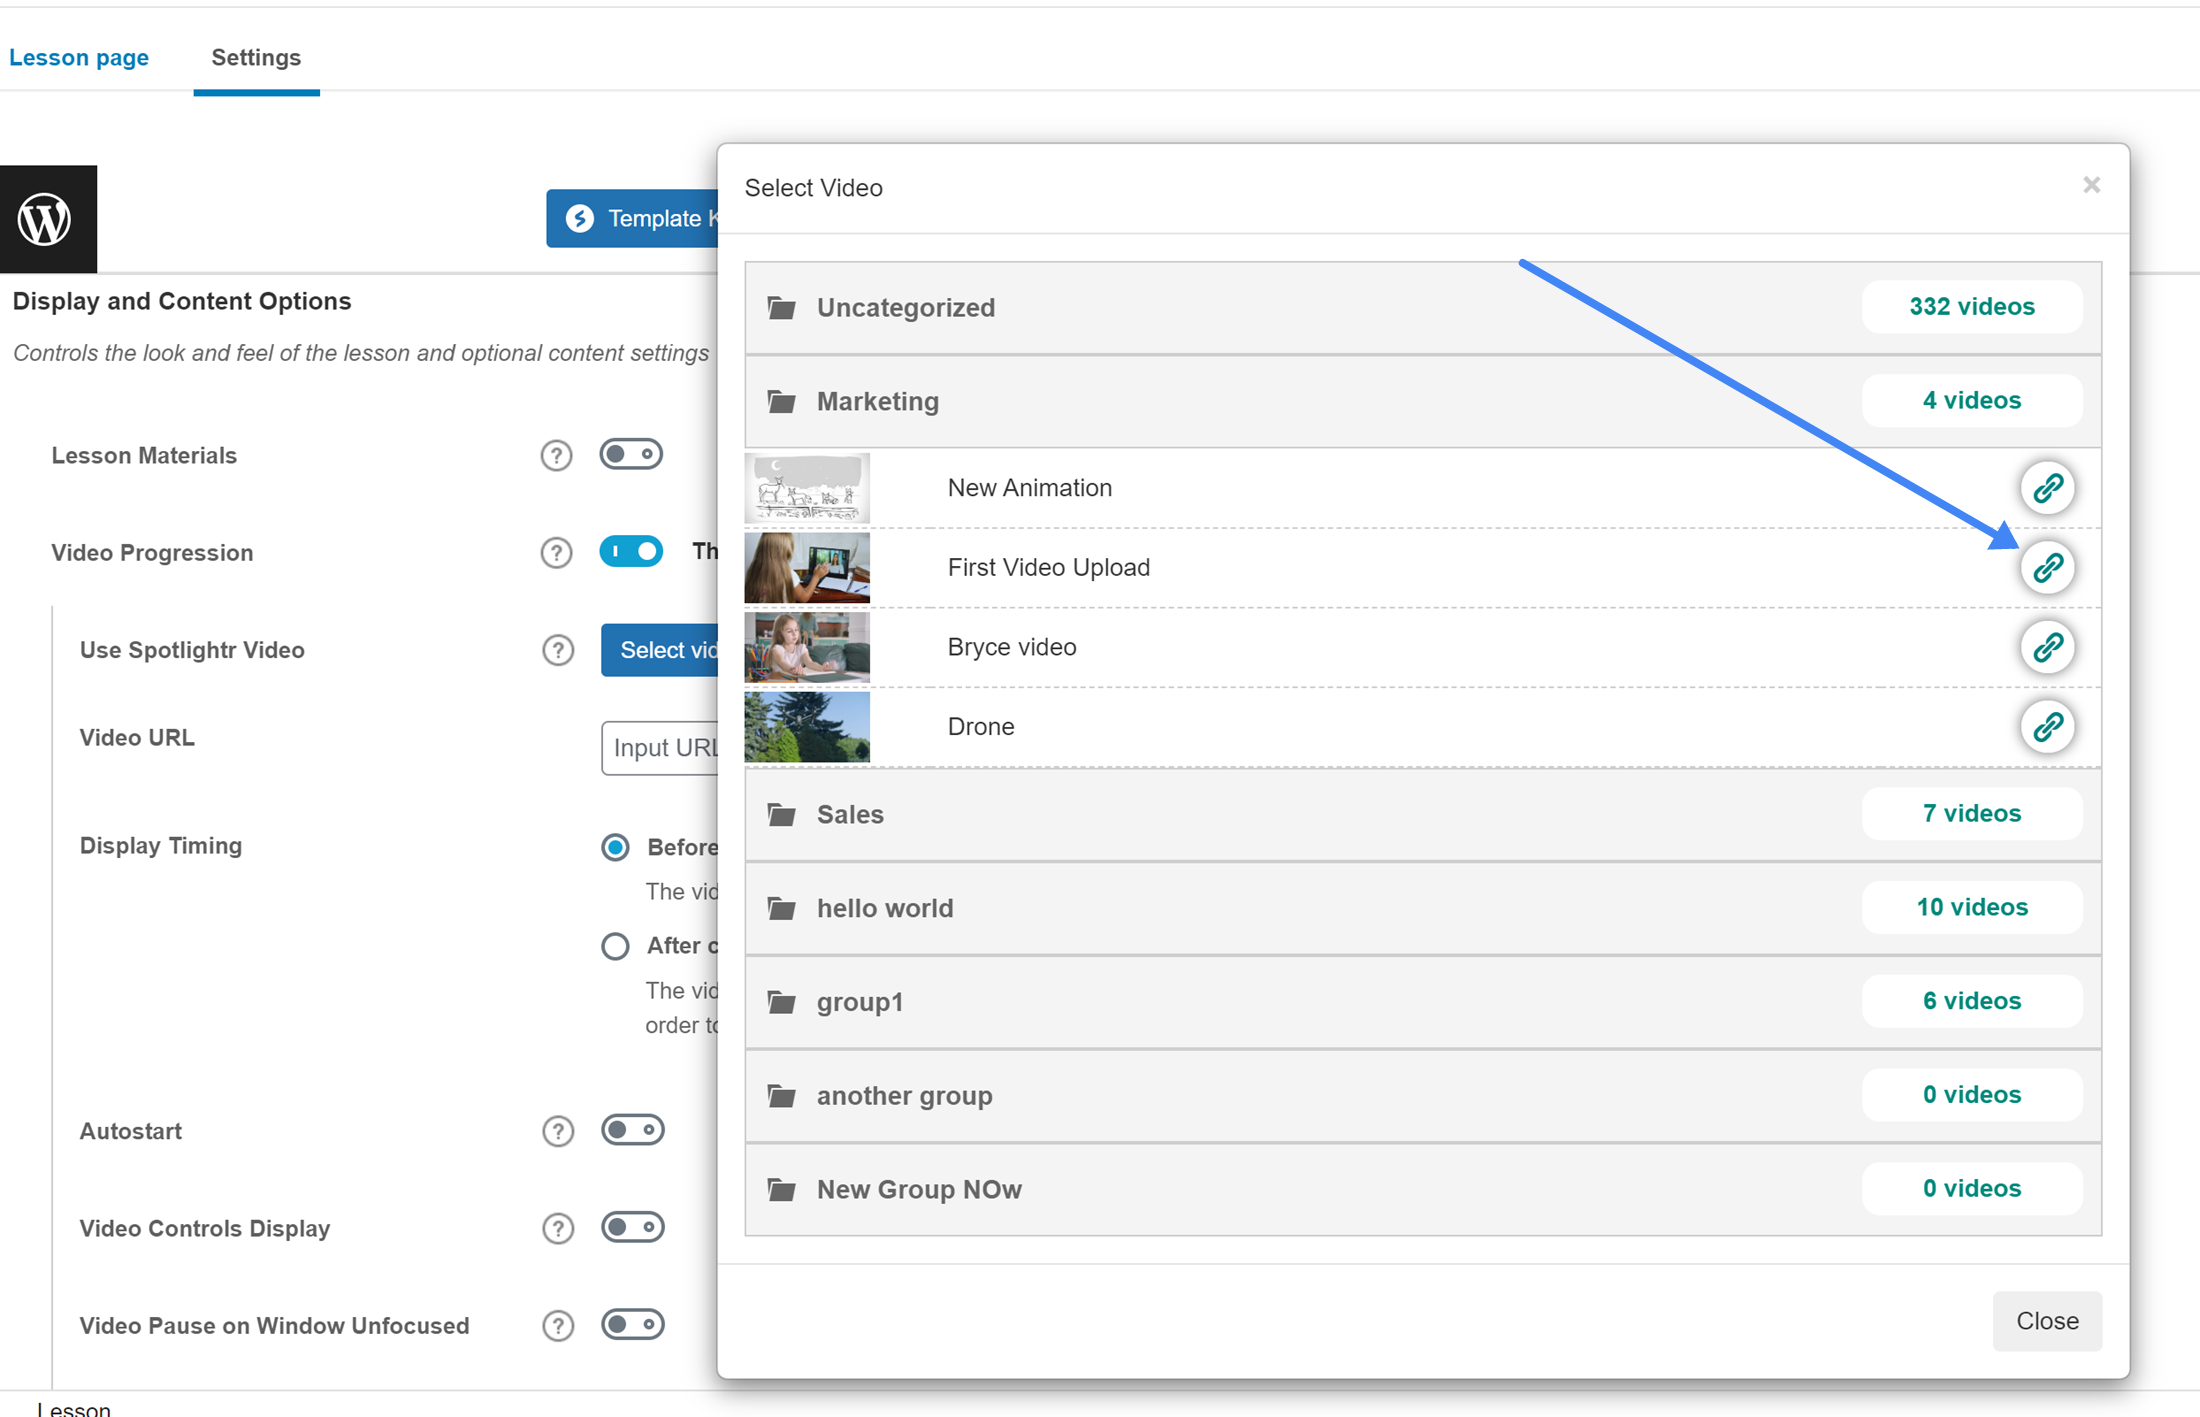
Choose any Publishing options and then click on Publish Video:
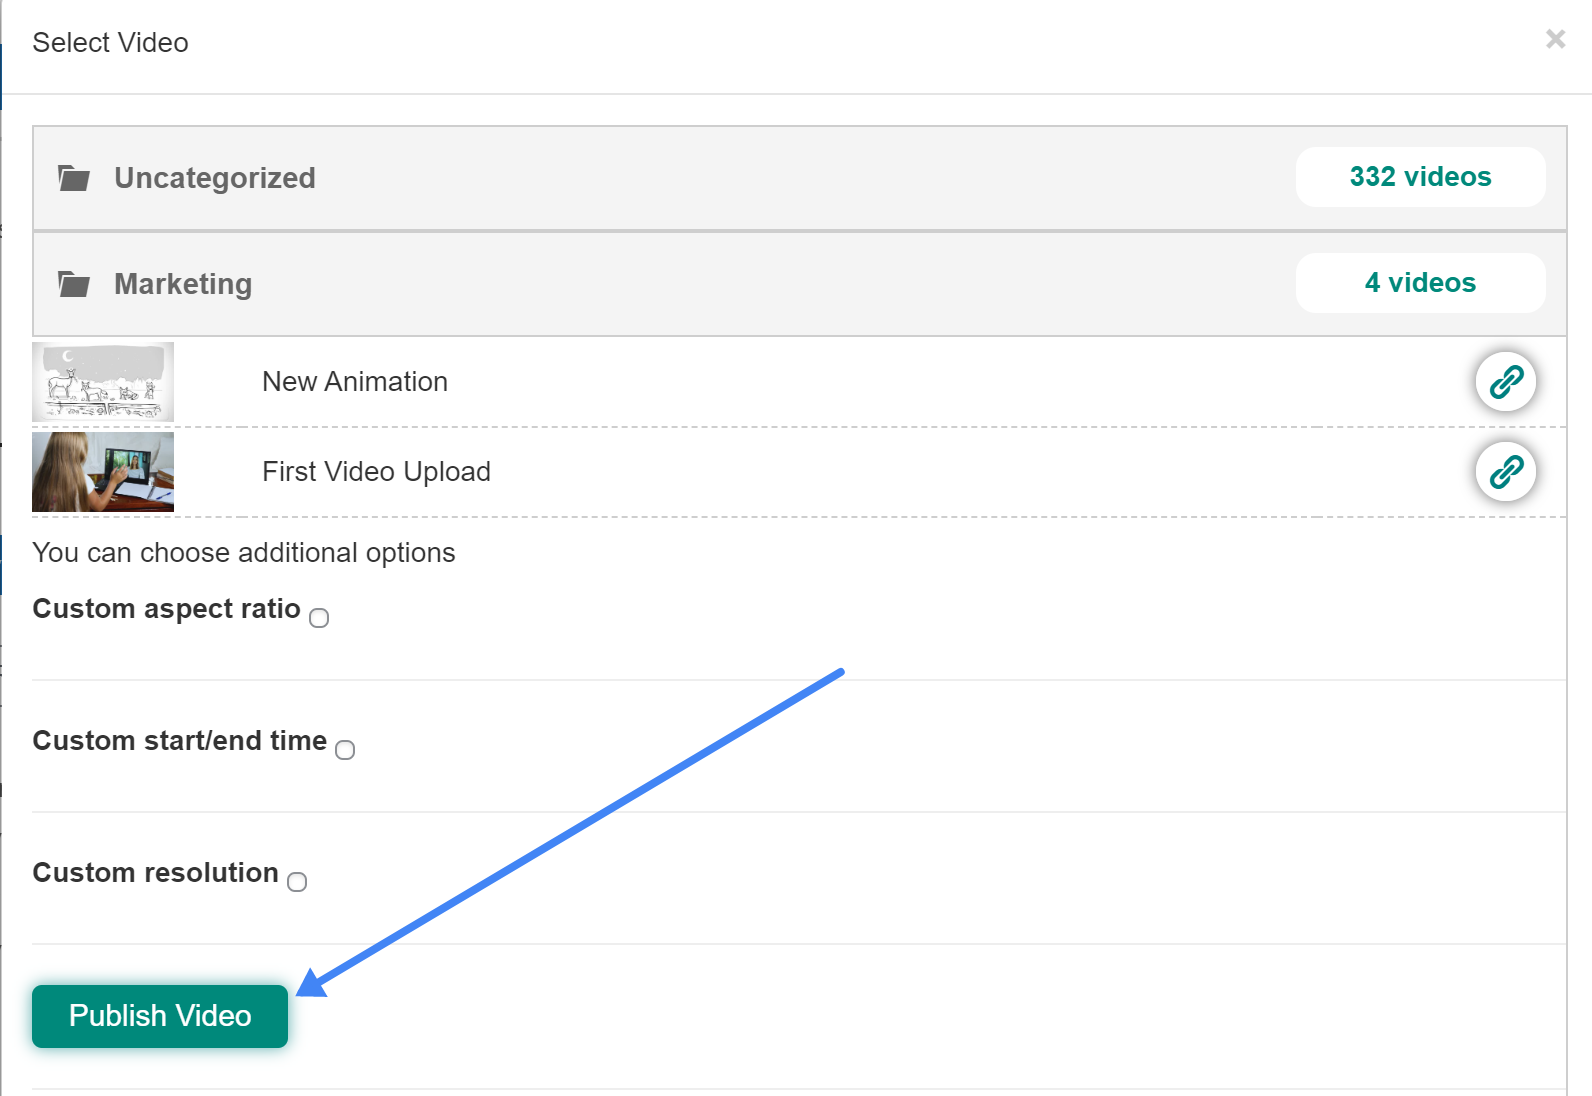
You’ll then see the embed code automatically added to the appropriate field:

Video Progression Settings
Let’s now review some other options you have for Video Progression. We’ll first start with the Display Timing and then the final 4 optional player settings:
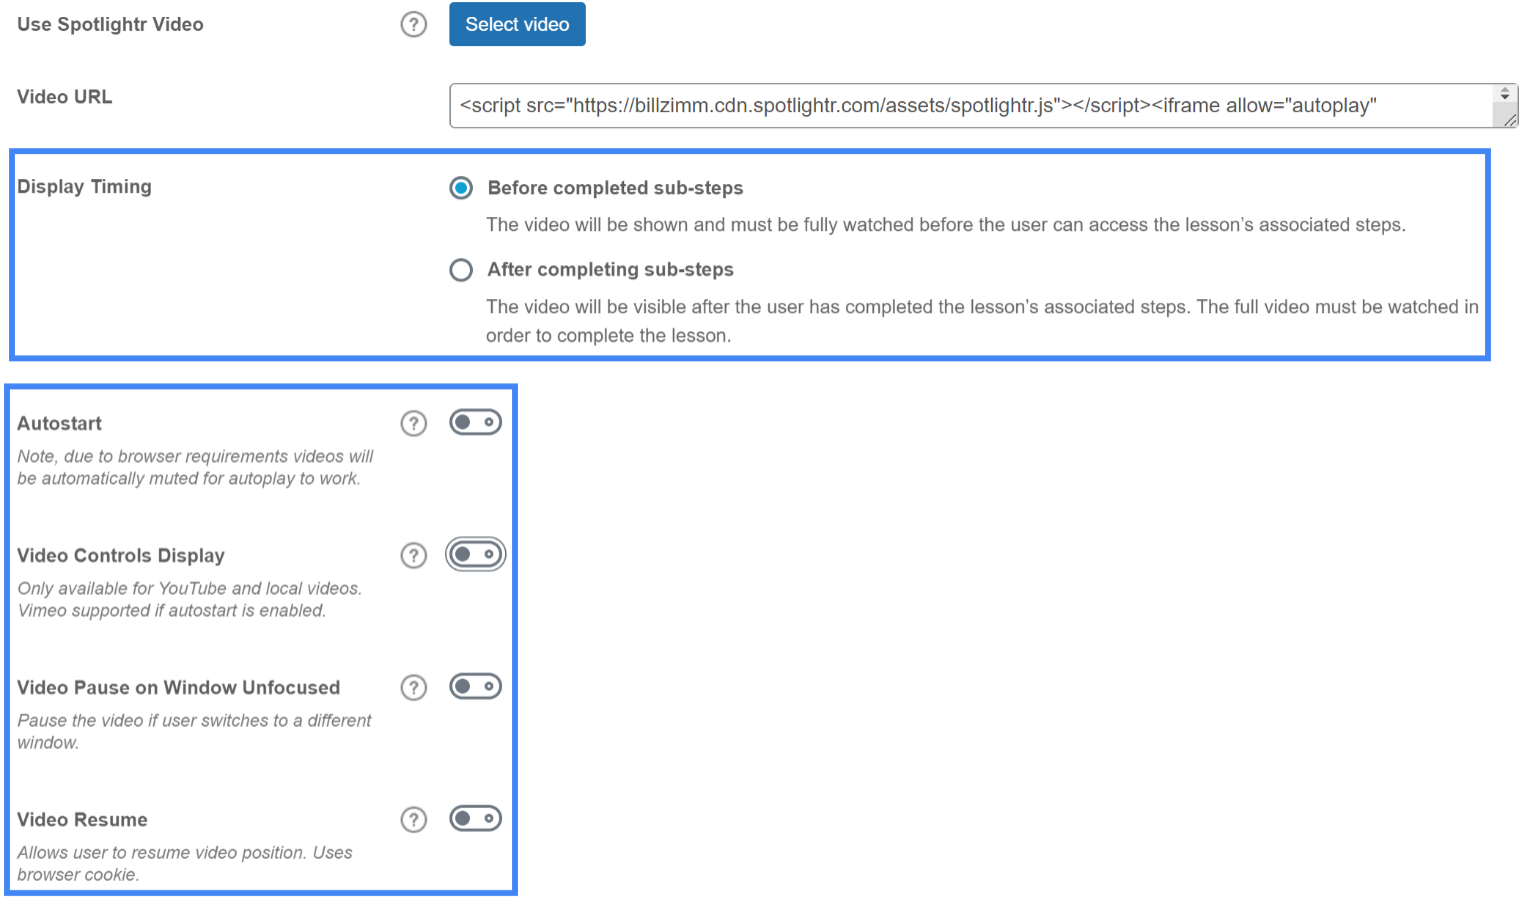
Display Timing
Before completed sub-steps – This is the default setting. This means that the video will be shown right away and must be watched in completion before the student can access anything else related to the Lesson, like Topic or Quizzes.
After completing sub-steps – This means that the video will be hidden from the student and till be visible after the student has completed any Topics or Quizzes related to the Lesson. Once those are completed, the student will have access to the Lesson video. Keep in mind that the student still has to complete the video in order to mark the Lesson as complete.
What you decide to use here is completely up to how you have your Course organized. Most people use the default setting, as they want the main Lesson video to be watched first and then followed up by the Topics and/or Quizzes.
Autostart
This will start the video automatically when the page loads.
In general we do not recommend setting your videos to auto-play. However if you do require this, then we recommend this be done inside of your Spotlightr settings. We have a few features that LearnDash does not for auto-play.
Note that due to browser policies, if you set the video to Autostart then the video will start out muted. There will be an ‘unmute’ button on the player that the user must click in order to enable the audio of the video.
When you click that ‘unmute’ button the video video has already started, so you miss the audio of the first few seconds of the video. That’s why one very popular Spotlightr feature resets the video to the beginning once the ‘unmute’ button is clicked.
Here is a demo video of how that works.
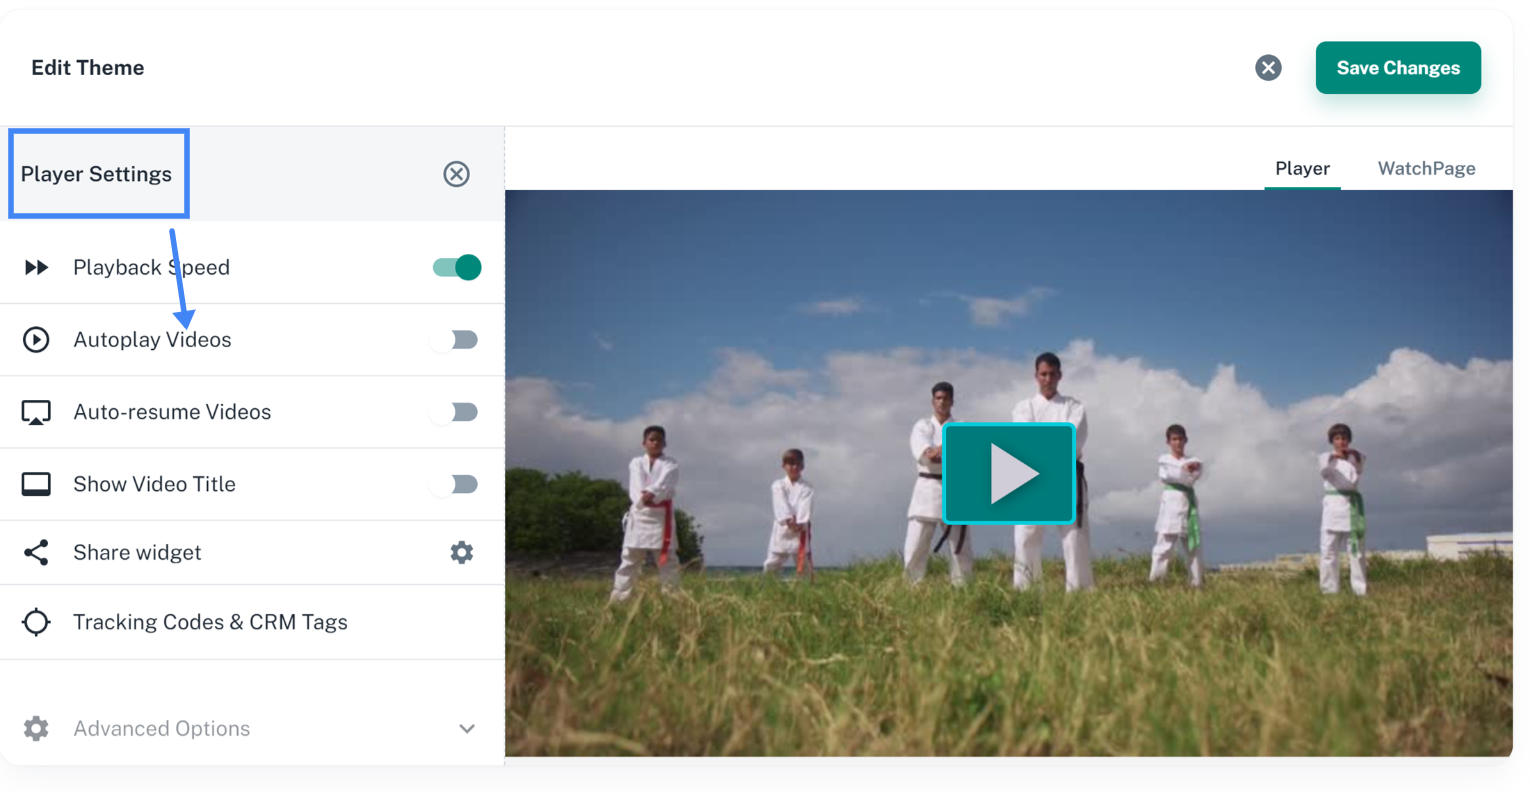
You can configure all of this inside the Project theme and all videos that have that theme applied will auto-start. You can find this feature inside of your Spotlightr Theme >> Player Settings >> Autoplay.
Video Controls Display
When you enable Autostart in LearnDash then the controls are removed by default. Enabling this option will always display the controls even if you have Autostart enabled. LearnDash documentation claims that this only works with Youtube and local videos, however we have found this also affects Spotlightr videos.
This feature is normally only used if the LearnDash Autostart feature is turned on. If you follow our recommendation and use Spotlightr to auto-play your videos, then this feature does not apply as we do not hide controls automatically if auto-play is enabled. We get into this more in our recommended settings at the end of this article.
Video Paused on Window Unfocused
The goal of this feature is to assist students in staying focused on the material and helping them to not skip any important parts of a video if they scroll the page or switch the page.
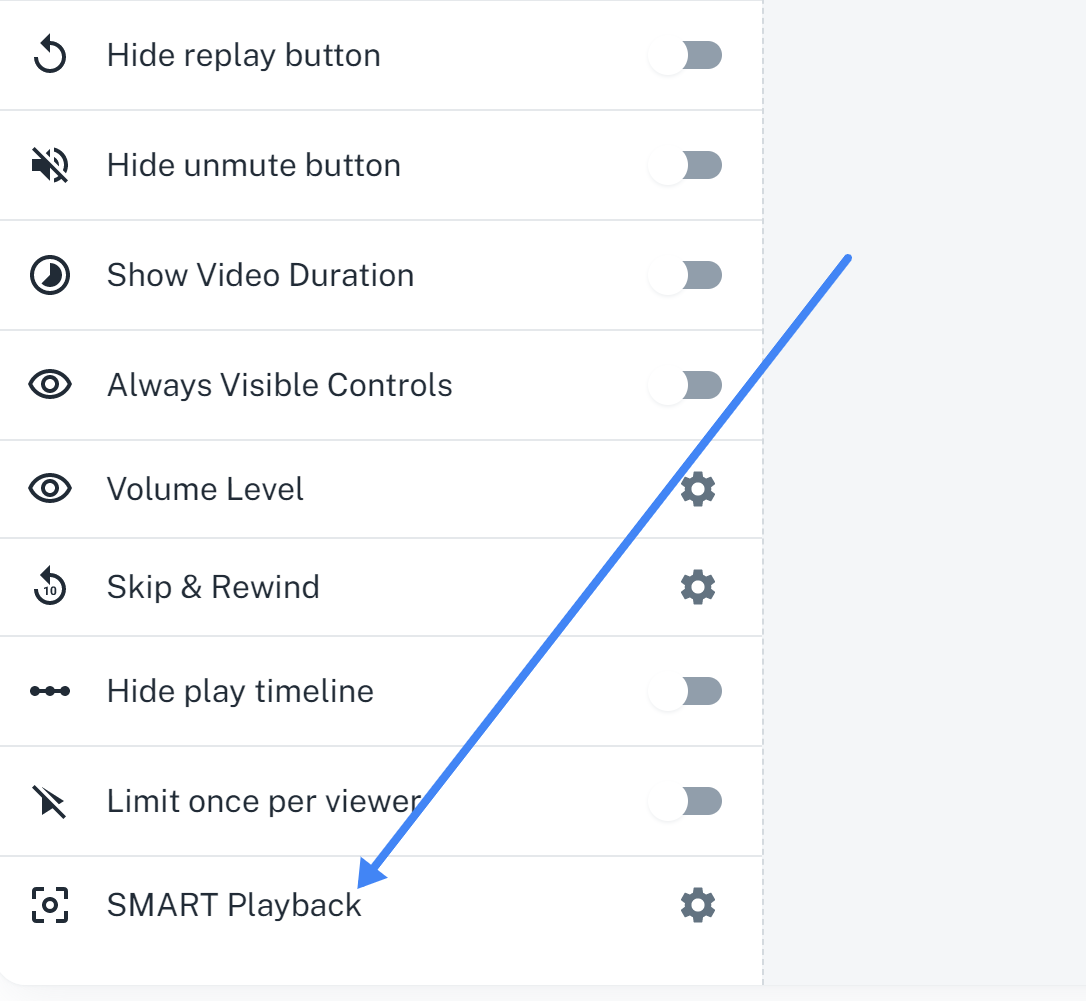
We call this feature SMART playback, and recommend configuring this inside of Spotlightr if you want this feature enabled.
It can be configured to pause the video when the students scrolls down away from the video and/or when the student goes to another browser tab or page.
You can find this feature in your Theme >> Player Settings >> Advanced >> SMART Playback.
Video Resume
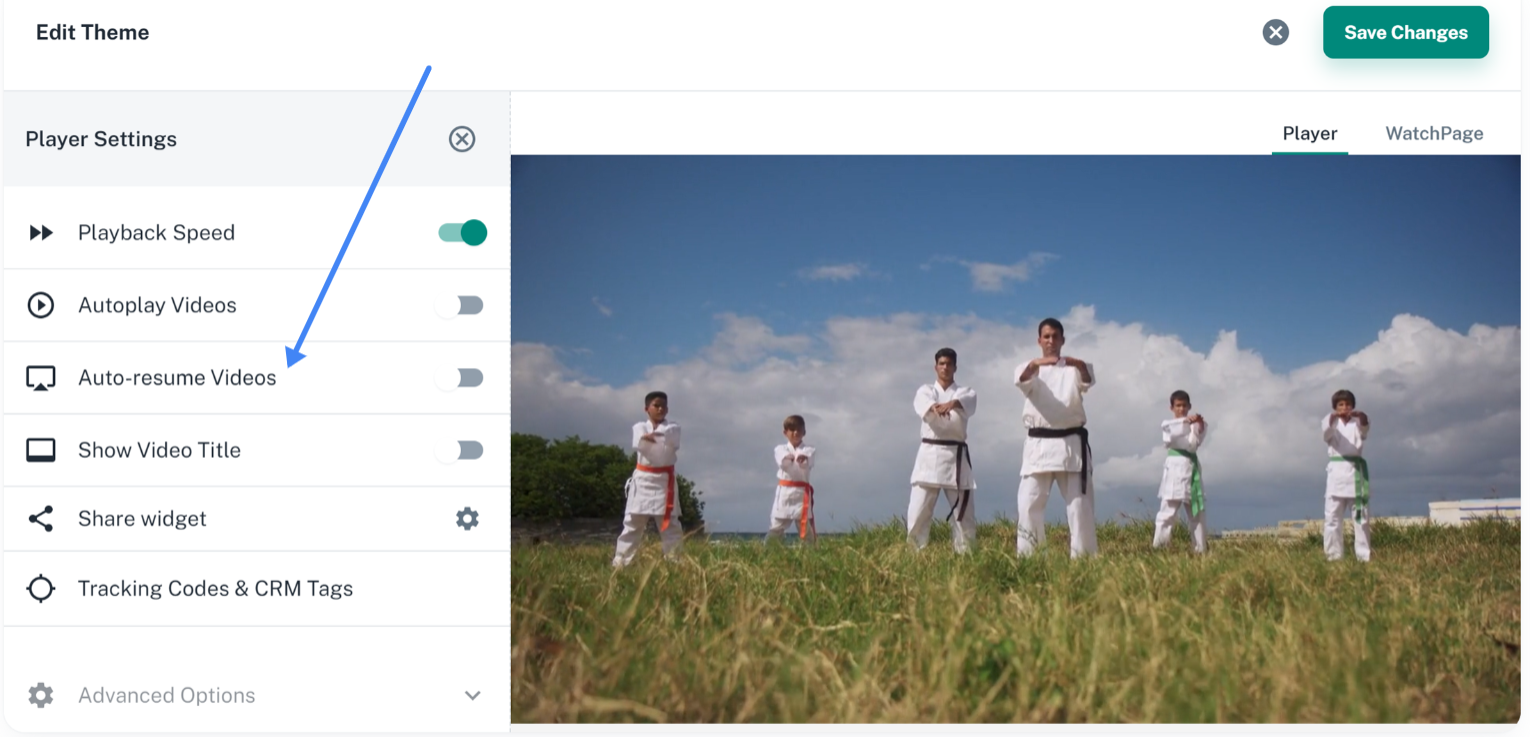
If the student closes the tab/window and comes back at a later time, this feature will ensure that the video starts from where it left off.
Again, if you require this feature then we recommend setting this via your Spotlightr Project theme. This will ensure every video you add to that Project will have this setting enabled, so you don’t have to enable every time you add a video.
Here’s a demo video of how this works. Play the video and after 15 seconds or so refresh the page. When you play it again, the video will begin where you left off.
It can also be found in your Theme >> Player Settings >> Auto-Resume
Spotlightr Video Progression Recommended Settings
LearnDash is contantly updating it’s plugin and this can affect the way it interacts with our player. If you have any issues then contact our helpdesk and we will help.
The goal of any coach or teacher is for their students to learn the information provided and complete their lessons. This is why we do recommend you use the Video Progression feature of LearnDash.
However we recommend you leave all LearnDash video options (Autostart, Video Controls Display, Video Paused on Window Unfocused, Video Resume) turned OFF. Keeping these off results in less conflicts with the Spotlightr player.
If you want to enable any of these features, follow our instructions above for each feature on enabling them inside of Spotlightr.
In general, here is what we recommend for all videos:
1 – Add your videos to your lessons in the Video Progression options using the Spotlightr plugin
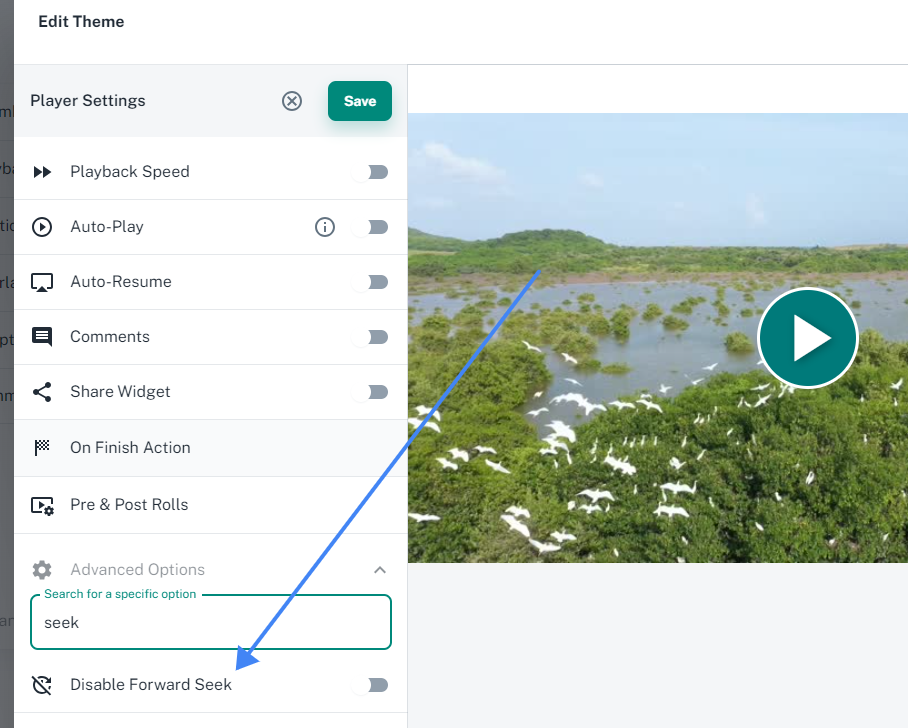
2 – Enable “Disable Forward Seek” inside of your Spotlightr theme.
That’s it!
This will display the controls and timeline to your students so they know where in the video there are, how long the video is going to last, and can rewind to re-watch anything they might have missed or need to watch again.
This will also prevent them from fast-forwarding to the end so they can quickly mark the lesson complete.
If for some reason, when you turn on our “Disable Forward seek”, video controls do not appear at all, then we recommend turning on Video Controls Display inside of LearnDash. This seems to be a bug in LearnDash that occurs in some set-ups.
We do have a few more video controls options that you may be interested in…
If you do not want any controls at all displayed to your students, then this is also possible. Spotlightr has an option to hide all player controls in your Theme. This allows you to completely hide all of the controls at the bottom of the player. The user can still click the player to play the video and click to pause it, and that’s it.
Here is a demo so you can see how that looks:
This can be enabled in your Theme >> Player Settings >> Advanced >> Hide All Controls.
You can also hide the timeline only. This will still keep the play/pause button and any other buttons you have configured for your player controls but hide the timeline so that students can’t skip ahead.
Here’s a demo of how that looks.
This can also be found in your Theme >> Player Settings >> Advanced >> Hide Timeline
What’s Next?
That wraps up our guide to the LearnDash Video Progression feature. We will update this article as LearnDash changes and updates their plugin if there are any changes.
If you don’t yet use Spotlightr, you can sign up for a free 14-day trial and see how quick and easy it is to get your videos uploaded, branding, and protected.
We are built and designed for teachers and course creators!
Spotlightr Video Hosting for Your LMS
Spotlightr video hosting is made for Learning. Keep your videos on-brand and customize with more options than any other hosting service.
And with our video encryption, your valuable video courses are
safe from illegal downloads and sharing.
Try Spotlightr for 14 days, risk-free. No credit card required.

