In collaboration with Spotlightr, I’m documenting each step in the creation of our course, so that you can learn along with us for when it’s time to create your own.
Today’s topic, scripting, is near and dear to my heart.
As a screenwriter, I’ve written a few feature films and several shorts. In my former day job as a video marketing lead for an NYC consulting firm, I helped write and produce videos for brands like BMW, and for labor unions and state governments.
Along the way, I’ve experimented with and employed a diverse cross-section of approaches to scripting.
There are pros and cons to every method, but in considering which approach to take for scripting the video modules for our course – The Startup Filmmaker: Bootstrapping Your Indie Career From Outside the System – three main options stood out as the best candidates.
We’ve made our decision on which one we’ll be trying, but let’s explore all three together, since I think there’s a strong case to be made for each, depending on your own needs for your specific course.
3 Popular Options for Your Course Scripting (and Recording) Approach
It’s important to note, before we dive in, that we’re technically not just choosing a script format in exploring these options.
When we decide on which approach to take, we’re also mostly locking ourselves into a format for recording our videos. Decisions made here will similarly have a significant impact on how you’ll edit your videos, and how they’ll look and feel based on that.
So we’ll cover these other aspect of your scripting and recording decision-making at the same time as we dip into the nitty gitty of how the actual scripting works in each case. And then we’ll finish up with some finer details on a few other recording decisions that will impact your scripting work.

1. The Fully Scripted Approach
Let’s start with the most straightforward option – fully scripting every word of every video that will make up your course.
I don’t recommend this approach for any but the most practiced or well-trained public speakers.
Delivering a fully scripted set of videos modules can be done well, and many people are able to do it. Most are using a teleprompter, the utilization of which is itself a skill that it takes some time to refine. Many also have formal training in speaking.
 For most course creators, I’d strongly suggest getting a teleprompter and operator if you decide to go the fully scripted route. Note that depending on where you live, it might take some time to find someone and it might cost you anywhere from $300 to $1500 per day, as a rough estimate.
There are also apps where you can set up a teleprompter on your own. I’ve used a few and found most to be cumbersome to operate, of questionable effectiveness, and just generally not worth the time it takes to juice what you need from them.
But the top reason I often caution against fully-scripted (prompter or not), is that it’s hard to come across as comfortable and genuine when you’re reading words or rehashing ideas you’ve memorized.
Non-professional speakers often get too fixated on memorization, or on getting the scripted words out perfectly, to the detriment of their on-screen delivery.
That doesn’t mean that fully scripted won’t be the right approach for some people.
Anyone with public speaking experience, any kind of formal training as a performer, or just a general comfort with memorization or on-camera delivery could be fine using this method. They might even excel at it. And fully scripted can be made to work with the right investments of time and money.
Since I’m going to be the person on camera for our course, and since I’ve also spent most of the past two decades hiding behind the camera, I won’t be going fully scripted for our modules. It’s just not a good use of resources for our course, and I don’t think it would result in the best instruction for students.
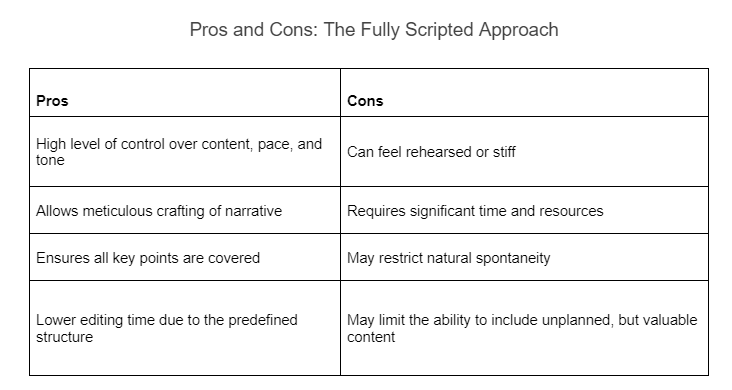
So you have them all in one place, here are the main pros and cons of fully scripted.

2. The Off-The-Cuff Approach
Now let’s talk about the polar opposite approach to a word-for-word script – no script at all.
We did not choose this option either, but there are several reason why it could have worked for us and might for you.
I’m going to assume that, if you’re reading this, you’re some kind of expert. Like us, you’re probably working on a course that packages that expertise in an approachable way.
And, in my experience, few methods of communication feel more approachable than an intimate, unrehearsed, on-on-one conversation with someone who is expert and passionate about the topic at hand.
I feel so strongly about this that I produced an entire film where I and the actors intentionally held back from perfecting the back-and-forth dialogue of the two lead characters. Instead, we let them talk like real people.
An unscripted delivery for your videos can feel casual in the best sense of the word. It can feel intimate, direct, and trustworthy.
It can also come across messy and unfocused, and you can look unprepared, without the right preparation. Or if it doesn’t sync up with your personality and personal preferences as a teacher. It can be easy with unscripted to veer off track, or to miss things that you’ll later have to go back to, or patch up when it comes time to edit.
With unscripted, you are mostly on your own – although it can help in this case to have an experienced video producer to guide you. In my time directing video for corporate clients, I’ve walked many subject matter experts (SMEs) back from the ledge of their performance anxiety, to produce some impactful unscripted videos. It can be done.
But it’s not easy, and I still wouldn’t suggest unscripted for the majority of course creators.
Again, if you’re a comfortable public speaker, this method could work fine for you. Similarly, if you have more time and money to spend on things like extra shoot days and additional camera angles, unscripted can be made to work well.
I just don’t think most people stand to gain much from this option, when you can take a hybrid approach and mix many of the benefits of full scripting into a more off-the-cuff approach.
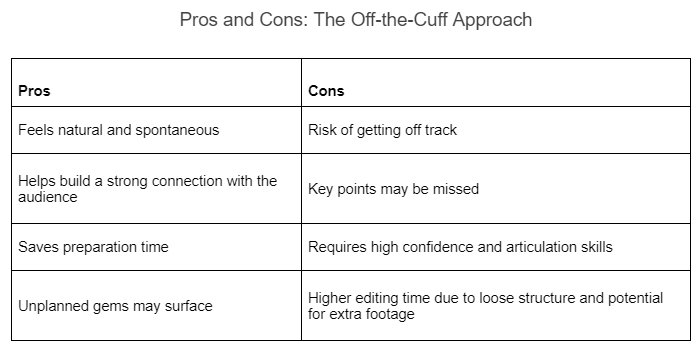
That’s what we’ll be doing, and we’ll explore that option in a moment. First, your pros and cons again, so you have them clearly laid out for this option as well:

3. The Middle Path: Outlining and Loosely Scripting
I’m not always a fan of middle-ground approaches, but in the case of our course (and perhaps yours) I think it makes a lot of sense to partially script your video recordings.
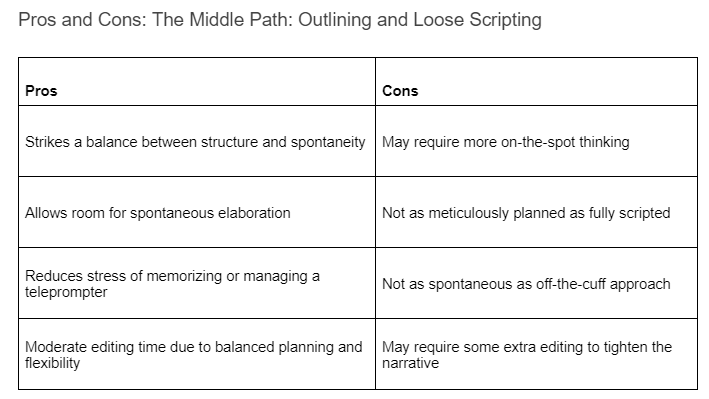
We’ve covered the advantages and challenges of both fully scripting your recordings and/or not scripting them at all. For most course creators, I feel a hybrid approach to these two opposite methods might work best.
Some scripting will help to focus your content, keep running times in check, and should provide something to hold onto in your brain once the camera is rolling.
And you can balance the mix of scripting and off-the-cuff to the degree of your comfort.
For some people, that might mean bullet points on index cards, or on your computer. I’ve even seen people successfully leverage low-cost teleprompting software to cue up rough bulleted notes, that provide enough of a reminder to support their prep work and enable them to comfortably deliver full sentences into camera.

I once wrote a 5 minute set of jokes for an open mic. I prepared for two weeks, and set a goal of not bringing more than a single index card up to the stage with me. My process went as follows:
– I fully scripted the five minutes of jokes
– I practiced reading and memorizing the full script
– I began reducing paragraphs in the script to two lines, relying on memory after that
– I began reducing the two lines to one line of related phrases per joke
– I reduced the single lines to short lists of words, per joke
– I wrote those words on the index card, and kept it on me as a reference
This sort of pattern for practicing could work great for anyone who wants to script out and then memorize their course videos – except it would take many weeks to accomplish, when you consider how long even a shorter online course actually runs. Professional actors can do this faster, but I’m going to assume you’re like me and not trained to do this as well as they do.
Additionally, my jokes were created out of thin air, even if they were refined later. When it comes to our courses, we already know everything we need and want to say. Why get tied up in perfectly scripting out and memorizing what we can already speak intelligently and pointedly about with just a little prep work?
What a hybrid scripting approach does is allow for room for us to embrace this benefit, while also respecting the difficulties of delivering our expertise in the sort of clear and concise narratives we’ll want to employ to remain effective teachers.
Other advantages of a hybrid approach to scripting include the ability to maintain a conversational and authentic tone, more akin to a dialogue than a lecture, more room for spontaneity, and less stress around memorization or reading a teleprompter. With a loose structure and some outline notes as guardrails, my hope is that I can let knowledge flow naturally and provide a personal touch when it’s time to shoot my videos, while avoiding some of the worst pitfalls of an unscripted recording.

To be honest, I’m entering into the recording phase of our course creation with some trepidation. It probably won’t come as a surprise to learn that I’m more comfortable writing than speaking.
But I’ve done it before, and I can do it again. I feel like my anxiety would be worse with the other two options, so my focus on prep is going to be on flexibility (hybrid approach) and on trusting my expertise.
Finally, as I’ve pointed out several times by now – this first version of our course is meant to be a test of its product-market-fit, as well as of our own ability to craft something at the level of impact we’re aiming to make. That leaves more room for experimentation and for “doing it well, rather than perfect.” Taking a hybrid approach to scripting and recording will allow me (and my partners) to rapidly prototype, and to gain confidence and experience we can take into a second version of the course later on.
It will also keep our production budget in check, while avoiding the much riskier approach of “just winging it” with unscripted.
Other Tricks of the Trade

For each approach we’ve covered here, there are also some additional best practices and hacks you might try out, to help maximize resources and/or work around some common challenges to scripting and then recording your course videos.
Use a standard, two-column A/V format for scripted and partially-scripted videos
When it comes to scripting videos for your courses, and for most other use-cases other than narrative fiction filmmaking, it’s almost always best to use a standard two-column Audio/Video format.
Here’s a snapshot of one of my scripts for our course, to show you what that looks like if you aren’t already familiar:

You can skip this method and write in single-column voiceover if you have an experienced, dedicated editor helping craft your videos, but even in this case such a partner would almost always appreciate at least a rough sense of how you’d like things to look and feel when it’s not just your talking head on screen.

Plan out additional, impactful visuals to supplement talking head footage, and/or audio
While we are on the topic…do not plan out your videos such that they only feature you talking to the camera, or only in audio paired to presentation slides.
It’s perfectly normal and expected for those formats to be a part of your teaching style, but in most cases your videos will come off as boring and stale if you rely on them exclusively.
You need to plan for other visuals as well.
These should add their own value, but at the very least they’ll minimize the likelihood that students will become bored or disengaged during playback. Don’t force anything, but give this some thought during scripting, so it doesn’t become an expensive problem that needs fixing when you get to the editing phase later
Recall that we’re working on a Minimum Viable Product (MVP) version of our own course – which means we’re keeping it simple – and we’re still not defaulting to this sort of barebones format.
At the very least, regularly cut back to yourself saying something valuable, before returning to slides or screen-recorded footage.
For partially-scripted or unscripted, borrow from the podcast format
 When it comes to partially-scripted or unscripted formats, you can borrow from the style of many podcast interviews. These are often recorded for video release and feature an unscripted format.
This approach can help you navigate the main challenges of focus and brevity, which are common issues when deciding not to script your video modules. Even though these podcast examples are edited, the interview-style format offers a clever hack for maximizing the potential of your unscripted recordings.
Consider this workflow:
1 – Turn your course outline into a series of questions to answer, per module and video
2 – Enlist a friend or colleague to ask you the questions, on camera in a Zoom session (or using something like OBS Studio)
3 – Be sure to restate each question, in each answer you give
4 – Cut out the questions in the edit, keeping only your answers
A method like this, which I’ve also employed before, will help tighten up your final content. People often answer questions more pointedly and effectively in an organic conversational format, than if they’re tasked with relaying the same information via a flatter, standalone prompt.
Opt for delivering into camera, whenever possible
 It feels important to underscore this point – a direct-to-camera delivery is almost always the best choice for course videos. Even if you’re employing a mixed format approach, I’d strongly consider setting a direct-to-camera narrative as your cornerstone. This requires looking into the lens when recording, as if it were a person you’re speaking to directly.
We’ve covered the reasons why this is a good idea at various points before, but so they’re all in one place:
– Direct engagement: When you talk directly into the camera, it feels to the viewer as if you are directly addressing them. This can help in establishing a personal connection with your audience and usually leads to them feeling more engaged.
– Professional look: A direct-to-camera approach can give your course a polished, professional appearance, similar to a news broadcast.
– Clarity of instruction: Especially for instructional content, being able to speak directly to the camera allows you to more effectively and clearly communicate the information you’re trying to teach. You can match visual cues (like expressions and gestures) with verbal delivery.
– Personalized interaction: Direct-to-camera tends to more accurately reflect your unique teaching style. It simulates interaction and more easily integrates attention-holding tactics like rhetorical questions or exercise prompts, making your course more engaging and personalized.
Notice some of the recurring themes to many of these benefits to direct-to-camera. They’re about engagement, clarity, and authenticity. In my experience, a reasonable degree of comfort on the part of the presenter is required to really embrace these characteristics.
So, what happens when delivering into camera just feels too overwhelming or unnatural?
If delivering into camera isn’t possible, take a docustyle approach
With all allowances for everything I just said, sometimes direct-to-camera just doesn’t work. 
Often this happens when there’s a particular person (whether you or a colleague) who has to be the one on screen – but they just can’t get comfortable enough to talk into the camera.
They’re the best expert available and are maybe even ready and willing to put in the work required to get comfortable enough to appear on camera, but when it comes down to it they still feel too vulnerable, too isolated, too alone on screen when they try. Or there just isn’t time to train up to their or your standards.
This is okay. But it shouldn’t stop you from creating your course, which means we need to find another way to get things done, while still showing sensitivity to their needs.
A common workaround in such a situation is to set up a documentary style shoot.
This won’t work easily with a webcam, for reasons that will make sense in a moment, and ideally you’d use two cameras to employ this approach more efficiently.
How and why to plan for a docu-style shoot for your course recordings
1 – Plan for an interview-style camera setup: This involves having the subject speaking to an off-camera interviewer, rather than directly into the camera. You can blend the approach with the podcast-style Q&A format mentioned earlier. Train your camera on the speaker, who is usually lit professionally and mic’d with either a lavalier or a boom mic (or both). A tripod is a must.
2 – Frame your content in interview-style: Purse the content you’ve outlined or lightly scripted by answering related questions posed by the off-camera interviewer. This will help facilitate that natural feel and keep the “presenter” feeling more engaged. It will also help make your eventual edit feel more authentic and conversational.
3 – Consider a two-camera setup: This will help provide flexibility in the edit and will likely ease more pressure on your subject. It could even result in shorter shoot days, since you can more easily cover up “mistakes” by switching between, say, a medium shot and a close-up in your edit.

But you should probably be doing that anyway, in many cases, if you want your modules to look and feel professional and polished.
And that’s about it for scripting and recording planning!
As a recap, your chosen approach should balance an estimate of your resources available, and your comfort level and personal style. Since your ultimate goal is to deliver the most value possible in an engaging and relatable way, research and test a mix of tactics for doing that within what feels attainable.
Give yourself a comparative abundance of time and/or money to figure this part out.
Your choices will have a big impact on how well you’ll be able to execute on your goals, when it comes time to edit and distribute your course videos.
Next Up: Recording Your Course Videos
We’re getting deep into our course creation journey now!
In the next installment of this series, I’ll recap some additional best practices around recording, and will spend some time recapping my experience recording the specific modules for our course from Fair Share Films.
If you haven’t already, sign up for the dedicated email list for this series to be among the first to read that post. And, don’t forget, Spotlightr and I are working on an extra special resource that we’ll be sharing later with everyone on that list.
Back with you soon!

