LearnDash and LifterLMS are definitely 2 of the most popular WordPress LMS plugins available today. At a high level they both offer very similar features.
This is a long review. We get into a ton of comparisons of these plugins so it’s definitely worht the read if you want to know more abou these two plugins. But I get it, maybe you want the TLDR.
I got you…
TLDR: LearnDash is better for a few reasons. It’s easier to use, has more out-of-the-box building options, and it looks much better on the front-end. I also think the cost and the way they charge for using their plugin makes more sense.
If you are ready to purchase it now, go ahead and visit their site now. That’s not an affiliate link, we don’t have anything to gain at all. I actually think LearnDash is better.
But WAIT!!!
Before you go be sure to check out why Spotlightr video hosting is the best solution available for your LearnDash video lessons. Sign up for our 14 day trial, no credit card required, and hit up our live chat support if you have any questions.
OK, now that the TLDR and our little plug is out of the way, let’s get into the weeds a bit here.
Features Overview
Both of these solutions have what you need to get your course up and running and selling. Here is what they have in a nutshell:
– Course builder with drag-and-drop interface
– Lessons with Video Lessons capability
– Quizzes with a variety of question types
– Content dripping which means you can schedule content to be released over a certain period of time
– Certificates for completed Courses
– Assignments to students
– Multiple payment solutions included one time payments and recurring payments
– Group access so you can restrict students to certain courses or give access to multiple courses from one purchase
Video Hosting Options
The nice thing about WordPress is its flexibility. This is why so many people choose to build their courses on WordPress, using an LMS plugin, as opposed to using a SaaS platform like Teachable. WithWordpress you can do pretty much anything you want with either the right plugin or the right code. With SaaS platforms you are restricted to their page builder apps.
That means there are many ways you can add video to WordPress Gutenberg blocks or other ways. Here’s a quick list…
– HTML block to add embed code
– Code editor to add embed code
– Video block to add a video URL
– Various plugins that add features or change functionality
With LearnDash and LifterLMS, video is a big part of their lesson pages (as it should be). So that means they have their own built-in ways to add video.
Both plugins have a “featured” way to add video which adds your video to the top of the lesson page by default. Let’s quickly review LearnDash’s “featured” way, which is their Video Progression option.
The LearnDash Video Progression feature works so that students must watch the entirety of the video before they can mark the lesson complete. There is a special section of the lesson page where you add your video embed code or URL. But you can’t just add any code from any video hosting company. LearnDash integrates with a few companies in particular. It works with Spotlightr, Youtube, Vimeo, Wistia and any self-hosted link.
Of course you don’t need to use this feature if you don’t want to. As discussed above, being on WordPress means flexibility. So you can add your video to any part of the Lesson page using any of the options I mentioned above.
The same goes for LifterLMS. They also have a section specifically for adding video when you build a lesson, and this asks for a video link (not embed code). It uses oEmbed to convert the link to media, so you do need the Spotlightr WordPress plugin installed to automatically whitelist Spotlightr links for oEmbed.
By default this area for video doesn’t have the feature to require students to watch the entire video before being able to mark the lesson complete. The do have an “Advanced Video” add-on ($240 per year, more on costs below) that also requires students to watch the entire video before being able to mark the lesson complete. That feature currently only works with Youtube, Vimeo, and Wistia.
And, just like LearnDash, you can also add video anywhere else in the lesson using the WordPress blocks or visual editor.
LearnDash Course Builder
With the LearnDash Course builder you will be using the usual WordPress Gutenberg block editor. There are multiple block types for LearnDash that are now added to your WordPress installation. If you’re considering this platform, a LearnDash review can help you decide if it’s right for you. There are multiple block types for LearnDash that are now added to your WordPress installation.
Like the Lifter LMS Course Builder below, we are going to give you some details on how this builder works. For a deeper dive, check out our Lifter LMS review, as the course builder is a large part of how the whole set-up will work. We feel it’s important to have a good understanding of it to make a better choice between solutions.
When you create a new course it will look like the following image. You will name the course and then add a course description. Then you’ll notice two tabs at the top:

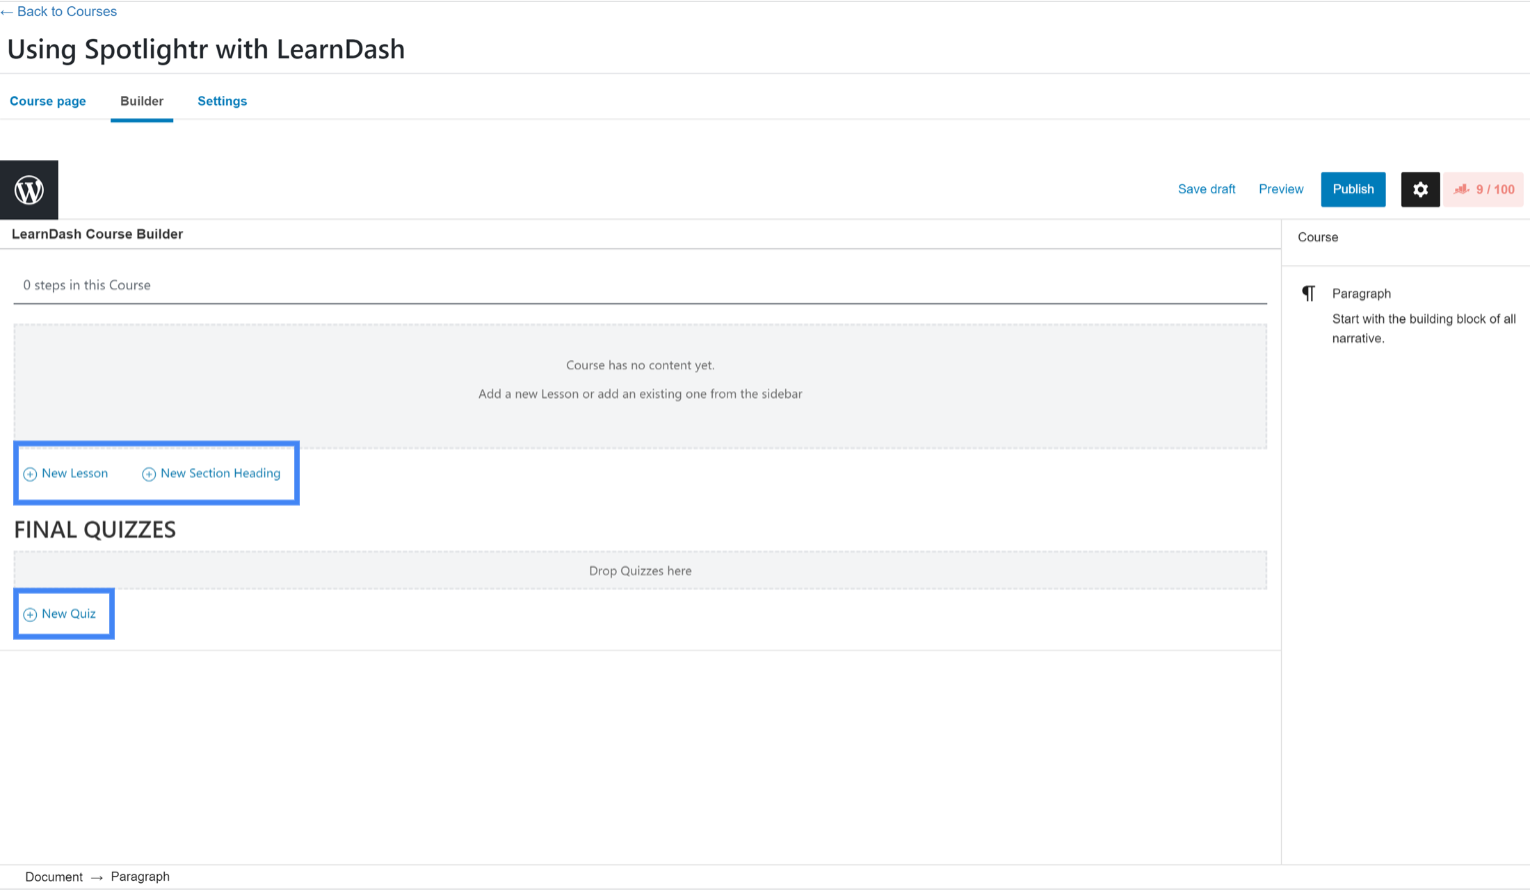
LearnDash also allows you to create Topics which are placed into Lessons. Topics let you further divide your Lessons into smaller pieces. So if you have a particular Lesson that is quite extensive, you can break it down into Topics. Topics can no longer be created from the Builder. You need to create them from the main LearnDash menu. Once created, you are able to add them from the Builder.
In this case, we don’t have any created so we would need to click the buttons to create them as I have highlighted here:
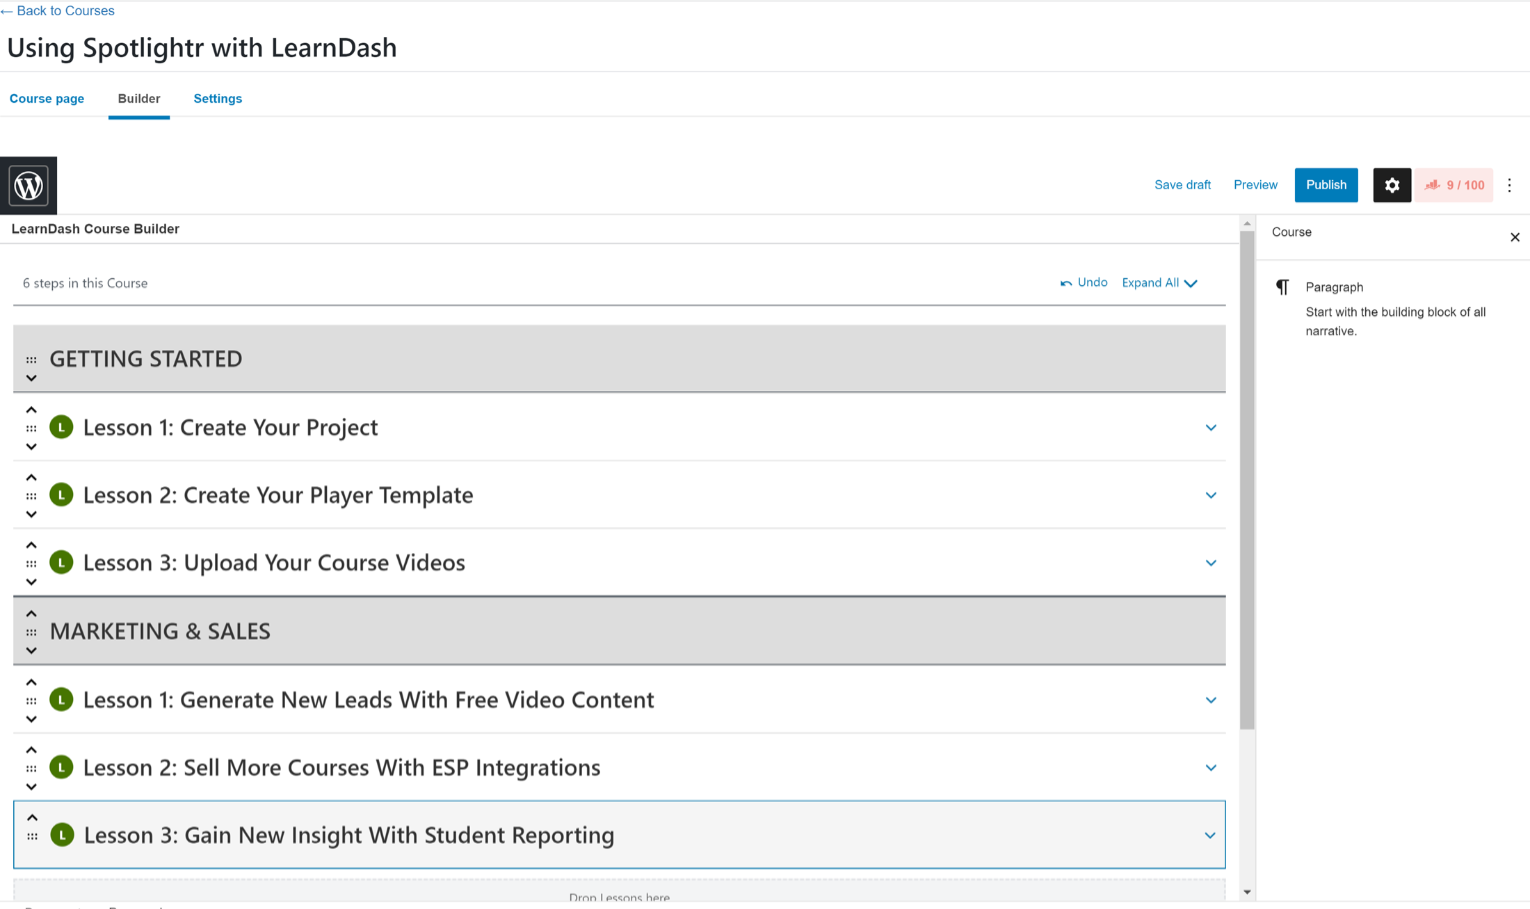
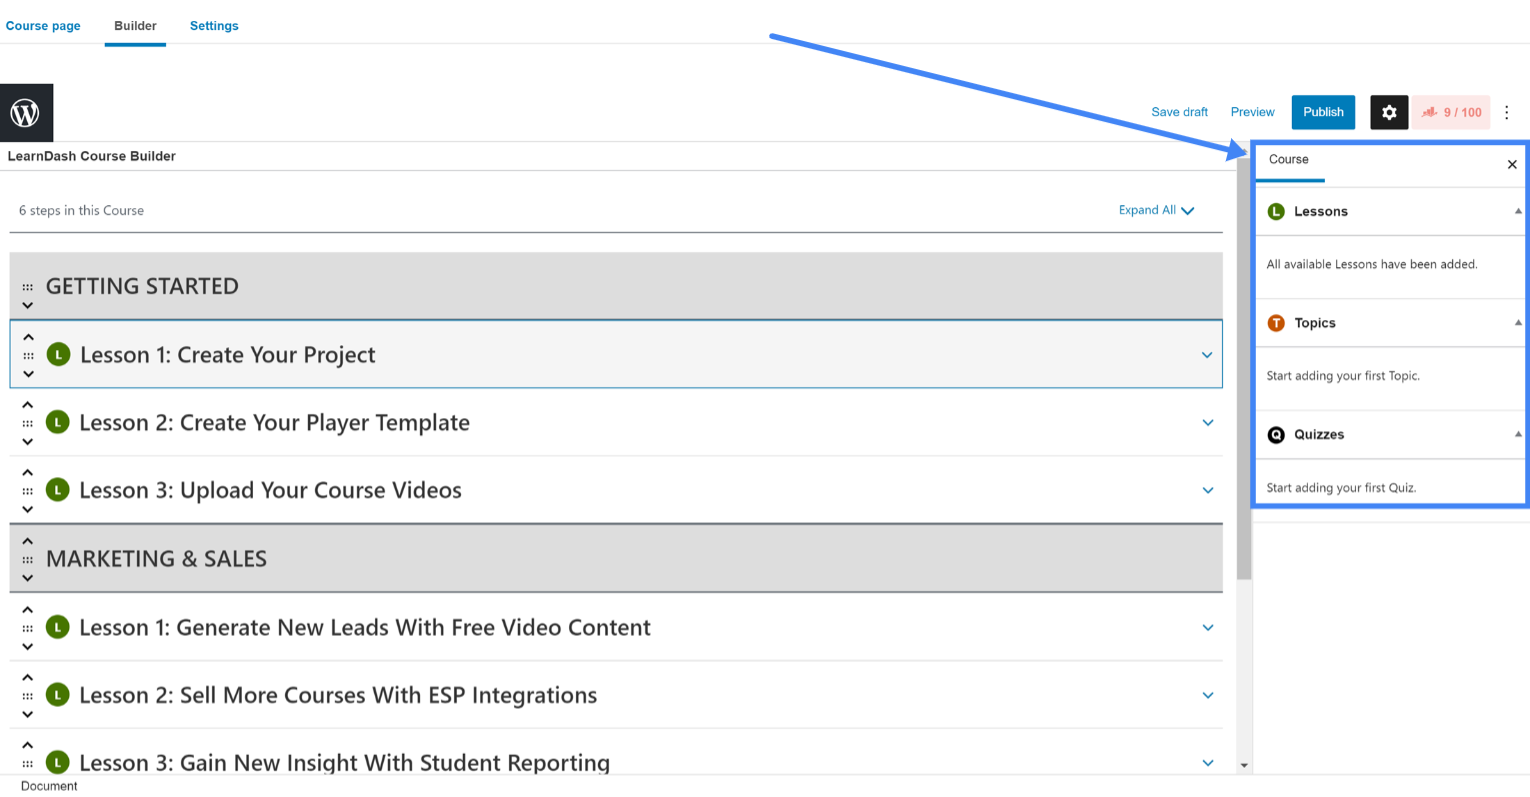
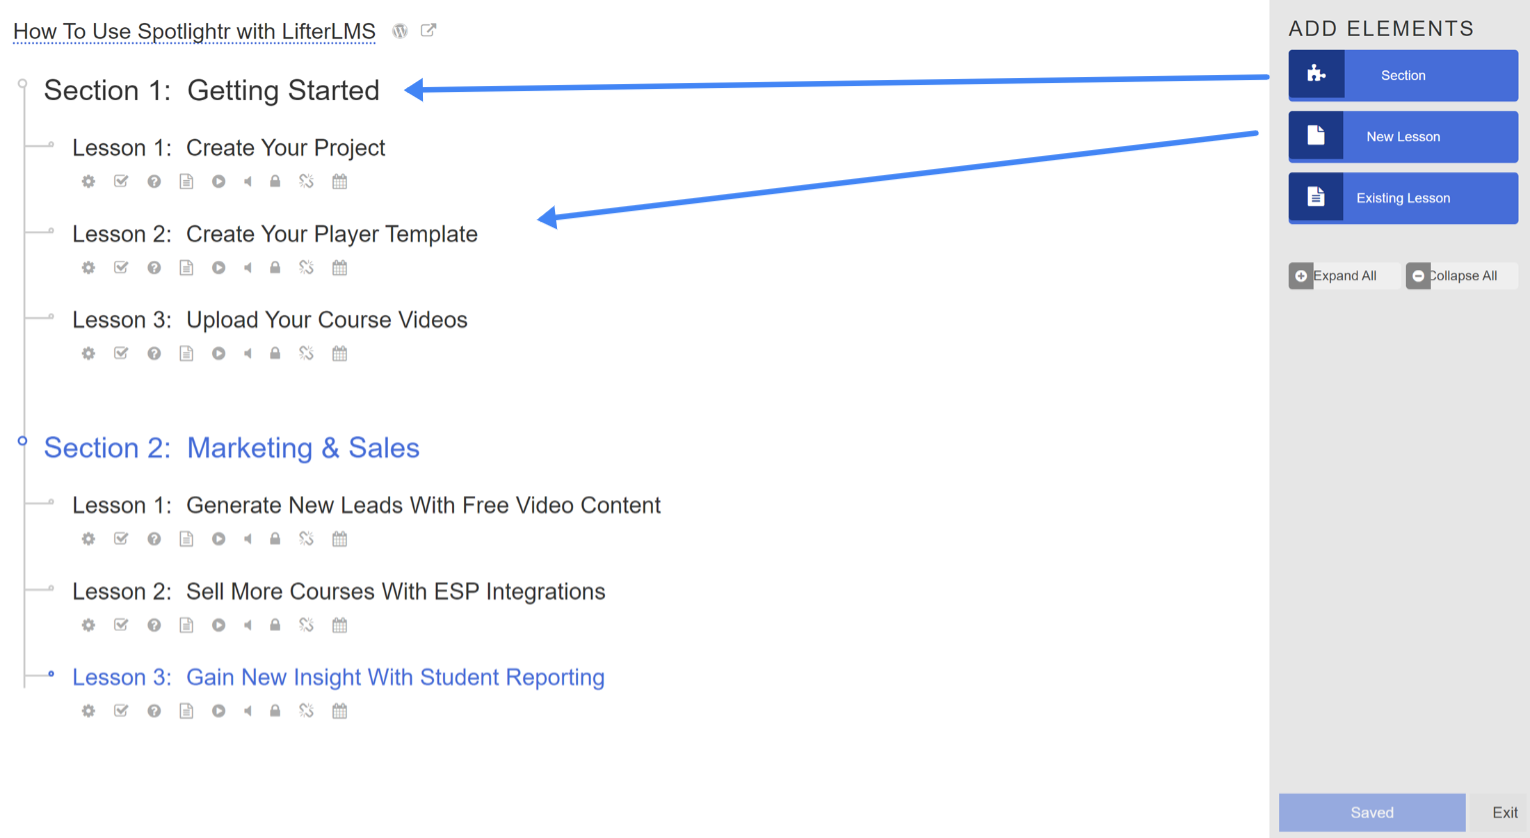
Here I created 2 Sections with 3 Lessons in each Section. They can be moved around and reorganized and you can click on each Lesson to take you to that Lesson page to build/edit that particular Lesson.
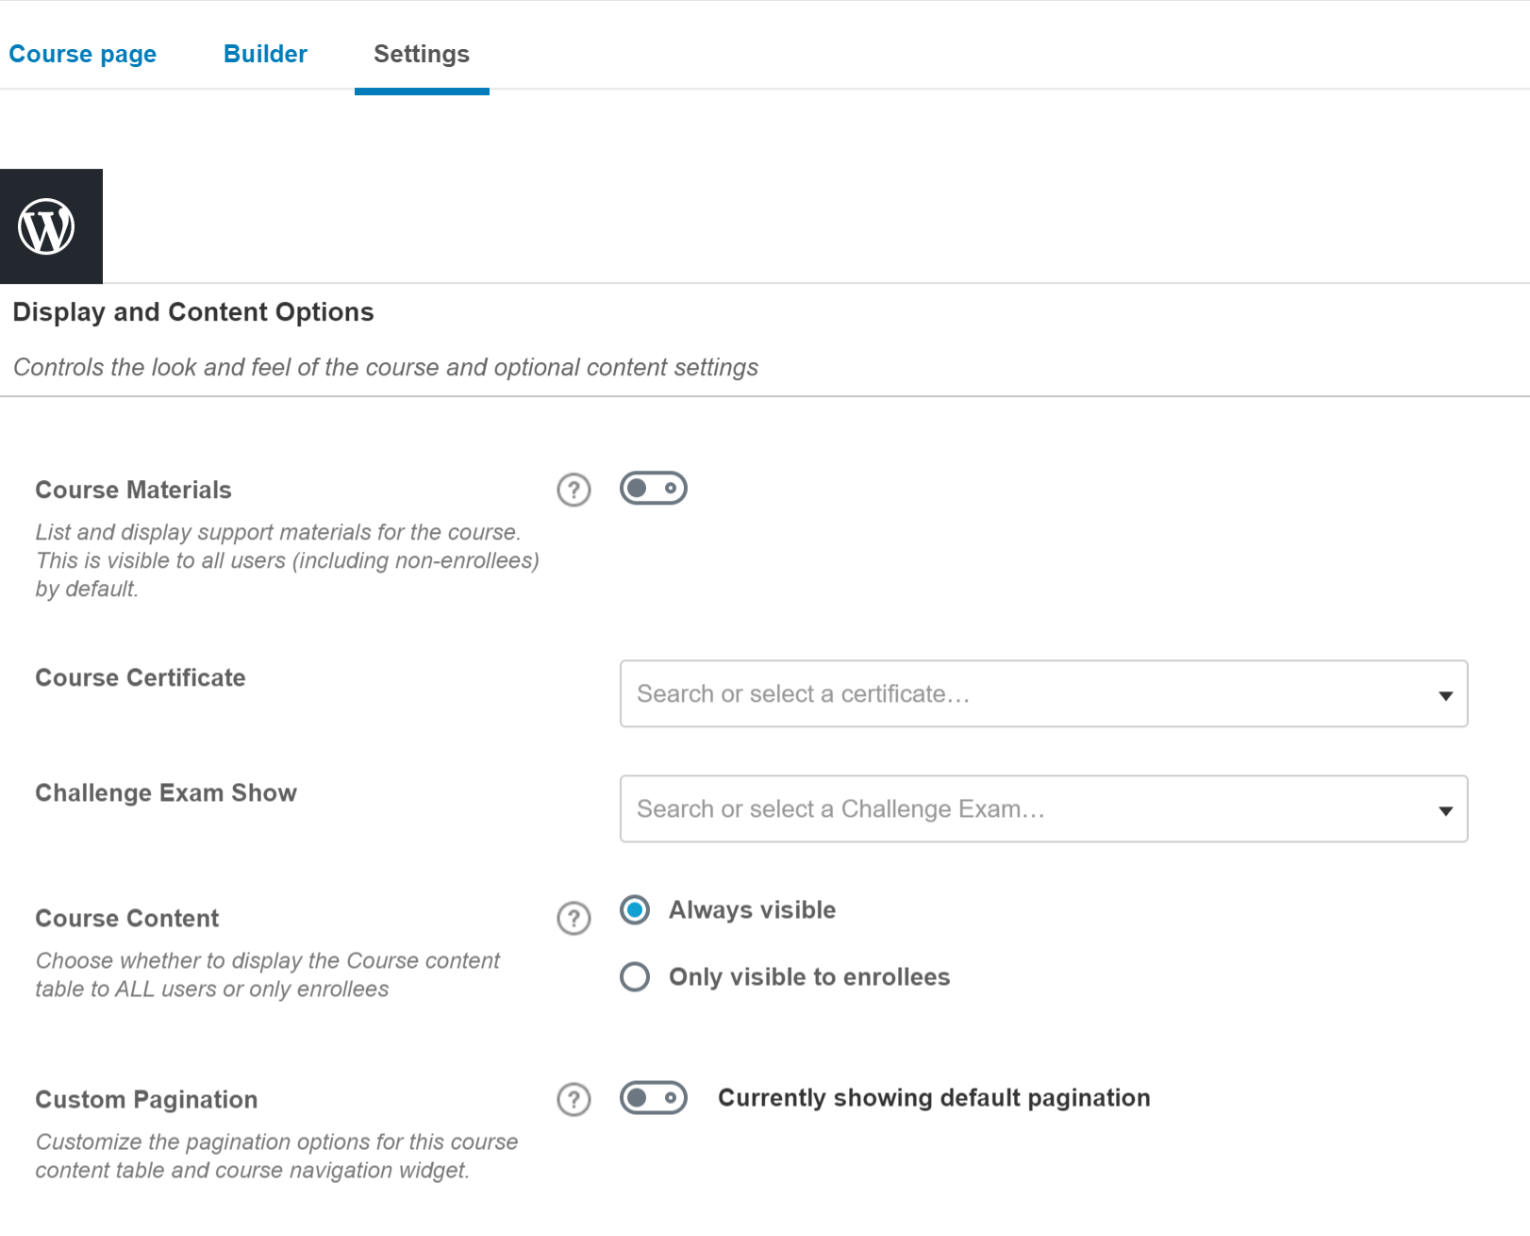
Course Navigation Settings:

And finally your Course Users at the bottom:

LearnDash Lesson Builder
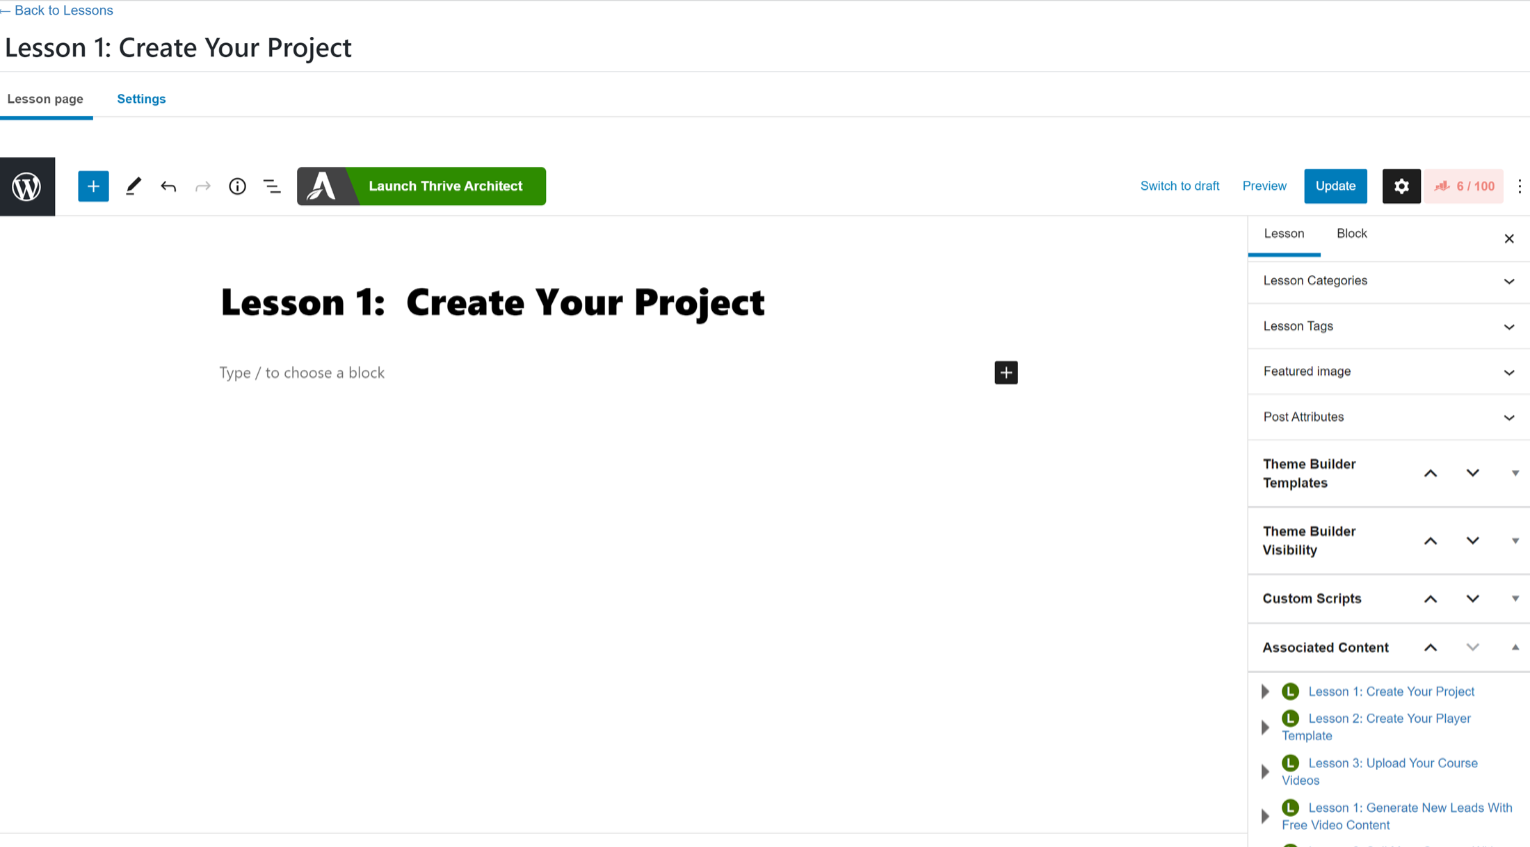
The Lessons are created in the same way the Course page is created, which is using the regular WordPress block editor. You will be able to add any content you want with the block editor.
They did include a convenient way to access your other Lessons by adding them in the block panel on the bottom:
Also included in the Settings tab are some features for your Video Lessons, namely the Video Progression feature. This feature prevents your students from marking their Lesson complete unless they watch the entire video.
Here you can see how the interface looks with the Video Progression feature turned on:
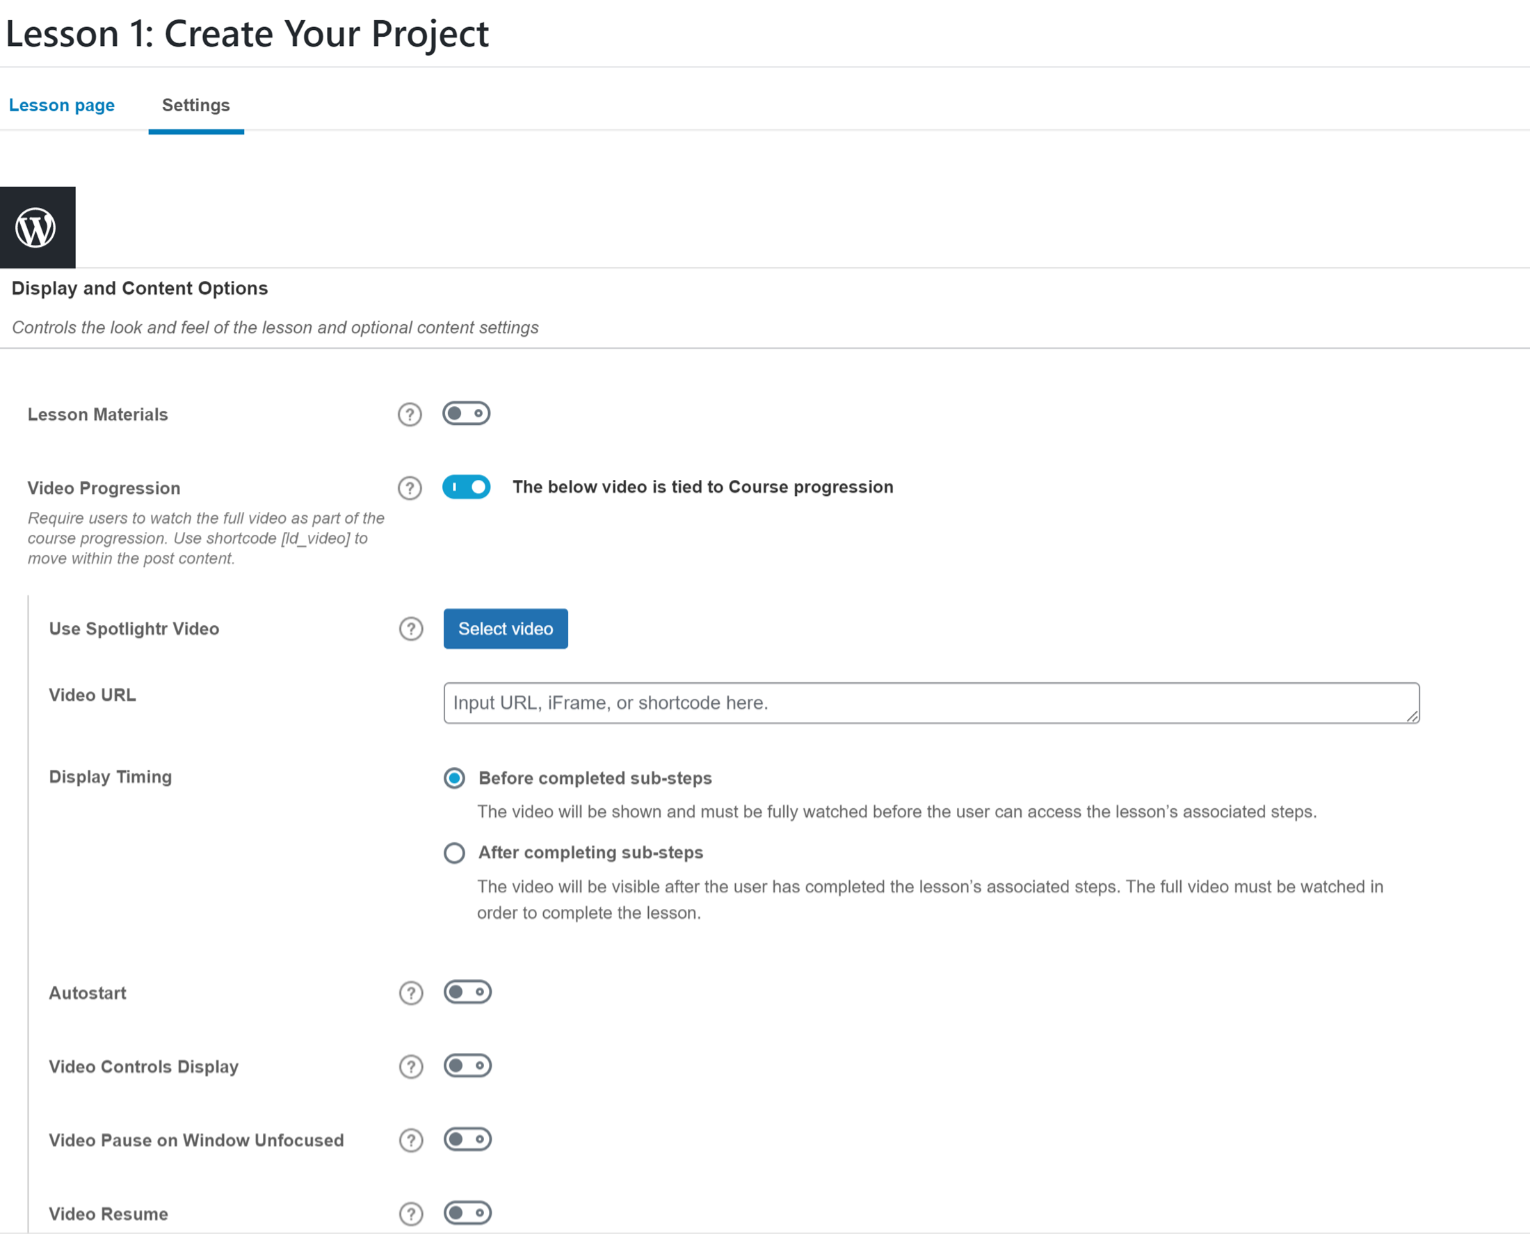
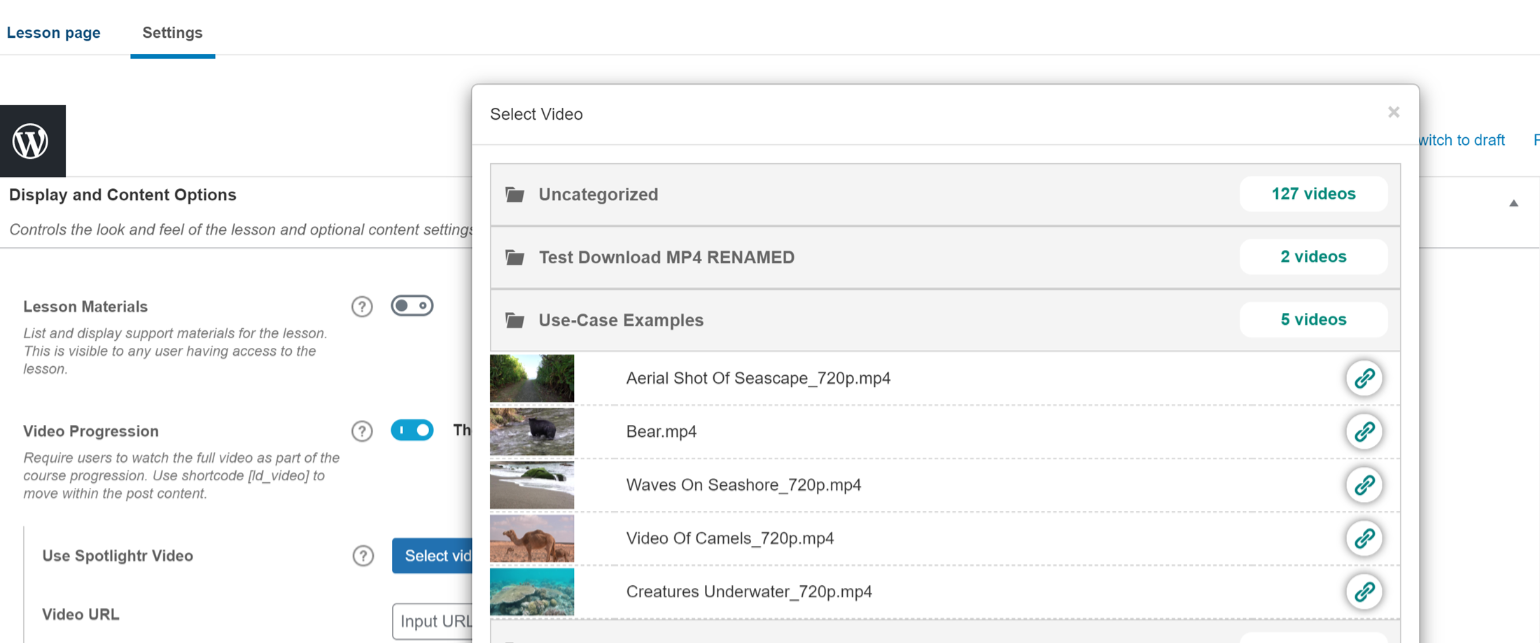
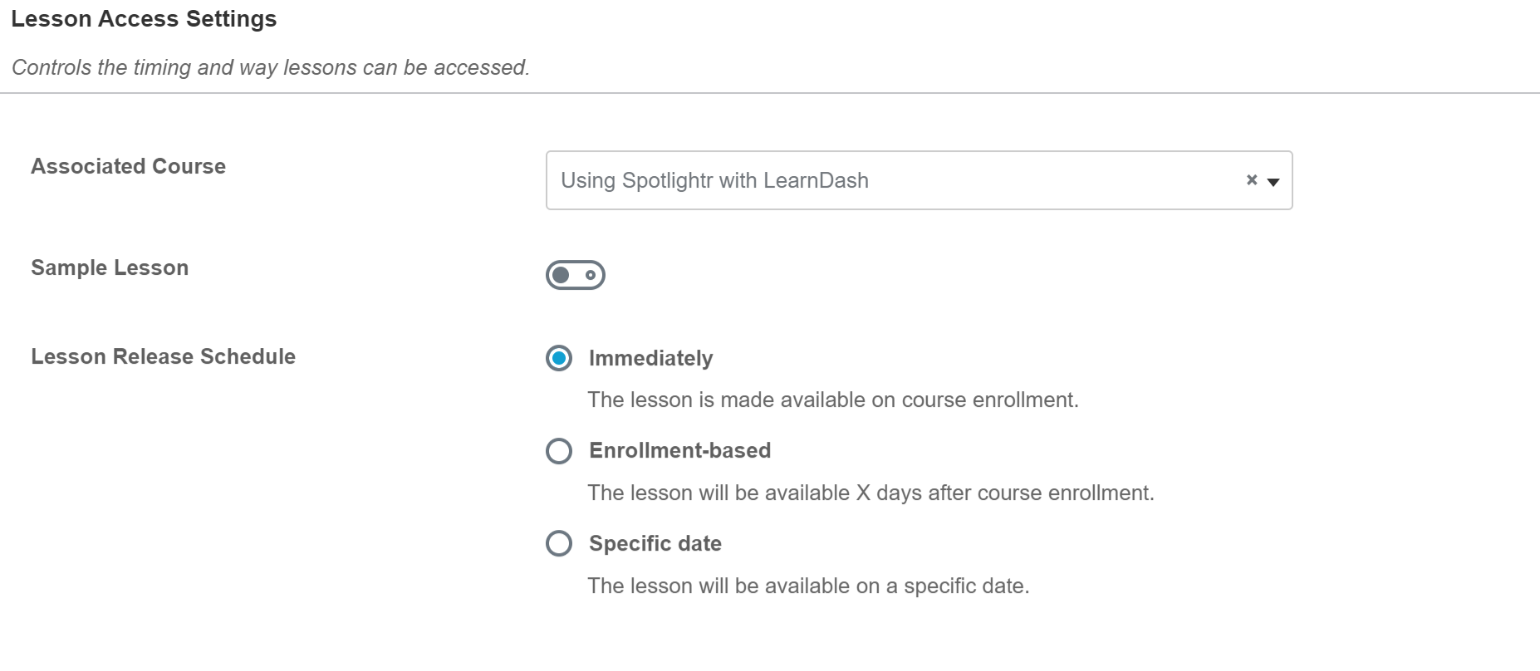
You also have your Access Settings in this tab. What’s noteworthy here is the ability to set when the Lesson is available. If you want to drip your content out, and make this Lesson available 7 days or 14 days after registration for example, you would set that by the Lesson Release Schedule options:
LearnDash Quiz Builder
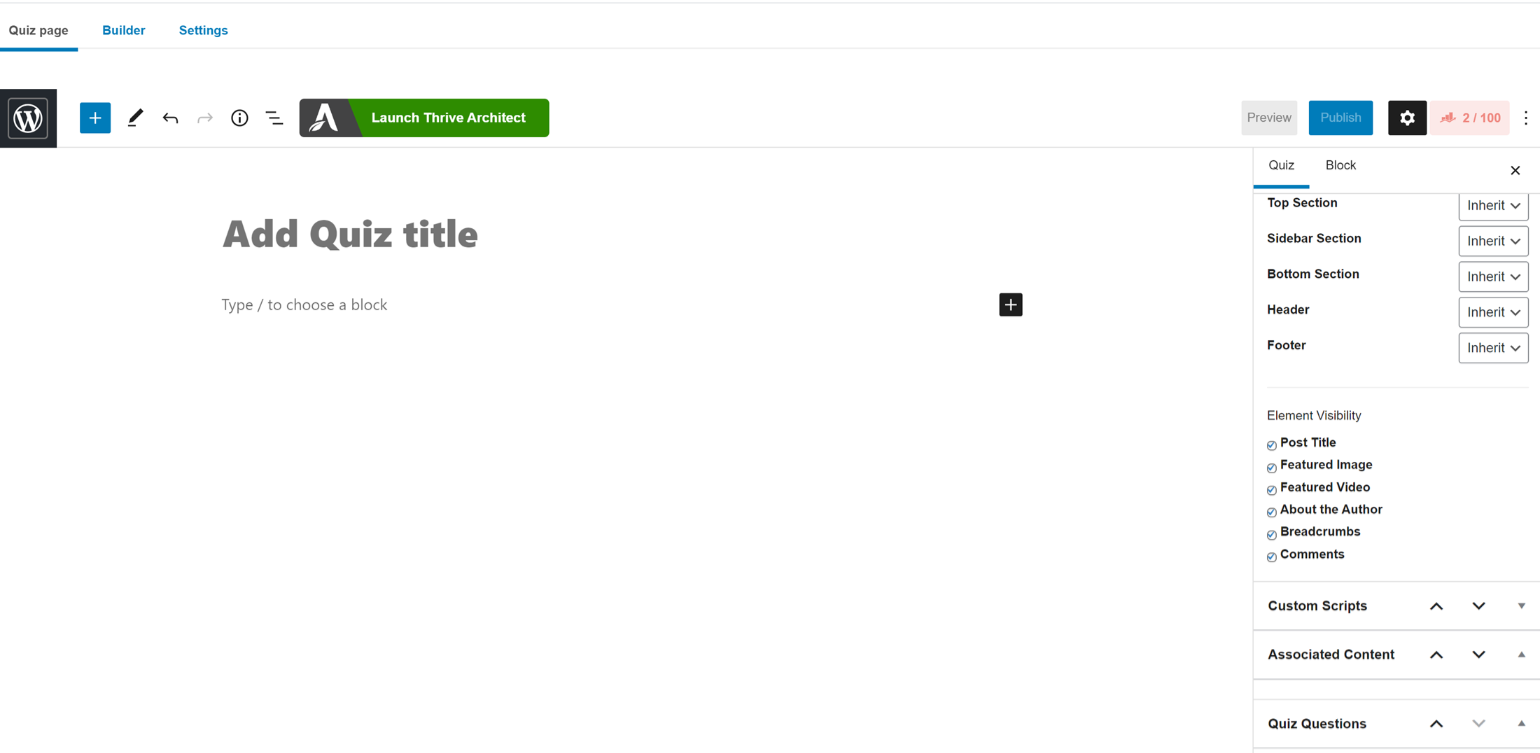
The Quiz Builder looks similar to the Course builder. The initial page, the Quiz page, is where you would add your content with the block editor:

Then you simply select your question type, add your question, and then add your answer(s). Here’s how that might look:
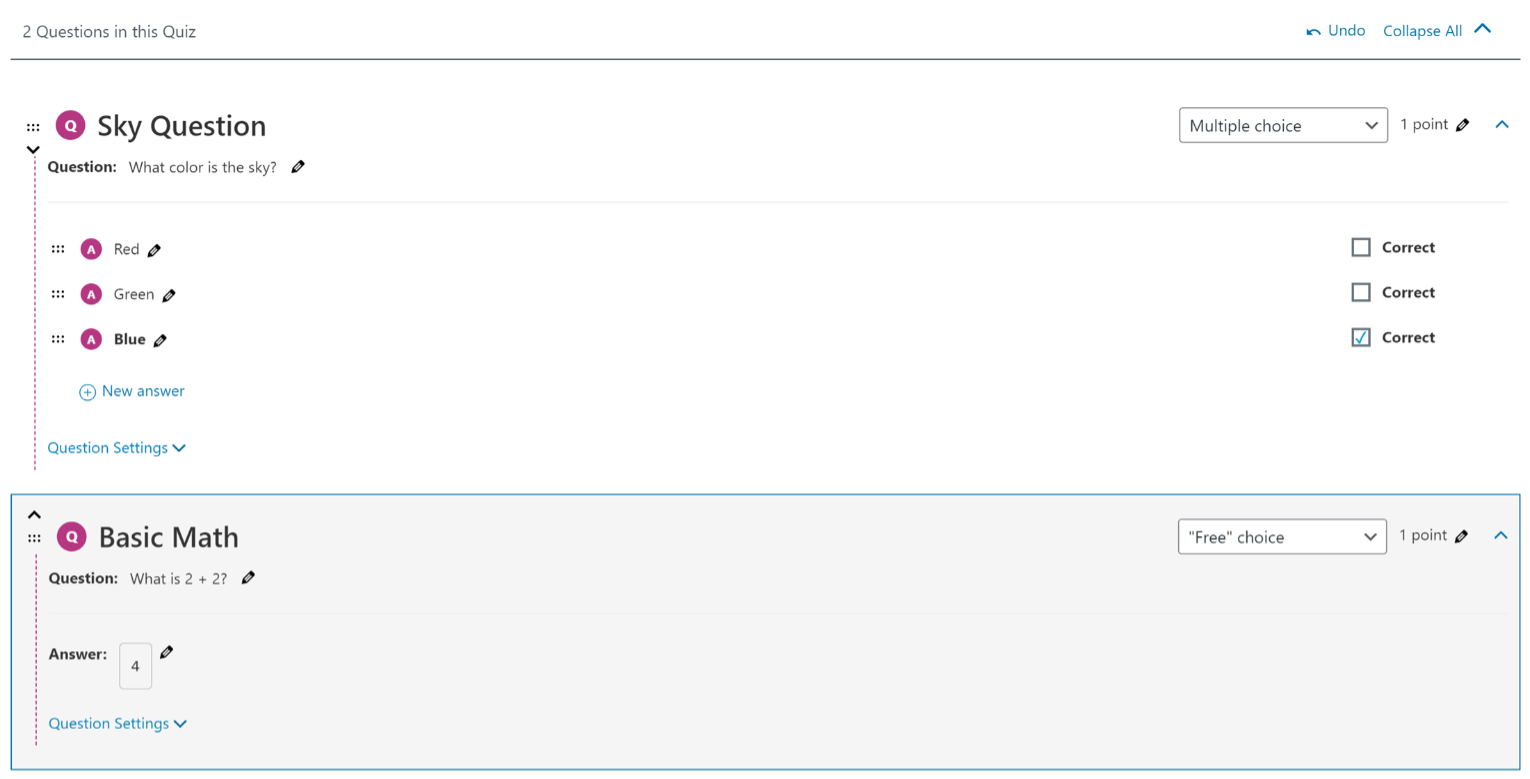
Here are the type of questions you can use:
– Single choice
– Multiple choice
– “Free” choice
– “Sorting” choice
– “Matrix sorting” choice
– Fill in the blank
– Assessment
– Essay/Open Answer
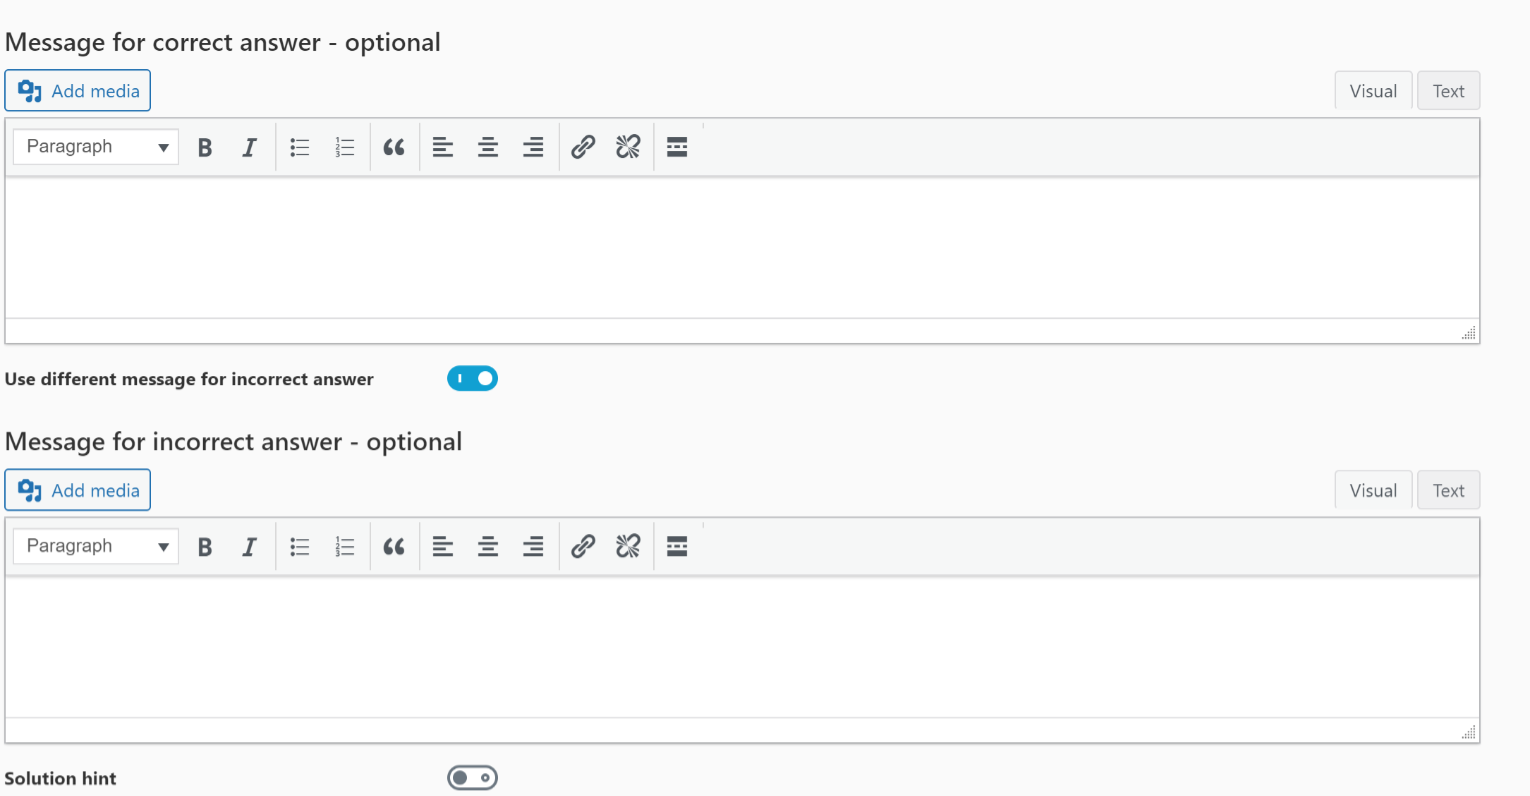
By clicking on Question Settings you can edit what shows for correct answers, incorrect answers, and also add a hint:

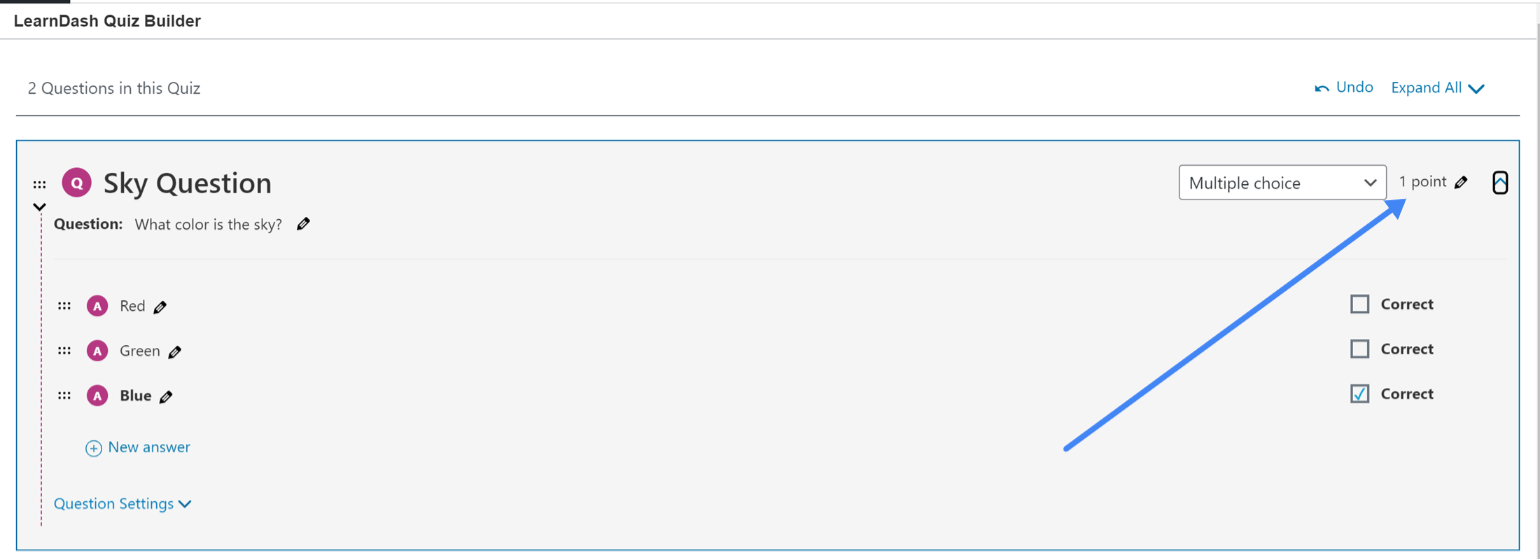
You can set the amount of points each question is worth here:
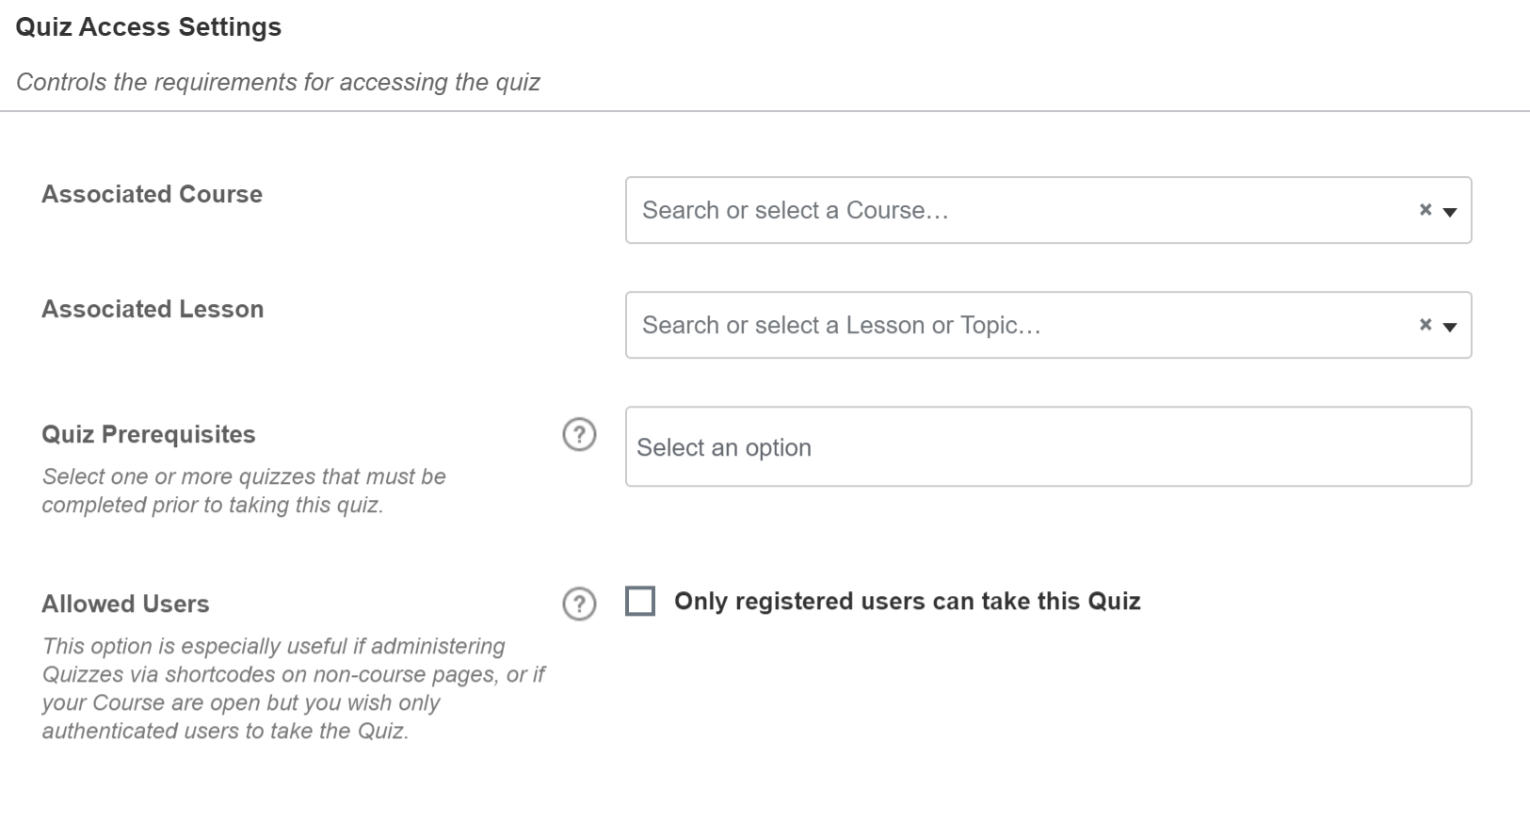
Your Access Settings will need to be configured to set who sees the Quiz:
LifterLMS Course Builder
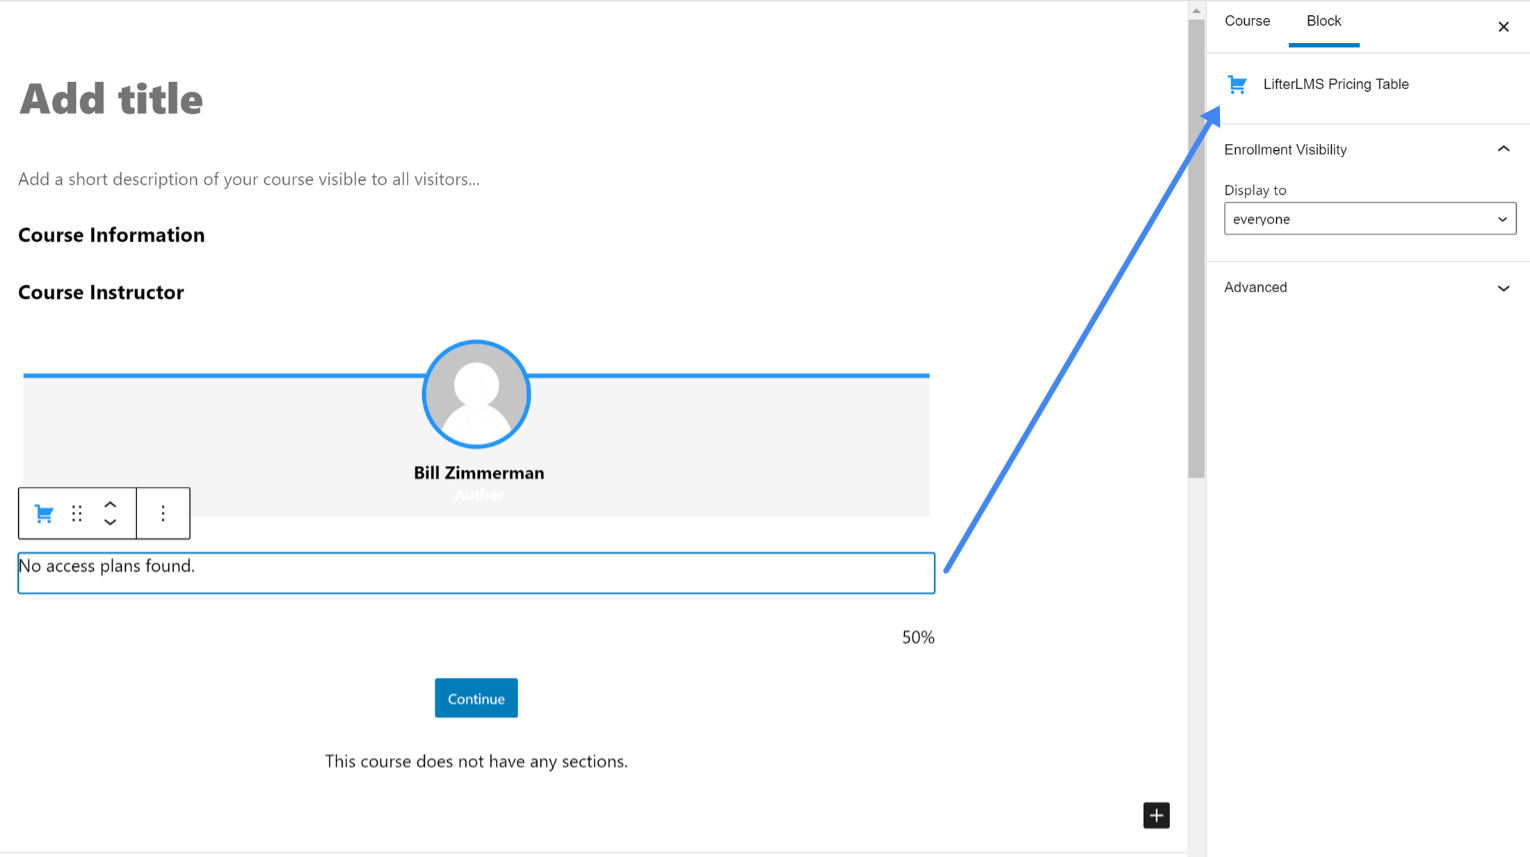
When you create a new course in Lifter you will get some pre-populated blocks created for you. Here you can see I have clicked on one block, the Pricing Table block and you can see the block options on the right. I have no pricing plans set up yet so it’s currently blank, but this gives you an idea of how the initial set up looks like:
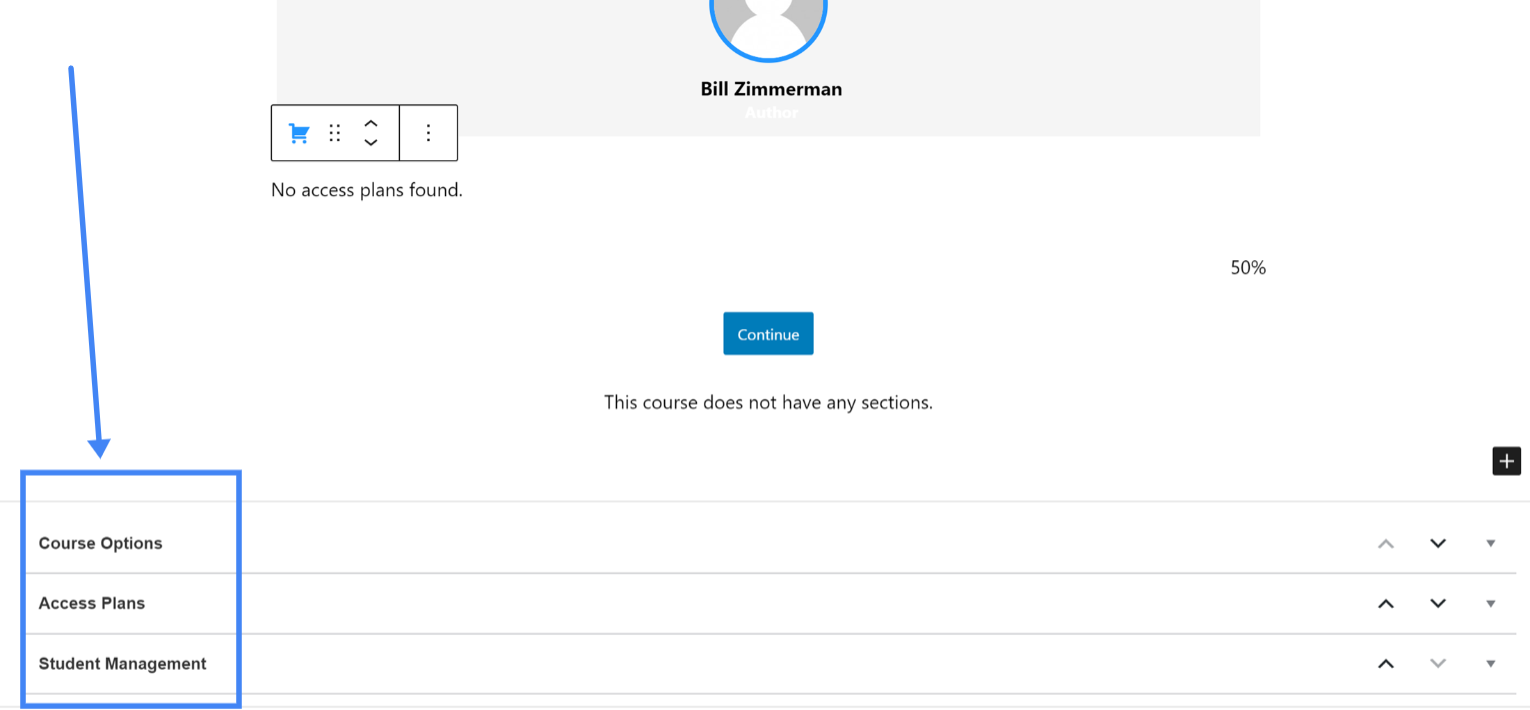
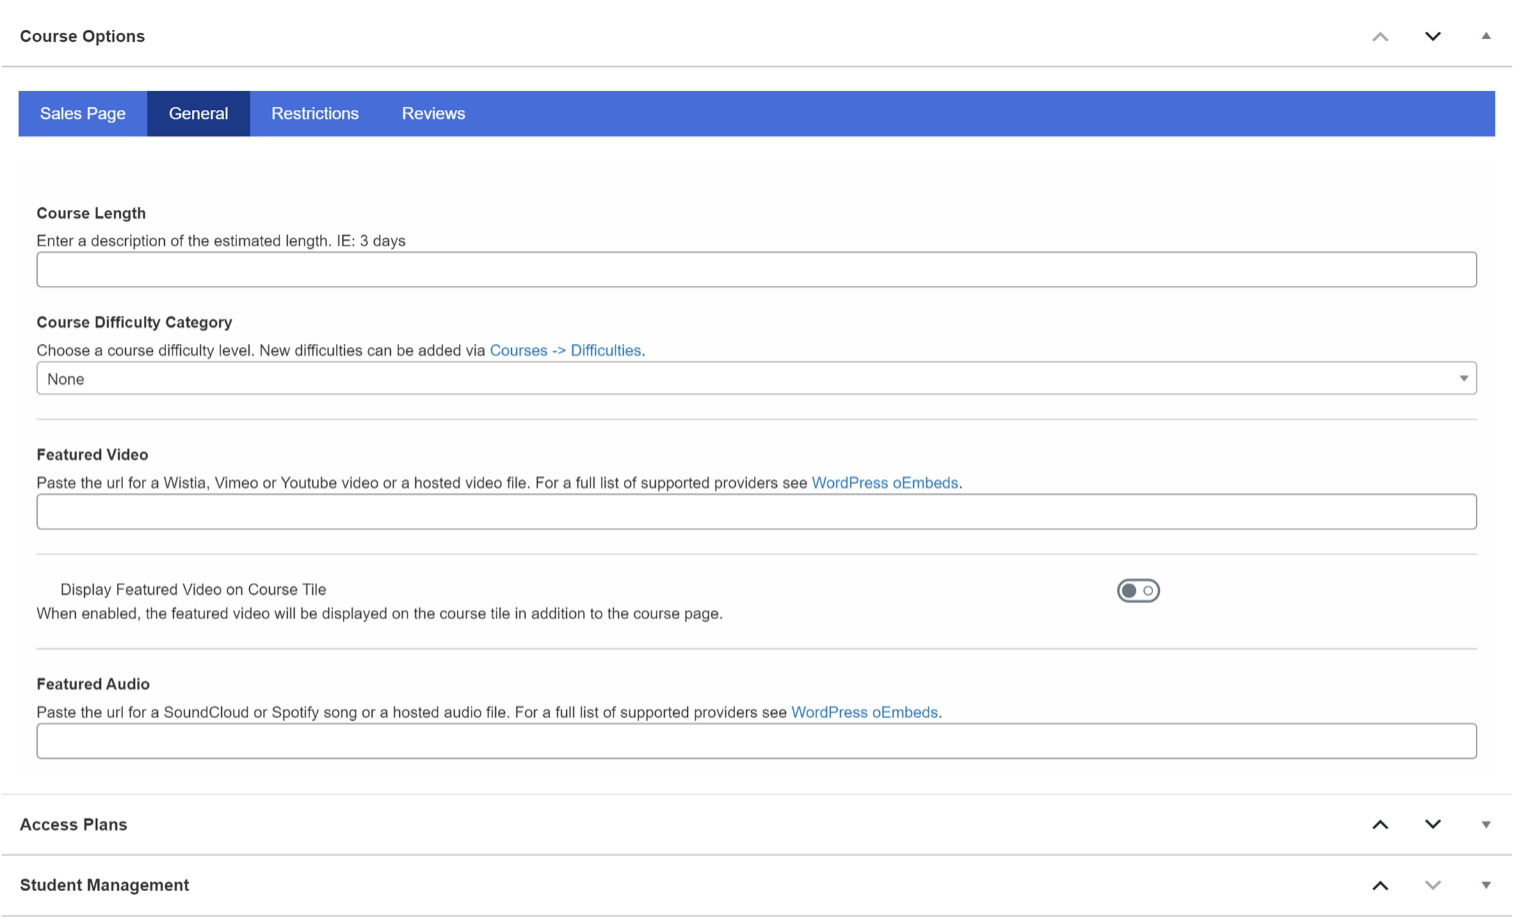
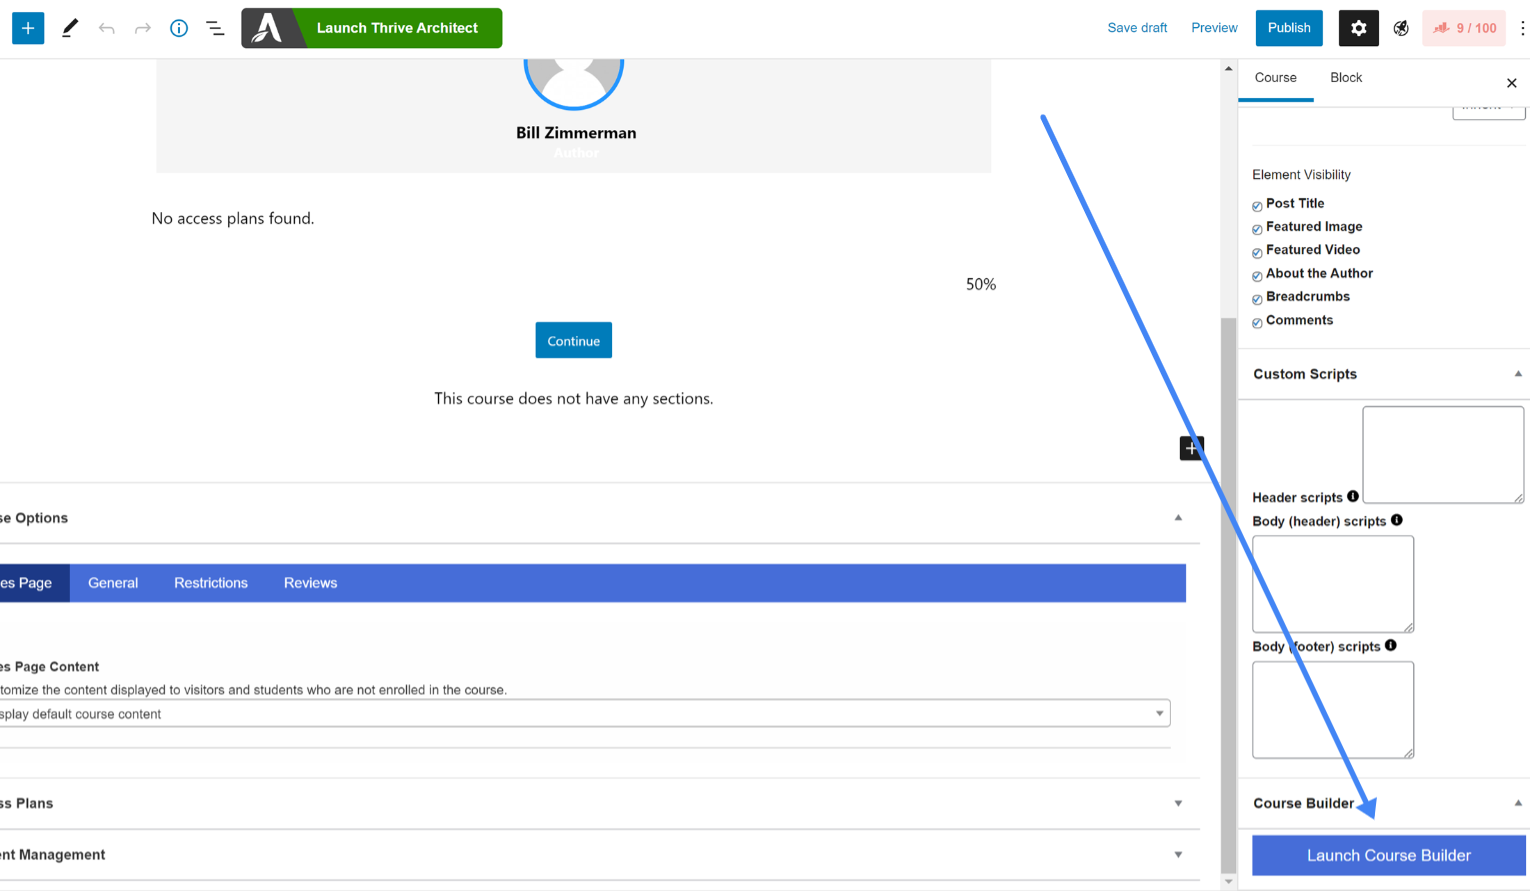
You’ll click this button to launch their Course Builder:
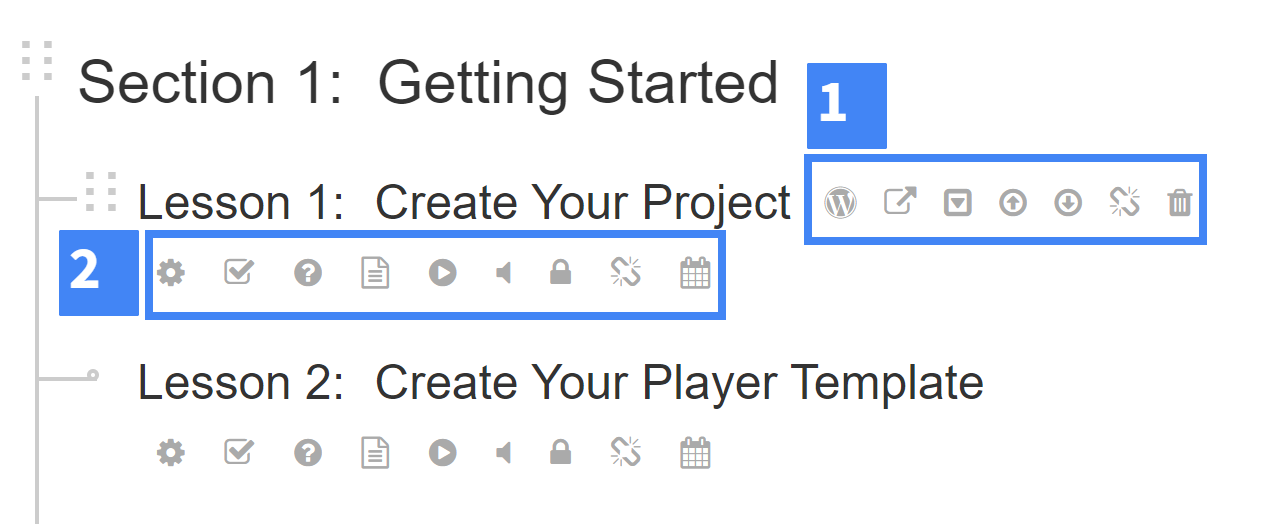
The icons in group 1 in this image are for moving the lesson around, previewing it, etc.
And the icons in group 2 do a couple of things. With the first few icons you can edit the Lesson Settings, add an Assignment, and add a Quiz. And then the remaining icons will tell you if you have content, video, or audio added, amongst a few others:
LifterLMS Lesson Builder
The LifterLMS Lessons can be accessed either via the Course Builder or through the main admin menu. Editing the Lessons is pretty straight-forward. You can add content using the the regular WordPress block editor or any blocks that come with the theme you are using.
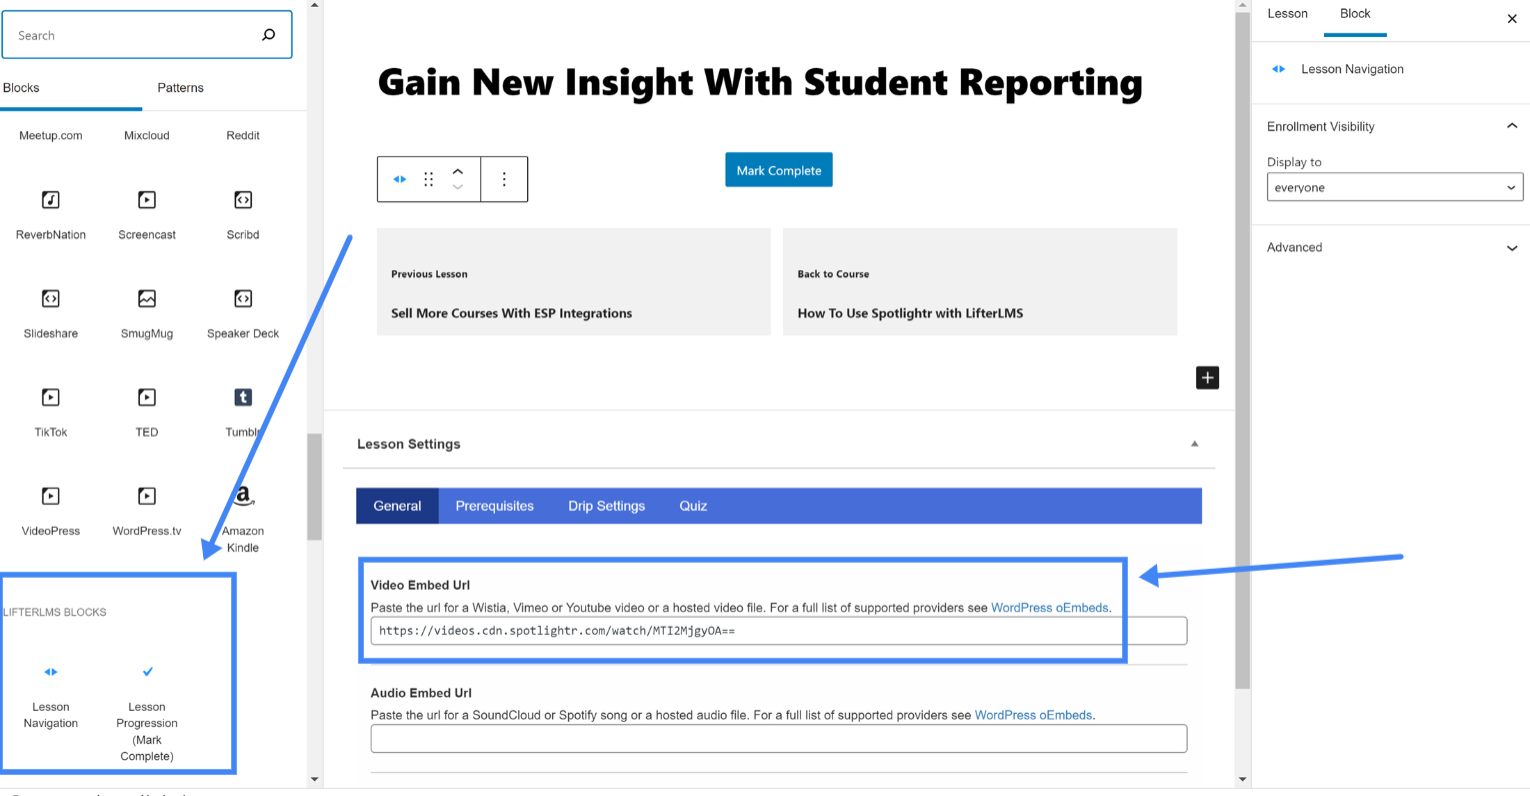
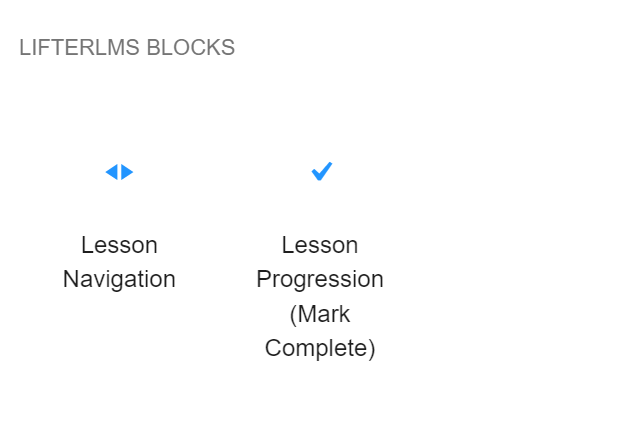
LifterLMS has a few custom blocks, both of which are already added to the Lesson. Those are the Lesson Navigation which you can see are the two buttons to go to the previous lesson or back to the course. And also the Mark Complete button.
And then you can see where you can add your video here as well. Note that the Spotlightr link requires the Spotlightr plugin to be installed as well. You can see all of that here:
LifterLMS Quiz Builder
The Quiz Builder needs to be accessed via the Course Builder:

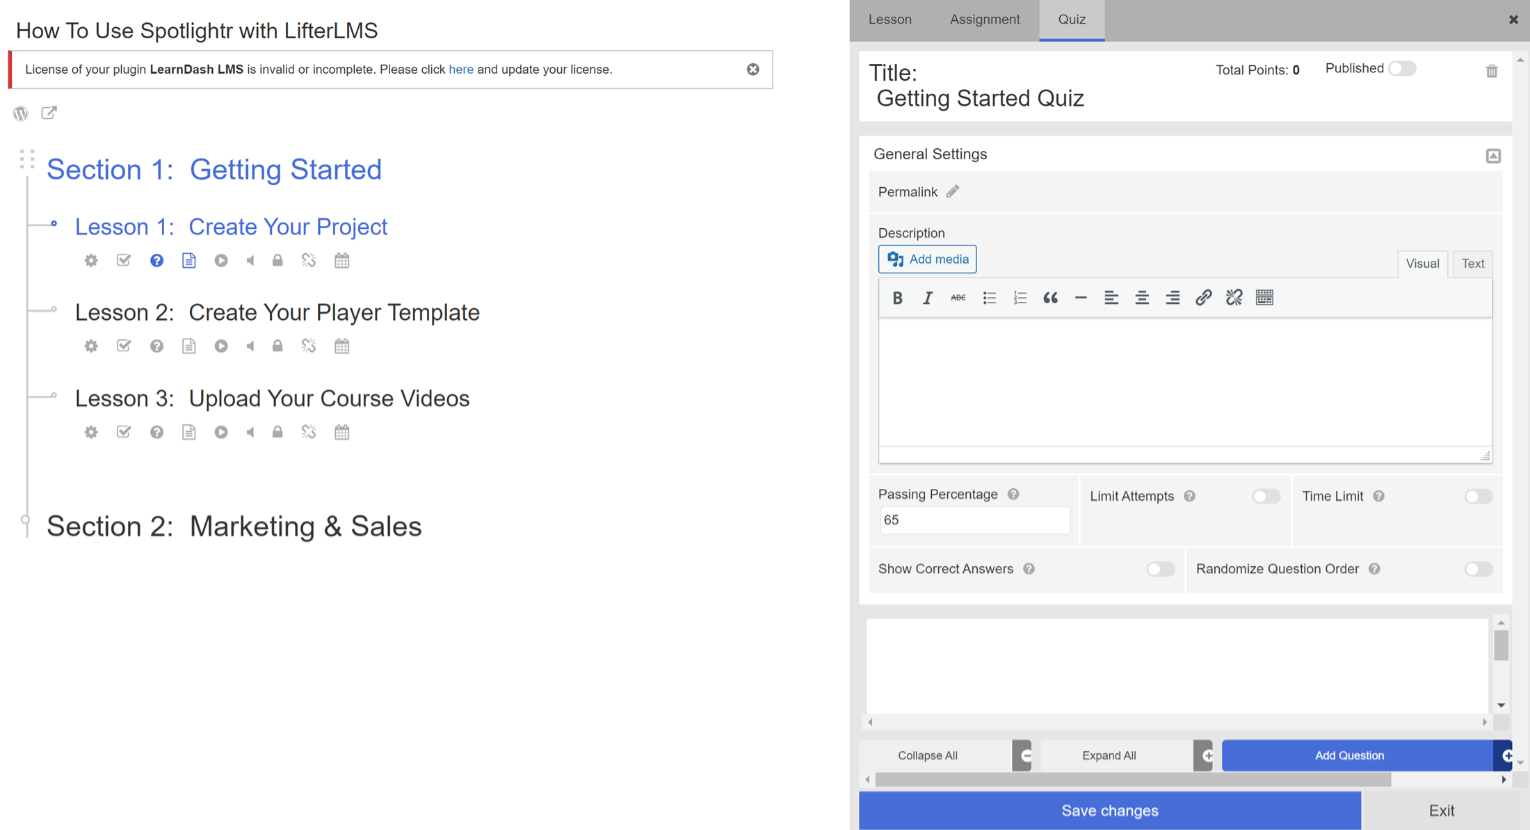
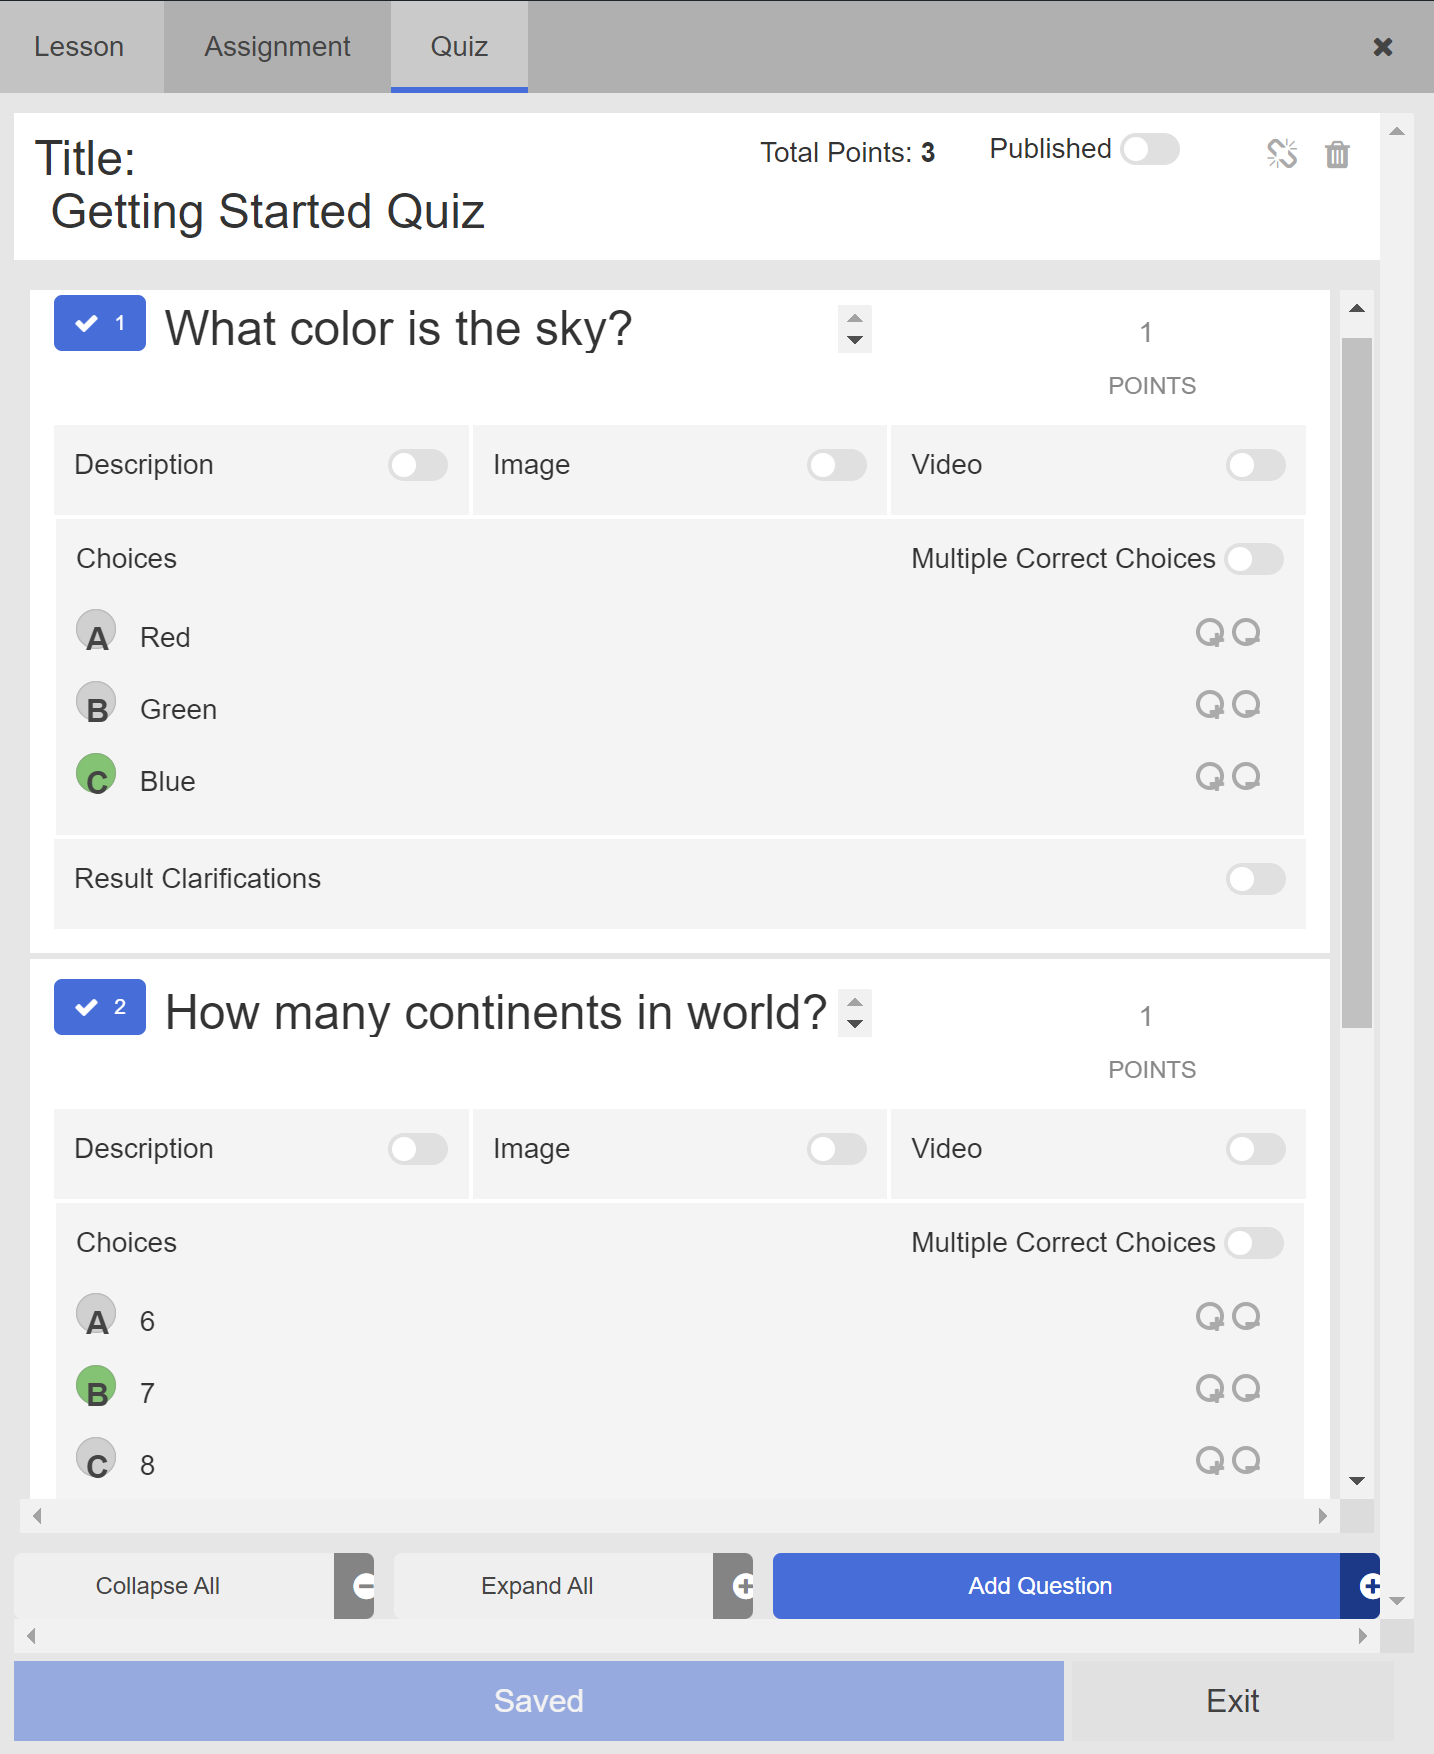
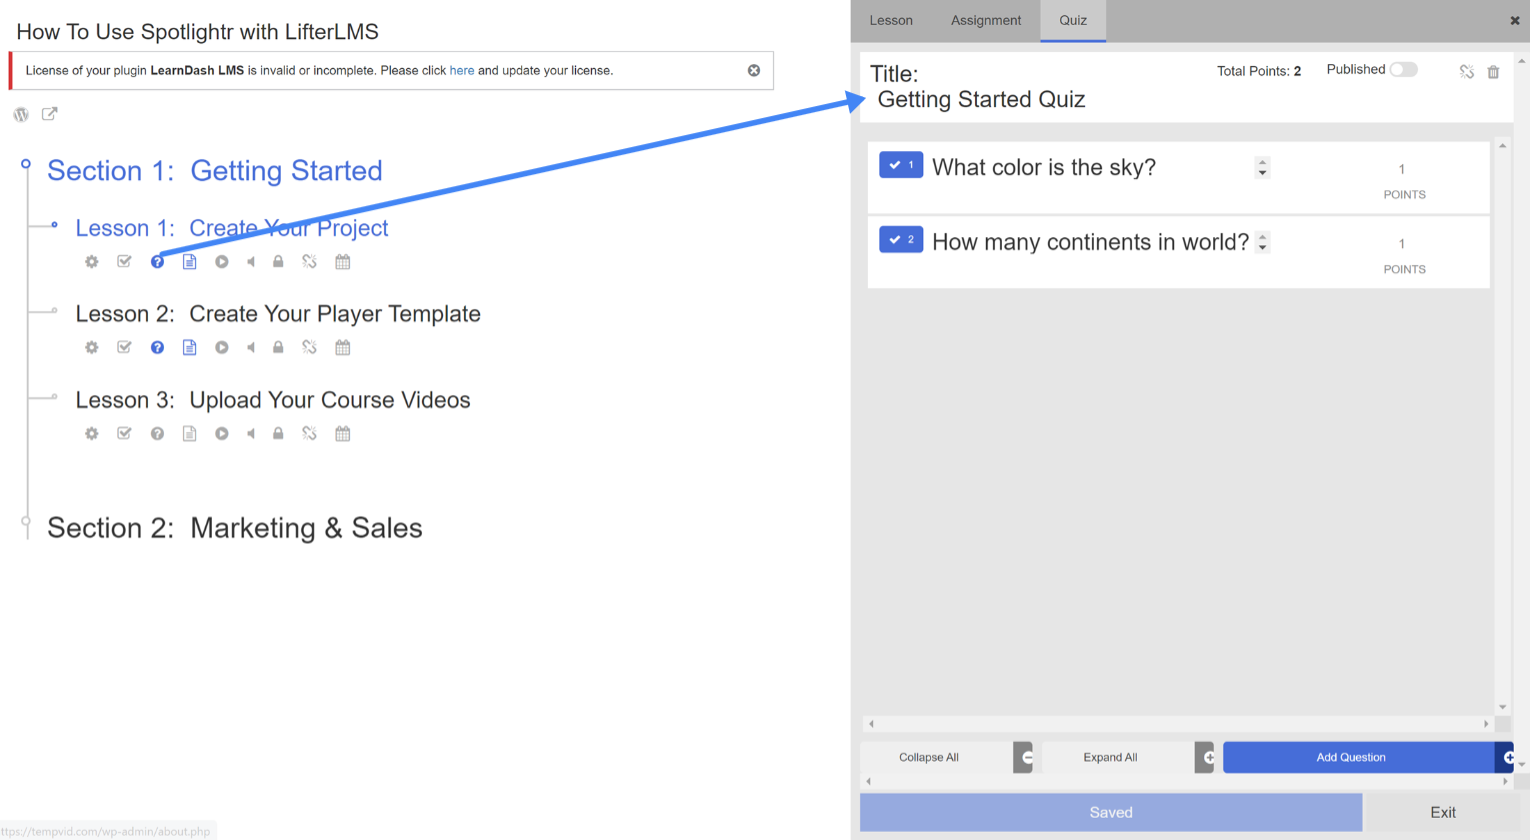
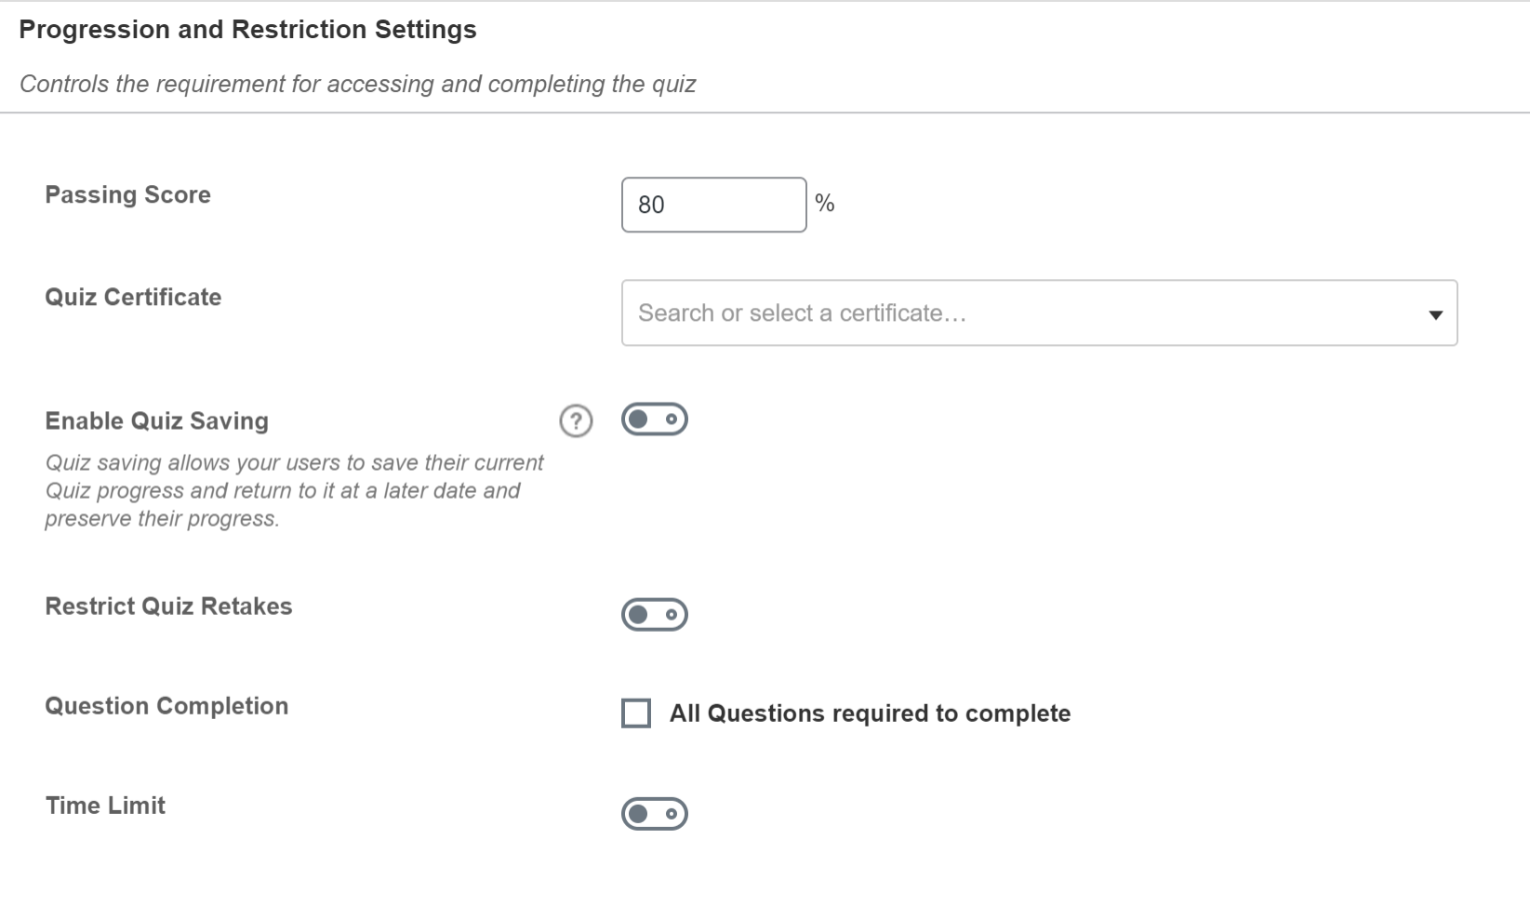
And going back to the screenshot above for the General Settings, that is where you set a few things like:
– Passing grade percentage
– How many times are people allowed to take the quiz
– Configure a time limit, if any
How Do You Charge For Your Courses With LearnDash?
LearnDash has built-in payment functionality and people also use the WooCommerce add-on (which is free). WooCommerce is of course a shopping cart plugin, probably the most popular shopping cart plugin on WordPress, so it does has some features that you might find useful. For example, you can bundle courses together into one product to sell. Or if you want to use something other than Stripe/Paypal, which is what their built-in payment system users. You can also offer coupons.
For basic use, the built-in payment system works just fine. WooCommerce will just give you other options if you need them.
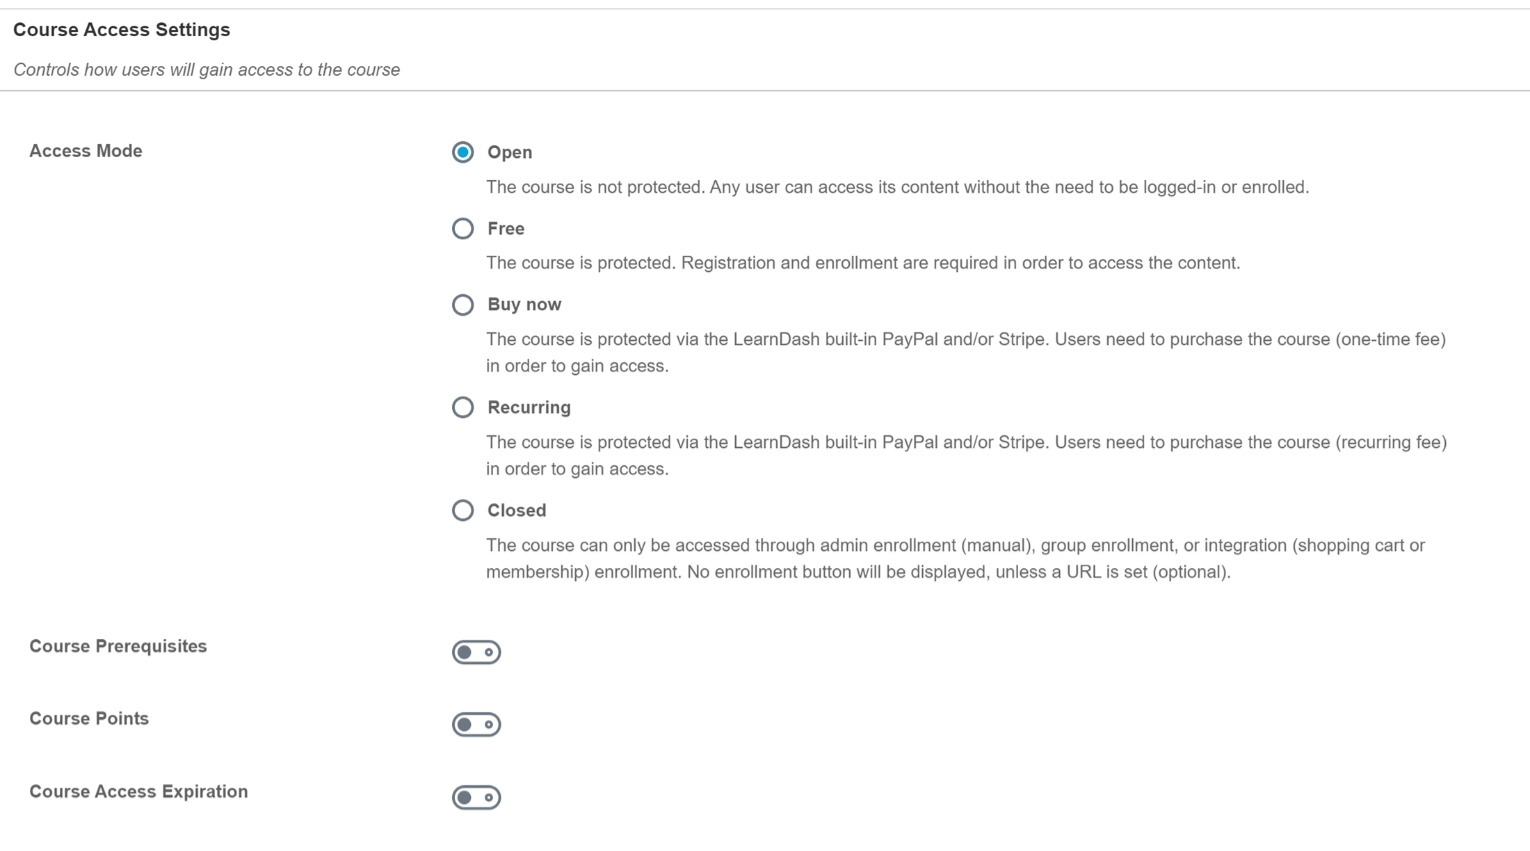
We mentioned these course options earlier in this article, but let’s review it again:
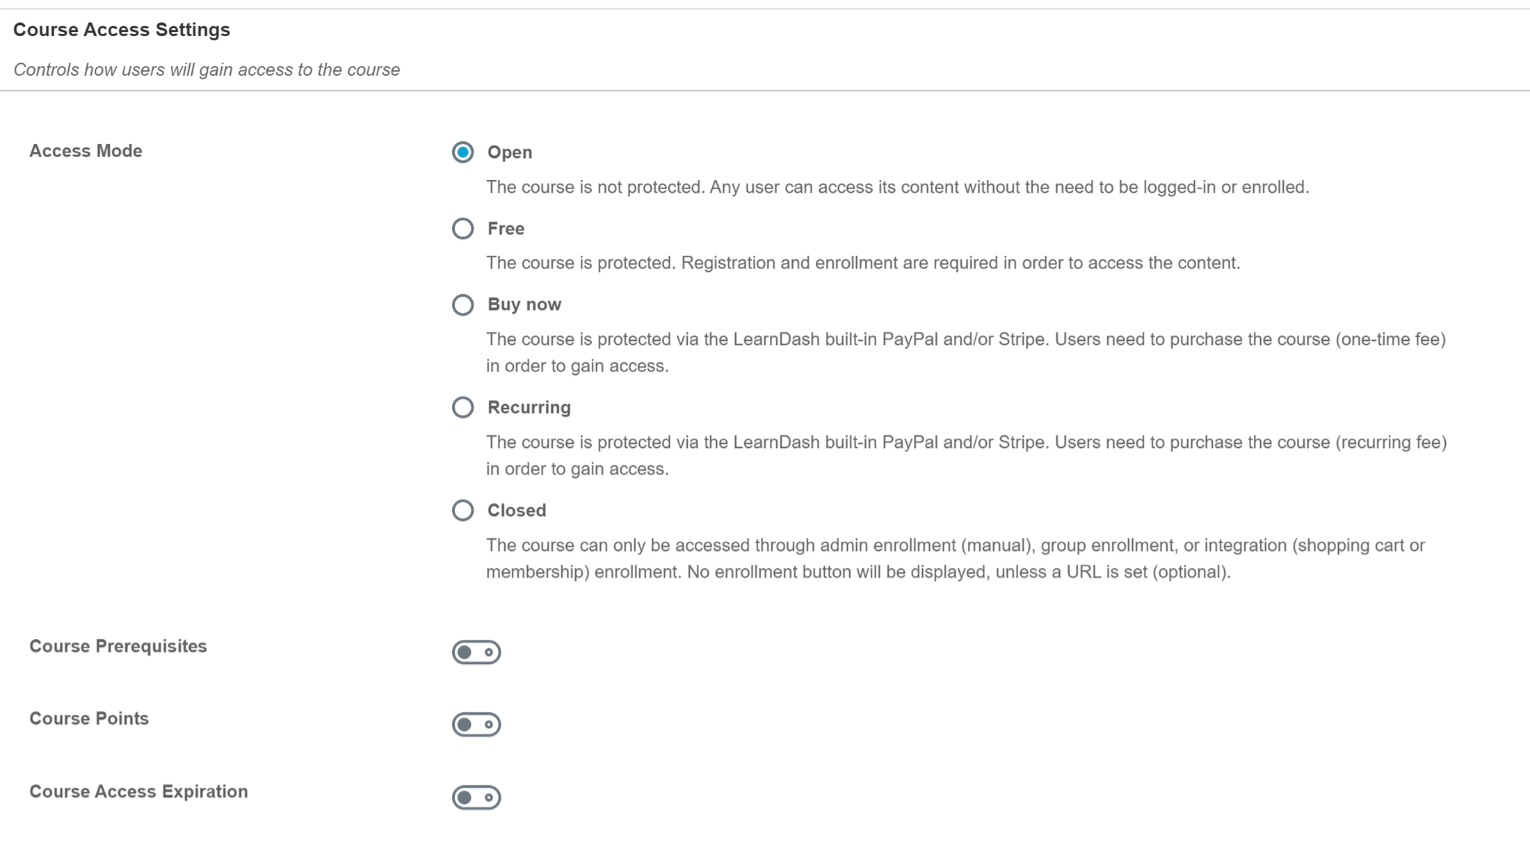
Let’s touch on each one of these…
Open – Anyone can take the course and you don’t need to register with an email address. Be aware that if you use this option then the Linear Course Progression won’t work. That means that users can skip around from lesson to lesson and don’t need to follow the course as it was laid out. Video Progression also will not work.
Free – No payment is needed to take the course but you will need to register with an email address and login with that email when you revisit the site.
Buy Now – Users must pay a one-time fee to take the course
Recurring – Users must pay a recurring fee (paying every month or every year) to take the course and keep access to it
Closed – Select this if you are using a separate integration like WooCommerce for example.
This is also a good time to talk about LearnDash Groups. With Groups you can put users into a…group…and give that group access to certain courses. Anyone added to that group will automatically be signed up for and enrolled in any course(s) assigned to that group. And you can also assign a Group Leader who can check on the progress of the students in their group.
Here’s a few quick use-cases for groups:
– You can sell to teachers who want to separate students into classes that have access to different courses
– You can sell to organizations that are training employees online on certain courses, all organized with groups
– Your course is set to start in a few weeks and you want everyone that purchased the course to get access to that course at that specific date
Charging for LifterLMS Courses
LifterLMS has built-in payment functionality as well as a WooCommerce add-on ($120 per year). The built-in methods are pretty flexible though.
LifterLMS uses Access Plans to give access to users to certain courses. With these plans you choose between lifetime access or recurring payments to continue to have access. What’s nice about the recurring payments is they don’t have to be infinite, in which case they are more like a payment plan.
For example, you can charge $99 every month for 6 months and then you get access forever.
You can also set expirations for access to courses for both one-time and recurring payments.
For example, if you charge $399 one-time you can allow access for only 1 year (at which time you can release an updated version to the course).
You can also have sales and offer trial access as well, which is very nice to have built-in.
We should also mention here that you can also create memberships which allow you to give access to multiple courses. These can be combined with the access plans we just reviewed. Memberships can only be sold to individuals though.
With the LifterLMS “Advanced Groups” add-on ($240 per year) you can sell memberships (multiple courses) to groups of people.
Main Differences Between Learndash vs LifterLMS
We mentioned in the beginning of the article, in the TLDR, that we prefer LearnDash and recommend LearnDash. The main differences between the two are why we choose LearnDash. Let’s get into them now.
Pricing Model
We find the LifterLMS pricing model quite frustrating. The free version can certainly get you up and running, but it’s almost certain that you will need to start looking at their add-ons soon enough.
For example, without an add-on you only have manual payment capabilities. You even get a notification at the top of the WordPress Admin Dashboard:

So this is likely the first add-on you will be looking at. If you want to purchase just the Stripe add-on to allow you to take credit card payments via Stripe that will cost $120/year.
If you want to require your users to watch the entire video before they can mark their lesson complete (similar to LearnDash’s Video Progression feature) that will cost you $240/year.
So that’s $360/year for what we feel like are 2 basic functions.
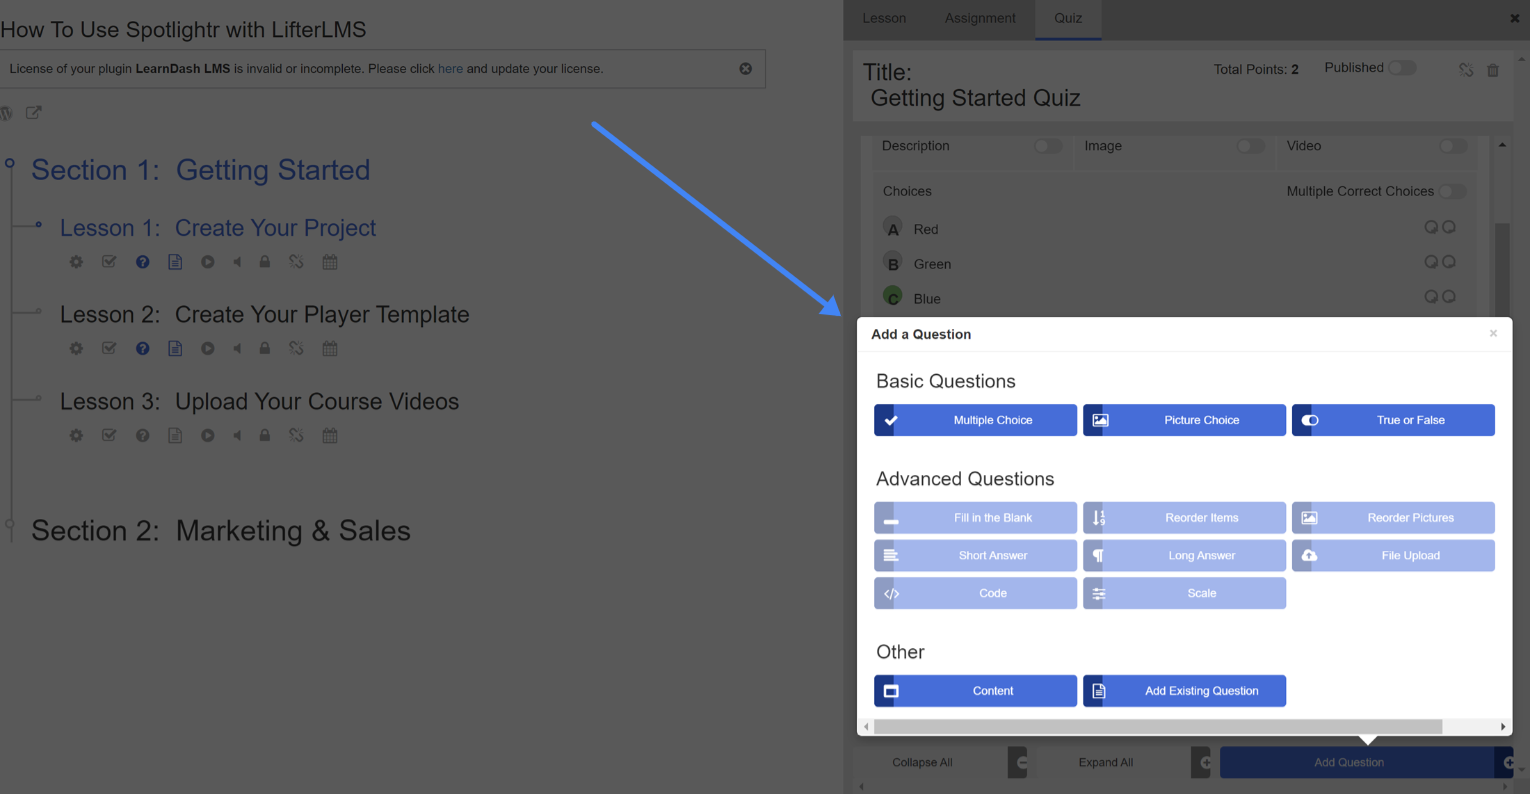
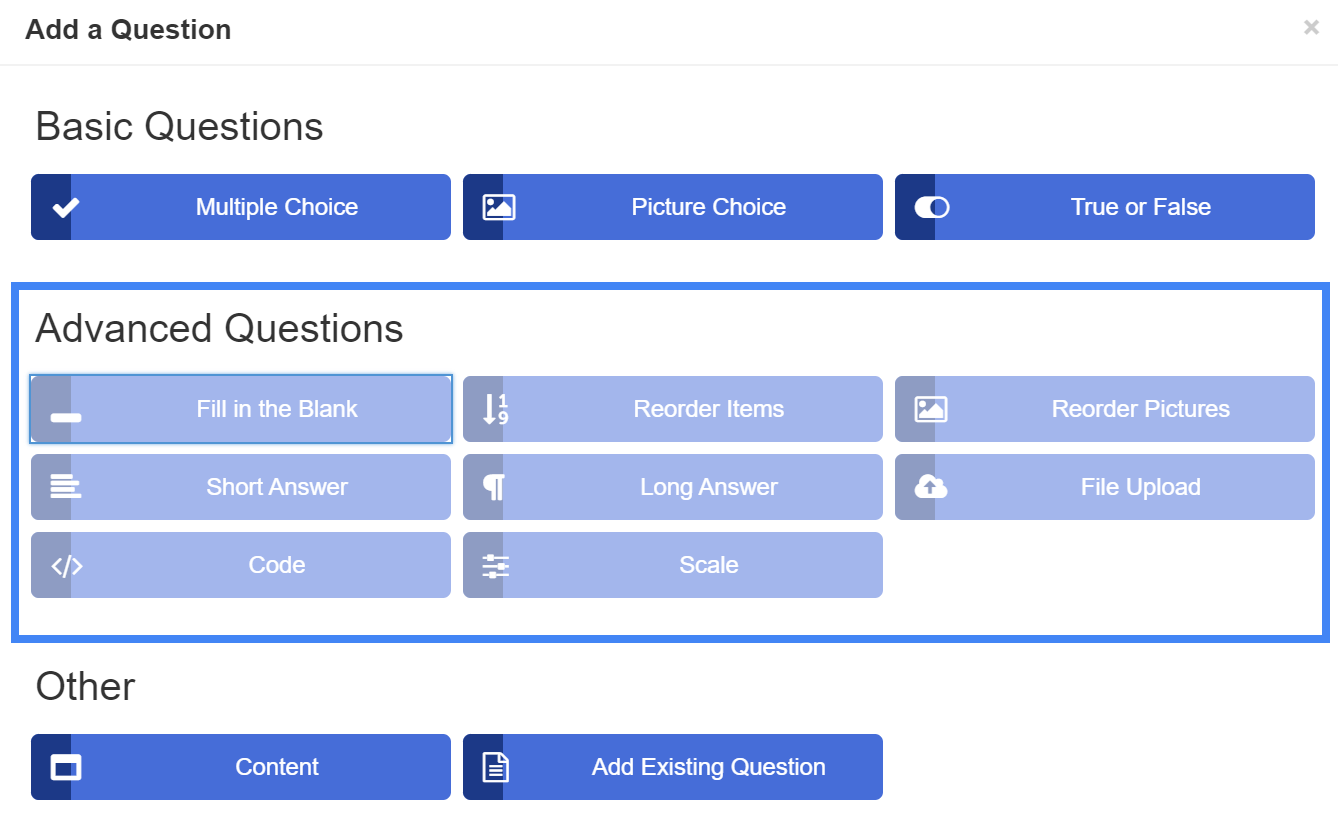
Regarding quizzes…the free version only gives you 3 question types for quizzes: Multiple Choice, Picture Choice, True or False.
The rest of the question types, the “advanced” ones, require their Quizzes add-on which is $240/year. Here they are:
That one also does NOT include the Advanced Video, Advanced Quizzes, or Groups add-on.
So the reality of the situation is that I need to pay $1200/year to get everything that is useful to me.
LearnDash’s pricing is much more straight forward. They currently have 3 plans for $159, $189, and $329 per year and they include all features. The main difference between them is the number of sites you can use them on. The only other difference is the inclusion of their ProPanel add-on which is included in the 2nd and 3rd plans. So even if you only need it for one site but want the ProPanel add-on it will cost you just $30 more.
User Interface
This one will obviously make sense to you once you use both plugins, but we just wanted to drop a word about it. This is always a very subjective topic but here’s our 2 cents. The LearnDash UI is much better. It’s more thought out and just makes more sense. Everything is basically accessed from the main dashboard menu and Courses, Lessons, Topics, and Quizzes are all configured similarly.
With Lifter some things are here, some are there. For example Quizzes can only be access via the Course Builder. And the Quiz Builder itself is clunky. Creating them via LearnDash is much more smooth.
Granted, you can access alot from the Course Builder. But we just don’t like the way they went about that. The way they combined basic WordPress UI functionality with their custom panels doesn’t work for us.
Again, very subjective, but LearnDash is the clear winner in our eyes.
Quiz question types
Their quizzes have been touched on a few times, but it’s worth mentioning again. Not only do we find LearnDash’s question types more useful, you don’t need to purchase an add-on to access all of them.
Here are the type of question types that LearnDash provides:
– Single choice
– Multiple choice
– “Free” choice
– “Sorting” choice
– “Matrix sorting” choice
– Fill in the blank
– Assessment
– Essay/Open Answer
Here are the type of question types that LifterLMS provides:
– Multiple choice
– Picture choice
– True or Fales
Those 3 are included in the free version. The rest here all required the paid add-on:
– Fill in the blank
– Reorder items
– Reorder pictures
– Short answer
– Long answer
– File upload
– Code
– Scale
The single choice/multiple choice is probably the most used question type in most testing. LearnDash separates them out but you can do single choice within Lifter’s multiple choice question type.
You get a full WYSIWYG editor for the question. And the options like ability to use HTML and media in the answers is a big plus. Plus you get to give custom feedback to the student when they choose correct or incorrect answers.
This all means you can give students a much better experience when they are testing their knowledge.
And design-wise, the quizzes just look better. The design is better
Custom Blocks for Creating/Editing Pages
LearnDash provides quite a few custom blocks in order to customize how your course and lessons look. Here’s some screenshots:
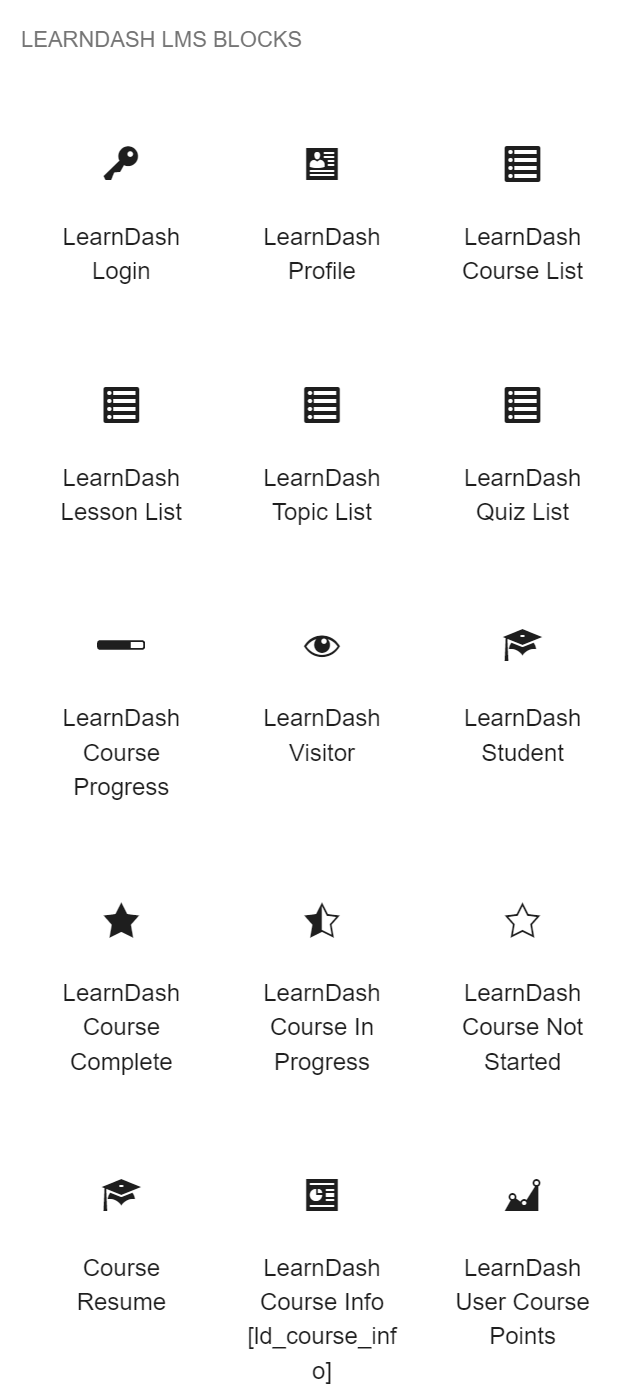
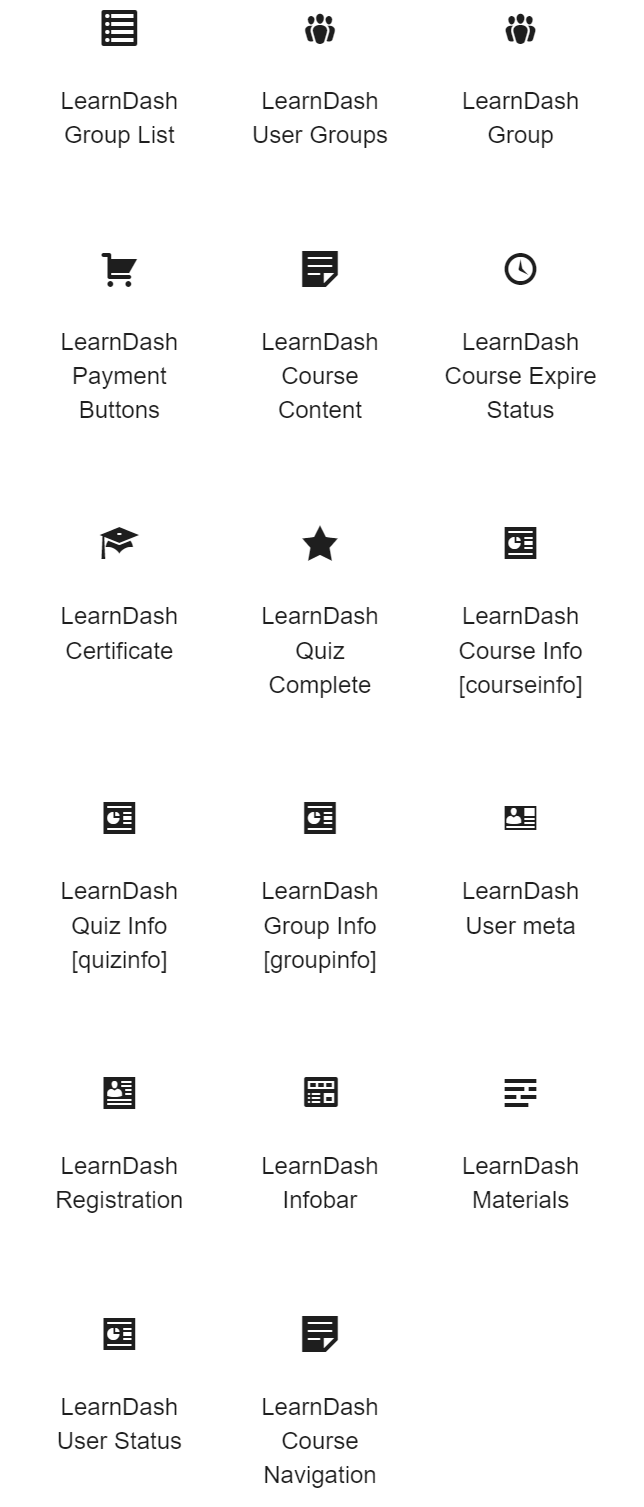
Much like the quizzes, the design of the not just the lessons, but the course layouts as well, look much cleaner and “custom” than Lifter.
Conclusion – Pay for LearnDash
Even if you are just starting out and really want to spend as little as possible, do anything you can to get $159 together and get LearnDash. You’ll read some other recommendations online that compare these two plugins tell you to start with the free version of LifterLMS and then in the future you can move to LearnDash if you need to. That’s an awful idea.
As mentioned above, the pricing model alone scares us away from LifterLMS. We don’t feel the value is there.
The move will be a huge pain and take time. Plus you will likely not be able to set everything up the way you had it, so you will need to make lots of adjustments.
Also consider any students that currently have access. You will have to worry about getting them access to the new set-up. That sounds awful. You should avoid it if you can.
Spotlightr Video Hosting Is Made For Your Online Courses
Build your entire video course, protect it from piracy, brand the entire experience, and market to new students for more enrollments.
Do it all with Spotlightr. The Video Hosting Company built specifically for courses creators.
Sign up for a free 14 day trial, no credit card required, and see for yourself why you need to use Spotlightr for all of your video courses.

