A Real-Time Case Study on Video Recording, from a First Time Course Creator
Welcome back to our blog series detailing how to create your own online course, featuring real-time testimony from me, Michael DiBiasio-Ornelas, a co-founder at Fair Share Films.
Together with Spotlightr, I’m detailing our experience creating our first, bootstrapped online course on independent filmmaking. In this installment, I’ll be sharing everything I learned from recording the actual videos that will later comprise the modules for our course.
Check out the previous installments in this series on our Spotlightr blog, for all the important preparatory steps it’s worth working through before you get to this point. The more prep you do before you start recording, the more smoothly your course creation journey will go.
Introduction: Familiarity and/or Excitement Take You Only So Far
I want to share two core observations before we jump into this discussion:
 1 – As an experienced filmmaker and video marketer, I went into my recording sessions with perhaps a little more experience than the average course creator, in terms of execution in this area.
2 – This experience only took me so far, in softening some of the common challenges to producing effective recordings, in a timely way
Those reflections are obviously unique to my experience, but I’m sharing them because I wonder if course creation seems easier than it actually is, right up to the point where the camera is rolling.
Even with all my prep, and despite my passion for the material and genuine excitement to share our learnings with our eventual students, I’d say that recording has been the most difficult and time consuming stage of my course creation journey so far.
It’s been pretty rewarding, too, and hopefully will pay more dividends later when the course is out. But I thought I’d take a moment to set the scene a little more generally before diving into the details, because I could easily see how someone reading this series could face a similar clash between the excitement and anticipation of course creation – and the reality of doing the hard work to make sure the journey goes well.
Preparation: A Not-so-Secret Ingredient for Recording Success
Recording can feel intimidating, and I have to admit that I struggled with it at first when it came time to record my videos. But there are steps we can take to ease the pressure on ourselves before the camera starts rolling (and after).

As a filmmaker and producer, I almost always set aside rehearsal days for my actors. Some other producers feel it’s a better idea to spend that time and money elsewhere, which to me is often short-sighted. Rehearsal is a much cheaper way to gain ground in the natural process of requiring time to settle in to a recording.
Having recorded my own course videos now – without much prep, due to time constraints – I find myself doubling down on my belief in “Practice, Practice, Practice.”
The main reason I didn’t rehearse much is because our course, “The Startup Filmmaker: Bootstrapping Your Indie Career From Outside the System” is a slimmed down, Minimum Viable Product (MVP) version of something we want to test out before investing a ton of resources into it. We’re not aiming for perfect (yet). Rather, we’re seeking to ensure we can put together a solid offering and a good test of our perceived market fit for the material.
But the next version of our course? My co-founder, an accomplished actor, will be on camera instead of me. And we’ll make sure she has some time to study the scripts and/or to have a teleprompter available when it comes time to record.
We’ll also set aside more shoot days than I did originally – although professional actors and experienced presenters tend to be able to deliver way more pages per hour than anxious introverted writer-directors.
That’s all a long way of saying to rehearse if you can.
I’ll end this particular reflection by adding that, although I didn’t rehearse in a formal way, I did spend a good 10-15 minutes in advance of each recording practicing my delivery and refining my scripts. I found this helped me to relax, and that it sped up my recording times in general.
This tactic helped me realize that some turns of phrase were too much of a mouthful for me to deliver (resulting in a quick rewrite). It also revealed some material that could be cut out from my scripts and outline. Finally, I noticed some key points that could be reshuffled in my scripts, and found other areas where my lessons could be spaced out with audio-only narration paired to visual examples instead of on-camera delivery.
Create An Ideal Recording Environment
Now, this was an area where my experience as a video producer really paid off.
I’ll walk you through what worked for me in setting up my recording space in a moment, including some of the reasons why I made the decisions I did. Before that, it’s worth mentioning that you do not have to do this part yourself.
You certainly can if you’re comfortable, and have the time, money, and desire to experiment and learn some new skills. Otherwise, consider all of the below some background for asking informed questions of any potential video producer(s) you might hire to help with your shoot days.
Okay, here’s what we want to pursue in setting up our recording space, in order of importance: Silence. Visual clarity. Comfort and beauty.
Silence. Tips for Securing a Quiet Spot to Record
When it comes to silence, you want to set up in as quiet a room as possible. If you can afford a studio space, that’s often a best-case scenario. But it’s not required. Many people record course videos in a home or an office. Wherever you set up, avoid foot traffic and street traffic, consider posting a physical sign indicating that you’re recording and asking for quiet, and do what you can to soundproof the room.
You don’t have to go crazy on that last point. There are professional and DIY options for formally soundproofing a space, but this will often be overkill for a course video. Instead, try to set up in an area where there are plenty of soft furnishings, or at least a good amount of everyday objects that will help break up sound wave reflections as you speak. Listen for echoes and work to avoid them.
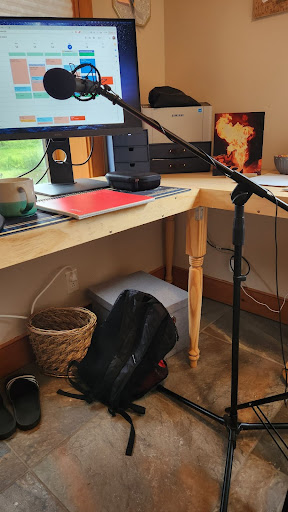
For my recordings, I set up in a home office space I was fortunate to have available. It’s downstairs from the rest of my family, and has some soft furniture and enough other items in the room to scatter sound reflections. Two challenges I had to face were air conditioning (recording in summer) and street noise.
 For the air conditioning, it’s a common practice to run it until it’s time to press record. Then you turn it off. If you turn it back on, don’t forget to turn it off again! This is especially true for when you’re recording yourself alone, since it’s likely no one is monitoring your audio feed for noise.
The street noise was a bigger problem.
I live off a fairly busy rural throughway. There can be a good bit of high-speed traffic during the day. Luckily, the house I rent is well-built. The walls knock down most of the sound, even if the windows are still an issue. I set up a thick folding screen between me and the front door to absorb some more of the unwanted noise. Then, I relied on the quality and proximity of my external microphone to get loud and clean audio of my voice, knowing I could knock down some of the street noise later when editing my audio. Finally, if an especially loud construction vehicle seemed to be approaching before or during a take, I either waited for it to pass or sometimes re-recorded that take.
Always use an external microphone when recording. Even a $30 external microphone is going to produce far better results than a headphone mic, or worse, a laptop mic.
I want to highlight that external microphone note before we move on in a moment.
Buy one. I don’t care what your budget might be.
Yes, bolded and underlined! It’s a worthwhile investment.
If you can, spring for a low cost boom stand as well, for positioning your mic as close to your mouth as possible. You can decide if you want it to show on camera or not. I like it off camera, but was still able to get it close enough with the boom stand to get a clean audio feed.
Note here that tabletop stands – even with boom arms built into them – run the risk of catching loud accidental noises, such as an elbow or table bump that may occur when you’re recording. A boom stand that sits on the floor won’t have this problem.

In short, to close out this section, it’s best to really do everything you can to maximize silence in your shoot environment. Poor or spotty audio can cause a lot of challenges across the board for your recordings, especially when it comes to jeopardizing engagement, once students are actually watching your videos.
Visual clarify. Tips for Achieving Clean, Attractive Video with Better Lighting and Set Design
When it comes to optimizing the visuals of your video, there are two main recommendations I’d make, even for an MVP course such as ours.
First, secure some method for adding professional lighting to your shoot. This can be as simple as an inexpensive, USB-powered ring light that you plug into your laptop. Or it can be as extensive as a three or four point professional lighting setup, executed by you or a freelancer.
The goal, in either case, is to provide some modeling of your face and body to separate your image from the background of your recording space. It also helps to create what’s called an eye light, which is when your eyes subtly reflect a light source (such as a ring light) back towards the viewer. This is a common practice in film and TV that helps draw further attention to someone when they are on screen.
Spotlightr and I have covered lighting in more detail, in two previous posts on lighting and equipment:
The second main recommendation is to put some time and effort into planning what your background is going to look like when you record your course modules. Even if you don’t have many options in this regard, in terms of where you position your camera, spending even 15 or 30 minutes “set decorating” your background can help produce a greater sense of calm and depth in your videos.
A busy background will be distracting, and a blank one can be too boring. Attempt to strike a middle ground with some decorative items or furniture that foster a sense of simplicity and cleanliness.
For my background, I choose a setting that was interesting but not distracting. Note also the framing. Chest up or a little higher should serve you well in most cases.

Comfort and Beauty. Getting Over The Jitters and Balancing Focus with Relaxation
Something often happens when someone steps or sits in front of a camera, to record themselves or to be recorded. And it can get even worse when we’re delivering our performance directly into a lens.
The experience can just feel very uncomfortable.
 This makes sense. Humans, generally, are social animals. While it’s true that in recording our course videos that we’re technically seeking to communicate with others, the connection in actuality is more belabored and artificial.
When, on top of that, we’re tasked with working to make it feel like the exact opposite is true (in order to communicate clearly and foster engagement) – one can understand why on-camera talent might struggle to settle into a recording session.
That was definitely my experience, at least with the early recordings.
Luckily, I had some experience as a film director to lean on. It wasn’t easy, but it did work for me to use some of the same methods on myself that I have employed in collaborating in the past with both trained (actors) and untrained (corporate leaders) talent, to get good results on screen.
 – Authenticity: It can be temping to chase perfection when recording. While of course we’ll often need a few takes to correct larger flubs and mistakes (normal and expected), allow yourself some space also to be a real person. A minor error here and there can actually help you come across as more real and more relatable.
 – Start and end with a smile: There are two benefits to this. First, viewers find presenters who smile more assuring and more engaging. It’s a good practice to get into when recording yourself. Additionally, I’ve found that trying to smile, even when anxious, can sort of trick your nervous system.
There’s inevitably something to be happy about, somewhere in your brain, even when struggling with comfort on camera. Find it and let it work for you, when seeking to relax a little during recordings.

– Breath work: Taking a deep breath is a common tactic that may seem too simple to be helpful. Generally, though, it’s always a useful exercise. Interestingly, I found during my recordings that taking a few erratic quick breaths instead fostered a more natural, sort of involuntary deep inhale afterwards, and provided a bigger boost of calm.
 – Silliness: Breaking down into silliness between takes is a good sign. In my experience as a director, it tells me that the person being recorded has begun to feel relaxed, even if it’s continuing to take some work to get a given section of the script done correctly. As I settled into our recordings, I turned to this tactic a lot.
It was a bit of a new experience for me and I think it also translated into a more natural demeanor in my delivery once I did start stringing better takes together.
 – Take breaks: I expected the recordings to tire me out a little, but my expectations were quickly exceeded. It takes a lot of mental energy and a good deal of physical energy and endurance to proceed from recording to recording, module by module. Give your mind and body plenty of breaks, and respect your limits. An on-camera performance is not an easy thing to power through.
Some professional actors can do it, because it’s a job they’ve been practicing for years. Regular humans like me can only record for so long, though. This has been hard to accept given our brisk pace for producing our course, but it’s the truth. The mind and body tell us when they need breaks, and reward us with increased productivity when we listen and provide those breaks.
Camera Selection, Recording Software, and Editing Software
Your choices of camera, recording software, and editing software are all very important decisions when it comes to shooting your course videos. Hopefully you already found the right combination for you, after reading our previous post on the tech stack for your course.

– Camera: I’m recording on the new Macbook Pro that we purchased as a backup editing machine for our company. The built-in web cam is a strong upgrade over my old laptop, and is enough for our needs at the moment.
– Recording Software: Since we’re bootstrapping, I decided to use OBS Studio, a free open source option that similarly works well enough for our basic needs.
– Editing Software: I already have a copy of Final Cut X on my machine, and I’m proficient in the application, so that’s what I’m using for our course.
Along with the external pro podcasting microphone I stole from my wife, and the small LED light kit I borrowed from our other co-founder, this gear and technology setup has worked well for my recordings.
Getting comfortable on camera, as I alluded to earlier, has been a different experience.
Conclusion: Give Yourself Plenty of Time (and Grace)
One last, big, important note about all of this.
Recording can take a lot more time than you might think. I’m an experienced filmmaker and video producer, and I tried to overestimate how long it would take me to get through each module. It still took longer.
It just often takes a lot of time to get comfortable

on camera. Consider also that, with courses, there’s often a lot of material to cover. Our own videos are trending longer than I anticipated but still might fall on the short side, compared to what else is available out there from other course creators. They’ve definitely outstripped my timeline, regardless.
Look for efficiencies on the top and bottom end of recording, once you’ve gotten through the larger discomfort of the first video recordings. I did find myself regaining ground by getting started sooner (no procrastinating, despite a little anxiety about resuming the recording sessions) and by powering through just a little when my energy was starting to flag.
Small delays, across multiple videos, can have a force multiplier effect on your recording timeline. Sometimes that’s just not avoidable, but I’d recommend trying to build in as much of a buffer as you can in planning out your recording sessions, which will likely need to span a few days or more.
Finally, understand that creating a quality course is a big undertaking. At points in this journey, I think I’ve leaned too heavily on the fact that our course is a bootstrapped version of something we’ll probably iterate later. Both I and my co-founders are still quality champions at the end of the day, which means we’ve been working hard at this. It also means that it’s become a good idea to not beat ourselves up concerning any delays, or difficulties in addressing challenges. Those are common occurrences when you’re doing hard things, but it doesn’t make what we’re doing any less worthwhile.
So, to recap, yeah, recording is hard.
For many, it might be the hardest part of creating your course. Other than editing, which we’re going to cover in the next (and second-to-last) installment in this series.
Afford yourself some grace, if you can. This, too, might shine through the screen and impress upon your eventual student audience. A little extra grace for everyone couldn’t hurt, right?
Next Up: Editing Your Course Videos
Phew. Editing. If you haven’t done it before, you are in for a treat! Sort of.
Editing takes almost as much work as recording, and can feel just as difficult. I’ve had a love/hate relationship with the craft for a long time. It can get exciting, but it can also trigger perfectionism in ways that require some boundaries for people like me.
Without adding any undue additional pressure, on top of everything we covered in this post, I want to underscore that your best ally in pursing a more relaxed and successful edit of your course videos later… is going to be a strong set of quality recordings now.
So go back and reread everything we just discussed, if that makes sense to you.
And then, next week, we’ll talk about how to optimize your editing workflow to set you up for success with the rest.
Don’t forget to sign up for the email list for this series to be the first to hear when that post is ready.
As a reminder, everyone on that list will also receive an additional deep resource on course creation from Spotlightr, that you can’t get any other way.
Until next time!

